casting Alumilite problem - mixing colors :(

Signed-In Members Don't See This Ad
Joined
Mar 22, 2009
Messages
48
HI
Any advice would be appreciated on what I am doing wrong attempting to color swirl a blank with White Alumilite with red and blue alumilte dyes.

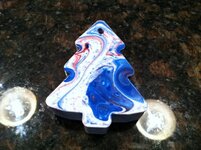
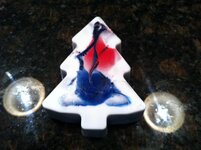
1) I picked a 1 inch thick small x-mas tree rubber mold to experiment with instead of a pen blank mold
2) I mixed the white Alumilite and the dyes in a little bit of mixed alumilite separately.
3) I poured the Alumilite white in the mold and waited maybe 10 seconds... it was still clear in the mold
4) I took the small amount of mixed red and blue alumilite and pour each of them separately in the mold and swirled them around the mold with a small stick.

5) When the mold turned solid, the face look nice with red blue and white swirls on the top.... BUT the back of the mold ( see pictures) looked horrible with just globs of color - YECK. I was hoping the pattern on the top would transfer itself more or less through the blank mold like the ones I purchase from other vendors do.

Maybe I should use a pressure pot to "Force" the colors to the bottom of the mold or maybe I am just not doing it right.

Can anybody help?
 

Attachments

  • photo.jpg
    photo.jpg
    67.1 KB · Views: 521
  • photo3.jpg
    photo3.jpg
    50.3 KB · Views: 452
Signed-In Members Don't See This Ad

PTownSubbie

Member
Joined
May 15, 2009
Messages
2,229
Location
Chesapeake, VA
Although I can't tell you how to fully fix your problem, I can tell you that pressure will not force one color to the bottom of the mold. Pressure will just collapse small bubbles and not force colors to mix.

The mixing of colors is all in the way you pour and stir. It takes practice to perfect your techniques. If this is your first cast, it is good and you can learn a lot from it.

Casting takes time to perfect and keep a book showing how your stirred. Next time change it slightly and see how the results change. This is the only way you will get what you want. How someone else does it may not work for you.....

Good luck and keep trying!
 

penmaker56

Member
Joined
Feb 28, 2008
Messages
449
Location
Potomac, MD, USA.
it might be what you are using to color, certain pigments used to make the colors are heavier than the pigment used to color the base, so the color pigments will sink to the bottom of the mould.
 

NewLondon88

Local Chapter Leader
Joined
May 15, 2008
Messages
5,077
Location
Claremont NH
if you get yourself one more mixing container (wide) and pour
your base color in there, you can drizzle the other colors on the
top and swirl to your heart's content. THEN pour this into your
mold.

Pour when it is just starting to thicken. (but with Alumilite, you'd
better pour fast!) Then you won't need to worry about heavier
parts sinking to the bottom. I pour with powdered metals and
if the resin is thick enough, it will still stay suspended.
(and bronze isn't feather-light!)
 

workinforwood

Member
Joined
Mar 1, 2007
Messages
8,173
Location
Eaton Rapids, Michigan, USA.
I see the bottom, it's nasty with bubble voids. The only way you can achieve what you want is in a pressure pot. Now..no matter what, the bottom will not ever look as good as the top, because the heaviest color will flow on the bottom of the mold..BUT, you sand into the bottom a 32nd of an inch or so and you will remove that and reveal the swirls inside. Timing is key, as everyone says..the cups must heat up before you pour. You pour when they are hot, but not too hot, or they will set in the cups..it's something you learn. You pour the colors, get some height on the cups so you get almost like a splash when the colors hit each other and be swirling the cups around at the same time. No Popsicle sticks needed to get swirls, just hold the cups high and swirl them around. NOW...you poured resin that was almost ready to set, you poured it from a height, you mixed the stuff with violence...this means there is air trapped in there...you need to now turn on the pressure, it will crush the bubbles. Even if the last drop came out like taffee, it will still crush the bubbles out of it. Give it 45 min in the pot, remove and let it sit and cool down, done. You sand the top and bottom sides and you will reveal the real swirls inside the outer layers.
 
Joined
Mar 22, 2009
Messages
48
Thank you everybody for your help. This was my first attempt so it definately shows I have a l lot of practice and learning to do.
 

Texatdurango

Member
Joined
Apr 23, 2007
Messages
4,649
Location
Show Low, Arizona
Thank you everybody for your help. This was my first attempt so it definately shows I have a l lot of practice and learning to do.
Recently Curtis did a few videos on mixing and pouring alumilite, did you watch those? If not, you owe it to yourself to do a quick search and have a look. They provide a TON of information for someone new to using alumilite and probably show you something you may or may not be doing correctly.

I've had solid blobs of color like yours but only when I just poured the different color in and let it hit bottom and spread.

Look at Brooks303's blanks, he doesn't get those swirls by accident, it takes practice and you likely won't get perfect or even decent results until you practice a little yourself.
 

Brooks803

Member
Joined
Sep 13, 2009
Messages
5,632
Location
Aiken, South Carolina
Thank you everybody for your help. This was my first attempt so it definately shows I have a l lot of practice and learning to do.
Recently Curtis did a few videos on mixing and pouring alumilite, did you watch those? If not, you owe it to yourself to do a quick search and have a look. They provide a TON of information for someone new to using alumilite and probably show you something you may or may not be doing correctly.

I've had solid blobs of color like yours but only when I just poured the different color in and let it hit bottom and spread.

Look at Brooks303's blanks, he doesn't get those swirls by accident, it takes practice and you likely won't get perfect or even decent results until you practice a little yourself.

Thanks George! Alumilite is VERY different than PR so I also recommend checking out Curtis's video. Jeff also gives great advice about letting the cup get hot before pouring. Timing is crucial with this stuff and pressure is an absolute necessity. It took me a little bit to get the hang of alumilite but once you get that "feel" for it it'll be a breeze. You do have a short window of "perfect" pouring time with this stuff but the results can be really amazing.
 

Bellsy

Member
Joined
Jun 26, 2008
Messages
385
Location
Elora, Ontario, Canada
3 colours.......3 hands so to speak.

Mix all of the white first in one batch. Now divide the white into 3 equal parts/cups.
Add red dye to one cup and blue dye to the other cup.
Have the mold in your pressure pot before pouring.
Pour the cups randomly into the mold.
Pressurize the pressure pot and allow the cast to cure.
Finished.

Dave
 
Top Bottom