Bellsy
Member
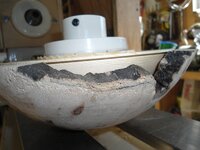
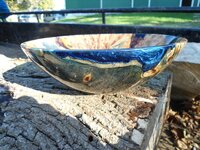
A few months ago at a wood turning guild meeting (TVWG) there was a partially turned bowl placed on the draw table. The bowl was marked as being Silver Maple. It was a burl piece that had missing pieces around the bowls rim that had apparently come off during turning. My best guess is that the person who brought it to the meeting did not want to proceed further with the turning. Much to my surprise I was lucky enough to get through several draws before one of my tickets came up. I immediately picked up the bowl with full intentions of casting the bowl to replace the missing rim pieces. Here is the method that I followed to make a mold which lead to a new casting experience.
The first step was deciding how to fill the internal bowl section and figuring out just how much of the bowl needed casting. I decided to make a pine core to fill the inside completely. While I was making up the internal core I was faced with two additional problems. The first was how do I hold the bowl after casting to turn it again? The second problem was how do I pour the casting medium and fill the inside and outside at the same time? The bowl needed to be cast upside down in order to get the medium to the rim of the bowl. The bowl needed to be held at the rim end of the mold. The mold design was taking on the form of at least 3 pieces to encapsulate the entire mold.
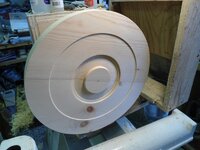
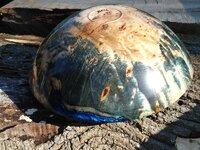
The first piece of the mold was the internal core, which was followed by a transition piece that attached to the core and to the third piece which I will call the outer mold body. The core was turned to suit the internal bowl form and allow for a 1/8" gap for the casting medium. The transition piece needed to allow for a face plate to pass through it. The outer body was then turned to allow a 1/8" gap for the medium to flow through to the bowls rim.
After the core was turned a new problem developed and I was faced with the problem of turning the outer body of the mold. I decided to use the transition piece as a faceplate to hold the outer body and secured it by means of wood screws. The outer body was laminated together to build up a partial thickness of the bowls height. The inside of the outer body was cut on the scroll saw removing a large portion of the waste material. Once the cutting was completed, the remainder of the outer body was formed on the lathe and trial fitted to the bowls outer shape. The last piece of the outer body was added and hollowed out to fit the outer portion of the bowls base.
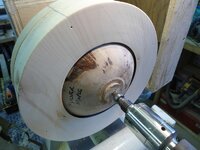
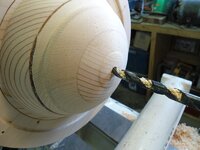
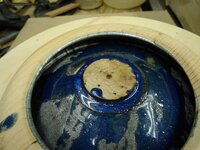
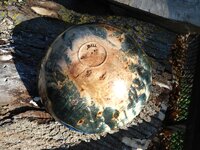
After the pieces were turned and shaped the entire bowl mold and the bowl were fitted together for one last inspection. When everything fitted properly the thought of air being trapped inside the bowl during casting came to mind. To solve this problem I drilled a vent hole through the core of the mold in the center. The mold and bowl were assembled and to help the casting medium flow better to the inside of the bowl, I added spacers (toothpicks) between the bowl and the mold at the rim. The bowl was then glued (CA) onto the mold core/transition piece with the aid of the tailstock to ensure the bowl was centered for turning after casting. With the bowl secured into the mold I added the outer body of the mold with wood screws and wood glue and clamps. After the glue was cured, the bowl was ready to be cast.
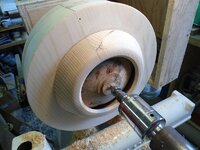
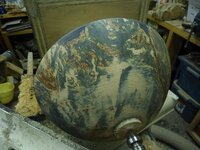
After the bowl was cast, I began to turn away the outer mold until I found the bowls form.
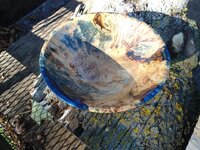
Stay tuned for more photos as the bowl reaches completion.
Dave
The first step was deciding how to fill the internal bowl section and figuring out just how much of the bowl needed casting. I decided to make a pine core to fill the inside completely. While I was making up the internal core I was faced with two additional problems. The first was how do I hold the bowl after casting to turn it again? The second problem was how do I pour the casting medium and fill the inside and outside at the same time? The bowl needed to be cast upside down in order to get the medium to the rim of the bowl. The bowl needed to be held at the rim end of the mold. The mold design was taking on the form of at least 3 pieces to encapsulate the entire mold.
The first piece of the mold was the internal core, which was followed by a transition piece that attached to the core and to the third piece which I will call the outer mold body. The core was turned to suit the internal bowl form and allow for a 1/8" gap for the casting medium. The transition piece needed to allow for a face plate to pass through it. The outer body was then turned to allow a 1/8" gap for the medium to flow through to the bowls rim.
After the core was turned a new problem developed and I was faced with the problem of turning the outer body of the mold. I decided to use the transition piece as a faceplate to hold the outer body and secured it by means of wood screws. The outer body was laminated together to build up a partial thickness of the bowls height. The inside of the outer body was cut on the scroll saw removing a large portion of the waste material. Once the cutting was completed, the remainder of the outer body was formed on the lathe and trial fitted to the bowls outer shape. The last piece of the outer body was added and hollowed out to fit the outer portion of the bowls base.
After the pieces were turned and shaped the entire bowl mold and the bowl were fitted together for one last inspection. When everything fitted properly the thought of air being trapped inside the bowl during casting came to mind. To solve this problem I drilled a vent hole through the core of the mold in the center. The mold and bowl were assembled and to help the casting medium flow better to the inside of the bowl, I added spacers (toothpicks) between the bowl and the mold at the rim. The bowl was then glued (CA) onto the mold core/transition piece with the aid of the tailstock to ensure the bowl was centered for turning after casting. With the bowl secured into the mold I added the outer body of the mold with wood screws and wood glue and clamps. After the glue was cured, the bowl was ready to be cast.
After the bowl was cast, I began to turn away the outer mold until I found the bowls form.
Stay tuned for more photos as the bowl reaches completion.
Dave