A day late and a dollar short.

Signed-In Members Don't See This Ad

mredburn

IAP Activities Manager
Staff member
Joined
Jul 5, 2009
Messages
8,753
Location
Fort Myers FL
Or A tale of two pens.

I set out to build a pen for submission in the freestyle pen contest. I finalized the design and built the blanks, took a close look at them and scrapped them.
I started with a basic scallop design, Koa and maple.
fs2.JPG


Then I routed across them like so with a 90 degree router bit.
fs4.JPG


Then I ran some ebony through the router on end and glued them on.
fs5.JPG


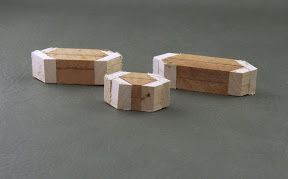
then I routed off the ebony parallel to the maple. Routed koa on end and glued it to the ebony. All with the 90 degree bit. So it looked like this when turned down.
fs6.JPG

The picture of the upper cap, the body of the pen, and the nose cone
fs12-1.JPG


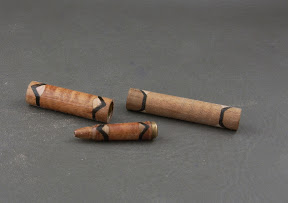
However what you cant see is that there is tear out on the maple that did not get turned away, it was too deep. You must realize that I had to really bear down on the math to get the Maple to meet at the point that the ebony tuns flat. If it was turned down to far or not enough and the maple wont match, it will be to small or to large. The next problem was the black was to thick for what I wanted in the design. The nose cone was also flawed where it was turned down to far and the black had scalloped from being cut away. And I didn't like the bland pattern of having the scallops on the same sides.

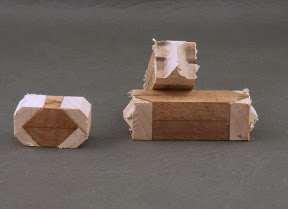
So I trashed it and started over

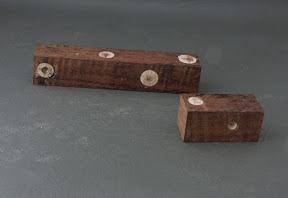
This time I had an "AHA" moment. I don't need to scallop the blanks to get the effect I wanted. So I did my layout and drilled the blank for different sized holes to correlate with the size of the maple scallop I wanted.
Much simpler and easier to control. I then turned a maple dowel to fit each hole. Rotating each hole 90 degrees.
fs13.JPG
fs14.JPG


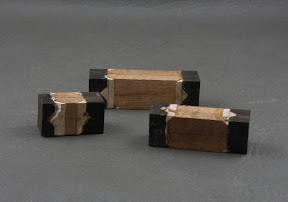
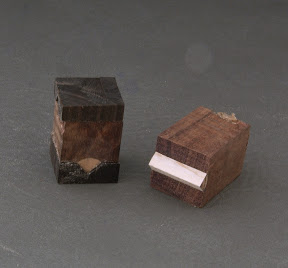
I then cut the blanks through the middle of the maple dowel, then I clamped them in my mill and using the 90 degree router bit i milled the angles cleaner. Milled the ebony and glued it on, milled it to match the maple and then fitted the koa to the ebony.
fs15.JPG
fs17.JPG


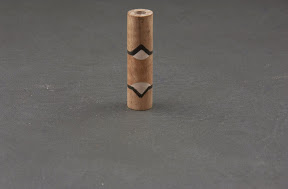
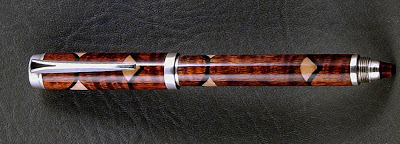
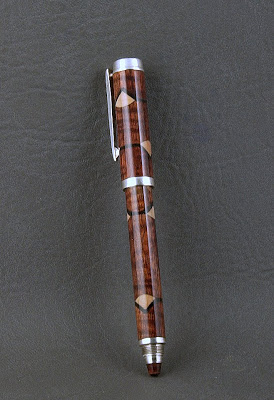
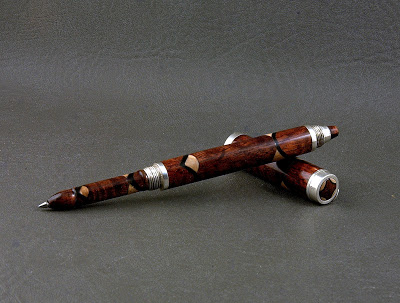
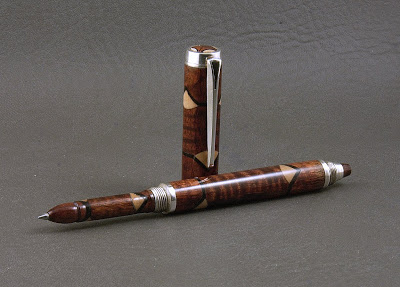
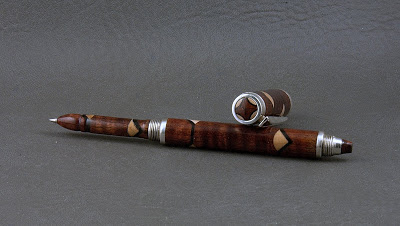
Threw some silver parts on the ends, a silver clip with an ebony inlay in the top, made a simple koa, ebony, maple, plug for the cap finial and a piece of koa for the lower body finial. It is post-able but I find it overly long when it is.

Here is what was to have been my submission for the freestyle but I ran out of time. Given one more day I would have made it. "Que Sera Sera"

fs21.JPG
fs22.JPG


fs29.JPG

fs24.JPG


fs26.JPG

fs27.JPG


As always I have room for improvement. Your comments and questions are welcome. I will almost certainly make the rejects into one of my all wooden pens just to finish it. No sense in wasting it.

thanks
 
Signed-In Members Don't See This Ad

76winger

Member
Joined
Aug 30, 2009
Messages
2,784
Location
Lebanon Indiana
I'm just going to bow to the creative ingenuity that went into turning those glued-up blocks of wood into such beauty.
 

ctubbs

Member
Joined
Sep 12, 2010
Messages
3,588
Location
Murray, Kentucky
What beautiful work Mike. I truly wish you had jsut hid that wonderful pen until next year, a sure winner.
Charles
 

PenMan1

Member
Joined
Jul 8, 2009
Messages
6,380
Location
Eatonton, Georgia
AND. NOW, for some comic relief, "what kind of refill does it take, and where can I get um the cheapest". Are you SURE THAT's your best price?

Once again, nicely done and a REFRESHING change of pace.

I give it a "10".

Respectfully submitted.
 

bluwolf

Member
Joined
Oct 2, 2008
Messages
995
Location
SW Florida
I saw the supposed "rejects" on Saturday. Any one of of us would have been happy with the results. I haven't seen this finished pen yet but if it's better than the "rejects" I'm looking forward to it.

Mike
 

RichF

Member
Joined
Jun 20, 2010
Messages
351
Location
Mount Laurel, NJ
Awesome pen Mike. Love the design. I'm sure this would have made it into the finals. Thanks for sharing your methods. I just wish I had all the same cool toys to play with.
 

hewunch

Member
Joined
Aug 5, 2008
Messages
4,663
Location
Albany, GA
Amazing segmenting work! What size is the center band? I ask because the grip seems kinda long. Not to take ANYTHING away from the pen, that is simply my preference.
 

Smitty37

Passed Away Mar 29, 2018
In Memoriam
Joined
Nov 23, 2009
Messages
12,823
Location
Milford, Delaware 19963
Hmmmmm

AND. NOW, for some comic relief, "what kind of refill does it take, and where can I get um the cheapest". Are you SURE THAT's your best price?

Once again, nicely done and a REFRESHING change of pace.

I give it a "10".

Respectfully submitted.
Well, when paying as much for a pen as our fathers paid for a car, we have to treat the pen seller like we treat car salesmen.:biggrin: Maybe we should ask "Well will you throw in a set of floor mats?":biggrin:
 

mredburn

IAP Activities Manager
Staff member
Joined
Jul 5, 2009
Messages
8,753
Location
Fort Myers FL
The silver center band is 4.4mm or .177. The nose cone is long on this pen as is the lower body. I like longer pens. The koa blank on the lower body is 2.5 inches long (63mm) the nose cone is 1.67 (42.5mm) I will drop the nose cone length down to 1.5 or even 1.4" The 1.6" is visually to long. The nose cone on this pen came apart 4 times as I was turning it and I had to reglue it back together. It is about .030 wall thickness in the middle koa piece. The top insert was made by taking a piece of koa 1/2 square drilling and boring it out to .480, puttin in an ebony plug. Drilling/boring that out .460 and puttin in a maple plug. Cutting the whole thing into quarters, rotating and reglueing them back together.
 

hewunch

Member
Joined
Aug 5, 2008
Messages
4,663
Location
Albany, GA
Mike, again great work. I think I wasn't clear in my question. What is the diameter of the CB? Specifically did you use a tap and die? If so which set. Thanks for being patient with me.
 

mredburn

IAP Activities Manager
Staff member
Joined
Jul 5, 2009
Messages
8,753
Location
Fort Myers FL
Hans the diameter of the cap is .565 the lower body is .467 I used the jr/navigator/baron etc size tube set. 11.5 upper and 10mm lower tube. I cut the lower body tube from the 10 inch stock tubes. THe upper cap is threaded with 10mm x .75 tap and die, the nose cone is threaded 8x.75
 
Last edited:

johncrane

Member
Joined
Jan 17, 2006
Messages
9,658
Location
Melbourne, Victoria, Australia.
Mike!
Sorry to here you had so much drama mate it always happens with dead lines,time slots i also missed the dead line,i must say your pen was way better than mine, never mind there's always next year.
 

Gilrock

Member
Joined
Oct 18, 2011
Messages
560
Location
Tucson, AZ
Awesome pen. But I thought if you make a great pen you're supposed to hide it till next February? :)

Gil
 

mredburn

IAP Activities Manager
Staff member
Joined
Jul 5, 2009
Messages
8,753
Location
Fort Myers FL
Thanks John at least we gave it a good try!:biggrin:
Gil - By next year I plan to make a better one.:rolleyes:

Its the compititions that drive me to take another step up and push to make a pen that hasnt been made. This pen may or may not have made it to the finals, not a problem. There are some great finalists in the frestyle and they had to make a pen that would be able to compete as well. We all win.
 

Dalecamino

Local Chapter Leader
Joined
Jan 2, 2008
Messages
14,572
Location
Indianapolis, In.
I can't help feeling bad about this not making the contest. I thought we had another day. This beautiful work of art would have cleared out all other entries. Still too much work for my lazy butt. Thanks for sharing this with us Mike.
 

Robert111

Member
Joined
Apr 12, 2011
Messages
1,127
Location
Saratoga Springs, NY 12866
What impressive creativity! I don't think I've seen the router used to make pen blanks before. Did you start by designing the pen and the blank on paper (or computer) or did it come straight out of the imagination?
 

mredburn

IAP Activities Manager
Staff member
Joined
Jul 5, 2009
Messages
8,753
Location
Fort Myers FL
What impressive creativity! I don't think I've seen the router used to make pen blanks before. Did you start by designing the pen and the blank on paper (or computer) or did it come straight out of the imagination?

It started with a concept drawn on paper. I wanted to have the scallop effect without bieng the current trend in scallops. Then I drew the first one on the computor to help measure the pieces. Then whenthat failed and I figured out I only needed to drill holes for the plugs and that I had been over thinking it and making it to complicated I did it all on paper.

Skiprat has several pens made using a router, mounted on his lathe and other wise.
 

Robert111

Member
Joined
Apr 12, 2011
Messages
1,127
Location
Saratoga Springs, NY 12866
What impressive creativity! I don't think I've seen the router used to make pen blanks before. Did you start by designing the pen and the blank on paper (or computer) or did it come straight out of the imagination?

It started with a concept drawn on paper. I wanted to have the scallop effect without bieng the current trend in scallops. Then I drew the first one on the computor to help measure the pieces. Then whenthat failed and I figured out I only needed to drill holes for the plugs and that I had been over thinking it and making it to complicated I did it all on paper.

Skiprat has several pens made using a router, mounted on his lathe and other wise.

When I read your account of the process, I thought of chess--how the masters have it all up there in the mind. I was interested that you used the computer for help with dimensions. CAD is another skill I've never tried. Life's so short!
 

MartinPens

Member
Joined
Apr 3, 2010
Messages
1,813
Location
Medford, Oregon, USA
Wow! What a process and what a great pen. I find your work inspiring and a little mind boggling. Sorry you didn't make the deadline. I'm quite certain it would have pushed someone out of the top three. Congrats on a beautiful pen!

Regards

Sent from my iPad using Forum Runner
 

plano_harry

Member
Joined
Jan 12, 2012
Messages
1,959
Location
Plano, TX 75093
Mike, thanks for taking the time to take the pics and do the write-up. That is a beautiful pen. What are the silver parts - aluminum, pr?

Thanks,
Harry
 

PTownSubbie

Member
Joined
May 15, 2009
Messages
2,229
Location
Chesapeake, VA
WOW!

My head hurts just reading your explaination!

I wish I could have stolen just a little bit of your brain when I met you last month!

Awesome Pen Mike!!
 

Alzey

Member
Joined
Oct 9, 2011
Messages
369
Location
Erwin, Tennessee
This is truly a work of art, creativity, design and patients. I hope to one day achieve a small portion of your skill level, but I starting turning at age 41, there may not be enough time left.
 
Top Bottom