A Penmakers Challenge Stage 1

Signed-In Members Don't See This Ad

ldb2000

Member
Joined
Sep 11, 2007
Messages
5,381
Location
Laurence Harbor, NJ, USA.
Cav , again I want to thank you for letting me do this . It's my way of giving back to the people here for all the things I have learned , and am still learning .
 

soligen

Member
Joined
May 11, 2010
Messages
1,085
Location
Sterling Heights, Michigan
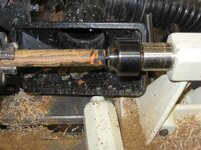
What I did was glue in the tube, leaving enough hanging out to build the CB onto. I tried to square the end for the CB with a parting tool, but it was never right. I ended up using the skew to get a good cut. I thought of using a hack saw, but.... NO SAWS!! I didn't think of grinding it into a mini parting tool.

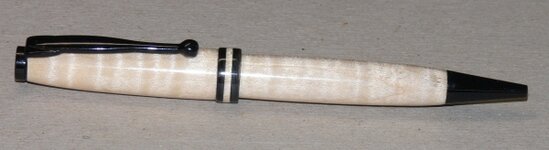
So, with the cherry end square to the protruding tube, I then took a rosewood blank and squared the end using my barrel trimmer - a brass tube ran loose inside as a sleave. I then CA Gel glued the blanks together and clamped. I parted off most of the rosewood, squared it to the tube, then repeated the whole procedure using my cherry lower blank. Part it off then repeat again using the opposite side of the rosewood blank. Finally part to length. The thin band is a tad thick, I think. I expected to need several tries to get it square so I left some contigency wood - but I got it much easier second time around.

Trim my bottom blank to final length, and glue in the tube.

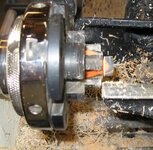
For the back bevel, I turned the upper blank to 1/2 inch round and chucked it up in my drill chuck (I turn on a ShopSmith). Swung the tool rest sideways and cut the bevel with with the parting tool (finally found a use for it lol).

This literally took an entire evening just to prep the blank for final turning.

My learning lists of firsts:

First time parting square to the turning axis
First time using CA on wood
First time turning on the end of a piece of wood.
First time cutting a brass tube on the lathe

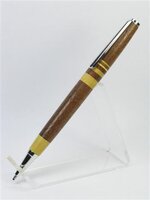
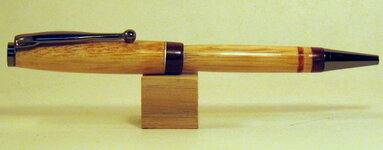
By the way, the cherry came from a tree in my brother's yard - taken down about 10 years ago. It was a short board I cut into blanks on an angle. The upper and lower are not from the same blank - they are the 2 short leftover pieces from either end of the board - I though there was a reasonable chance I would ruin the piece, so I saved the good blanks.

One unresolved trouble I had was tubes I glued in with CA Gel didn't hold. The CB parts held fine, but CA glued tubes broke loose on the barrel trimmer. I guess I'll stick to epoxy for now.

Tonight I played with CA as a finish. Not happy with the results yet, but I had to stop becasue my wife wanted to go to sleep.
 

Smitty37

Passed Away Mar 29, 2018
In Memoriam
Joined
Nov 23, 2009
Messages
12,823
Location
Milford, Delaware 19963
Well I have some 2.5 or so inch blanks that I didn't saw....I would think you could turn a blank round between centers before cutting to barrel length and drilling.. once round a couple of tools could be used Including a parting tool Or even a burning wire...
 

ldb2000

Member
Joined
Sep 11, 2007
Messages
5,381
Location
Laurence Harbor, NJ, USA.
A parting tool works best for this . A burning wire would work but might discolor the ends of the blank . Mine was parted in half for the two barrels with my thin parting tool and the bands were done that way as well .
 

DurocShark

Member
Joined
Jul 26, 2008
Messages
3,622
Location
Anaheim, CA
Well, I got the soapstone & alabaster pen done. The thin slices crumbled while turning. I tried again using just sandpaper, but it was no better. I had to go with a bigger slice for the alabaster.

Anyway, green soapstone and white alabaster from Craftdiggity on a rhodium slim kit.

alass01.jpg


alass02.jpg
 

RAdams

Banned
Joined
Apr 5, 2009
Messages
2,983
Don, that is a nice pen! I have some man made granite type material i am thinking about trying for hte next challenge pen. I think you have inspired me to give it a go! Thanks for posting this!
 

ldb2000

Member
Joined
Sep 11, 2007
Messages
5,381
Location
Laurence Harbor, NJ, USA.
Don , that pen is awesome . I have done a couple of Alabaster pens so I know what you went through making that one . The fact that you were able to part a small ring of the alabaster shows a great amount of skill .
My hat's off to you .
 

Craftdiggity

Member
Joined
Mar 10, 2010
Messages
1,373
Location
Egg Harbor Township, NJ
Don,

That sure is some nice work. Getting the Alabaster even that thin was an accomplishment. It really looks nice with the soapstone. Did you have any trouble getting the two different stone types to finish smoothly. I would think that the harder alabaster would be tough to sand down even with the soapstone.

I gonna have to come up with somethin' nasty for the next challenge. Can't be getting beat with my own stone. :mad: :wink:

Chris
 

DurocShark

Member
Joined
Jul 26, 2008
Messages
3,622
Location
Anaheim, CA
The hardness differences just took a bit of care. I finished the shape with a very light touch with the scraper, then gentle sanding. Like using different woods or metal segmentations.
 

Mr Vic

Member
Joined
Aug 11, 2008
Messages
1,865
Location
Falcon, CO
Here are some follow on photos to my pen, the blanks were turned round first and the small segments parted of the accent material and glued onto the main body, part and glue, part and glue. Used my tail stock to clamp-up for drying. NOTE: Give the glue time to cure and keep your bit cool when drillling.....had to reglue as the heat caused the glue to soften and break free.....
 

Attachments

  • Challenge1-D.jpg
    Challenge1-D.jpg
    53.7 KB · Views: 212
  • Challenge1-F.jpg
    Challenge1-F.jpg
    60.9 KB · Views: 243

RAdams

Banned
Joined
Apr 5, 2009
Messages
2,983
that is how i did mine too. i felt like i had more control over what was going on by parting the material off without the tube and hole drilled. I am looking forward to the next level!
 

ldb2000

Member
Joined
Sep 11, 2007
Messages
5,381
Location
Laurence Harbor, NJ, USA.
I found it easier to drill the blank and turn to size then insert a tube and hold it in place with the tailstock and part off the slices . The tube kept the slices in place and supported them while I parted them off .
 

Sylvanite

Member
Joined
Jul 18, 2006
Messages
3,113
Location
Hillsborough, North Carolina, USA.
It's interesting to see all the different approaches to cutting the segments. I didn't want to mess with thin slices, so I made a sequence of glue/part operations.

First of all, I turned both blanks (maple and blackwood) round between centers. Then I parted the maple and trimmed one end on each square. I also trimmed one end of the blackwood blank square.

Next, I glued the blackwood to the first maple blank. I chucked it up and parted the blackwood off (leaving a thin slice attached). I repeated the process with the second maple piece, and then with the blackwood again (only leaving a thicker slice).

Then I drilled, tubed, and turned the upper (segmented) and lower blanks. Although my segments weren't particuarly thin, I could easily have made them so.

I hope that helps,
Eric
 

ldb2000

Member
Joined
Sep 11, 2007
Messages
5,381
Location
Laurence Harbor, NJ, USA.
Yes I did . The thin CA i used to harden the wood did make it stick slightly to the tube which helped keep it together but when I parted down to the tube the glue bond broke and the slice just slid down the tube . It takes a little practice but it works like a charm .
 

RAdams

Banned
Joined
Apr 5, 2009
Messages
2,983
It's interesting to see all the different approaches to cutting the segments. I didn't want to mess with thin slices, so I made a sequence of glue/part operations.

First of all, I turned both blanks (maple and blackwood) round between centers. Then I parted the maple and trimmed one end on each square. I also trimmed one end of the blackwood blank square.

Next, I glued the blackwood to the first maple blank. I chucked it up and parted the blackwood off (leaving a thin slice attached). I repeated the process with the second maple piece, and then with the blackwood again (only leaving a thicker slice).

Then I drilled, tubed, and turned the upper (segmented) and lower blanks. Although my segments weren't particuarly thin, I could easily have made them so.

I hope that helps,
Eric


This post right here made it all worthwhile for me! That is one way i never thought of. I would imagine you could get crazy if you wanted to and make paper thin segments. That would be interesting to play with! Maybe four or five super thin alternating slices then a larger center band piece or something.
 

ldb2000

Member
Joined
Sep 11, 2007
Messages
5,381
Location
Laurence Harbor, NJ, USA.
Eric , when I first was thinking of how to do this I thought of doing it your way but being cheap I didn't want to waste too much of the paduk , it's a really nice piece of wood with great color , that was when I tried it the way I did .
I was hoping that we would come up with different ways of doing this . If something works for you that's great but when it don't it's nice to know there are several other ways of doing something , one of which should work for you .
 

RAdams

Banned
Joined
Apr 5, 2009
Messages
2,983
I agree 100%! And thank you again for hosting this little shin-dig! I will end up trying all the ways mentioned just to play iwth the results and see what works for what application. Like you pointed out Butch, your method was partly dictated by material consumption. This and many other factors weigh in when you are designing a pen. Threads like this one call us to actuallly think about what we are doing before we do it.

I usually dont even really think too much about design and all that until the blank is mounted on the lathe. Now i am forced to plan out my piece, with a specific goal. This factor alone changes everything. Now we are thinking about material matches, and thickness matches, what works, what doesn't? What techniques will i need to use to achieve my goal? It really is the perfect project to start this challenge. It opens so many doors into form and technique, Design and Process. Awesome start no doubt! I am excited to see the next level!


How many levels will there be?
 

ldb2000

Member
Joined
Sep 11, 2007
Messages
5,381
Location
Laurence Harbor, NJ, USA.
I haven't really decided yet , at least four but maybe more . Since I haven't built any of the pens for future stages I will judge the difficulty of each and adjust it so that everyone can keep up . I really would like this to be something that helps as many people as possible so I don't want to make any one stage to difficult . I have been designing the final stage pen in my head though and it will be hard but worth the trouble and everyone should be up to speed when it happens .
 

RAdams

Banned
Joined
Apr 5, 2009
Messages
2,983
Will it entail all of the previous mods in one pen? Plus something new to set it apart? That would be slick. However it is, I know it will be off the chain!
 

ldb2000

Member
Joined
Sep 11, 2007
Messages
5,381
Location
Laurence Harbor, NJ, USA.
Yes . The next build will include the mod from this build but there will be a little harder mod to the pen as well . I'll give a hint , it will be a mod that will require something that allot of people seem to have a problem with .
I will also say that the third build will use a cigar kit instead of a slimline . You will be able to use a slimline but a cigar is what I will be using . So if you don't have a cigar but want to play then use the slimline but modifying a different kit will open new possibilities .
 
Last edited:

Mack C.

Passed Away Sep 29, 2018
In Memoriam
Joined
May 4, 2008
Messages
2,019
Location
Brooklin, ON Canada
No saws were used in making this pen!

attachment.php

This is my attempt in the stage 1 challenge. It's done on a Father Sing slimline. I have no idea what the brown wood is. I thought the contrast between the yellowheart and the brown would stand out.

I had turned both pieces round between centres, then drilled 7 mm holes, parting off some small segments, and trying to catch them as they parted off.

Then I drilled and glued (2 part epoxy) both the nib and cap end. I left the cap end 3/4" short of the centre band to accommodate the segments, which were glued one at a time with epoxy.

The nib end was looking somewhat plain so I parted off a section of the brown wood to glue on the yellow heart.


2 things I learned with this exercise: 1. have a plan for the segments; 2. I made my first ever turning tool, a hacksaw blade parting tool.

attachment.php


Thanks for the challenge, Butch. It was much fun!
 

Attachments

  • A penmakers challenge 003 (Small).jpg
    A penmakers challenge 003 (Small).jpg
    14.5 KB · Views: 463
  • A penmakers challenge 004 (Small).jpg
    A penmakers challenge 004 (Small).jpg
    16.6 KB · Views: 470

ldb2000

Member
Joined
Sep 11, 2007
Messages
5,381
Location
Laurence Harbor, NJ, USA.
Great looking pen Mack , nice contrasts with those woods . Glad you learned something and had fun doing it , that is the whole idea of these challenges .
Good job on the parting tool , it will serve you well in the future . I cant remember the last time I used my regular parting tools it's been so long .
To keep from having to chase small pieces all over the shop , next time try drilling the blank and inserting a tube without glue then hold it in place with the tailstock or if you are using a mandrel hold it in place with the bushings and masking tape on one end to keep the blank from spinning . When you part the slices off they will stay on the tube .
 
Last edited:

Dalecamino

Local Chapter Leader
Joined
Jan 2, 2008
Messages
14,572
Location
Indianapolis, In.
All you turners are making nice pens in this challenge from Butch . I have too many projects going at the same time . SO , I will settle for this pen as my entry . I had planned to make one with sheet metal . Maybe another challenge . :redface:
 

Attachments

  • IMG_0675.JPG
    IMG_0675.JPG
    54 KB · Views: 217

ldb2000

Member
Joined
Sep 11, 2007
Messages
5,381
Location
Laurence Harbor, NJ, USA.
There is nothing wrong with that one Chuck , it looks very well made and has a nice finish . The metal segment at the CB and the segmenting at the nib end add intrest to the design .
 

jaeger

Member
Joined
Jan 3, 2009
Messages
741
Location
South Dakota
This is my pen for the challenge. This has been fun and I'm sure I will learn a lot.
Thanks for the Challenge Butch!
Now I just need to enter the photographers challenge.

Camo.jpg
 

pssherman

Member
Joined
Jan 19, 2006
Messages
840
Location
Paragould, Arkansas, USA.
Here is my entry for stage 1.

I turned the curly maple round. Then I drilled the blank as far as the drill bit could go. Parted off a piece long enough for the lower barrel. Then drilled the remaining maple. After drilling, I then parted off the thin slice. The black slices are acrylic that I thought was solid black. It only looks that way when thick. Again, I drilled the center hole before parting off the slices.

I placed all of the upper barrel pieces on the tube leaving the acrylic overhanging slightly. Appled a small clamp to hold all of the pieces tightly together and then soaked the joints with thin CA.

Then I turned everything to final size/shape. The center band was raised slightly for apperance and over hangs the lower barrel. The acrylic is actually a smoky gray when thin, so the grain of the maple slice is visible when viewed from the end.
 

Attachments

  • stage1.jpg
    stage1.jpg
    69.1 KB · Views: 184

ldb2000

Member
Joined
Sep 11, 2007
Messages
5,381
Location
Laurence Harbor, NJ, USA.
Sorry for not responding sooner but I've been getting ready for stage two and working on the draft for my design and technique for this build .
Jeager , looks good . Interesting choice of materials . Is the centerband attached to one of the tubes or free floating ?
Paul , nice contrasts on the centerband . Interesting design of the centerband , is it attached to the upper tube or a separate piece ?
Good job guys !!! on to stage 2

To anyone else that still wants to join in , Stage 1 will be open to entries until the end of stage two . You don't have to do this build to join in any of the other stages but it is advised that you practice the techniques used in this stage because we will be building on these techniques in all the future stages .
 

jaeger

Member
Joined
Jan 3, 2009
Messages
741
Location
South Dakota
Thanks Butch!
The center band is attached to the lower barrel. I used Bocote for the wood. Prior to this pen all the center bands that I have made have been free style with metal laminates. I have 2 bags full of center bands. I wish I could trade them for some transmissions!
I have been wanting to use some pieces of antler that I have blown up while drilling or were just to small for a full barrel.
I used a coping saw for most of the cuts that I made on the lathe. It worked well.
 
Top Bottom