Drying burls

Signed-In Members Don't See This Ad

keithkarl2007

Member
Joined
Apr 22, 2008
Messages
1,727
Location
Ireland
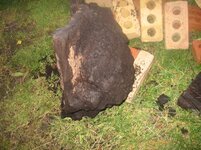
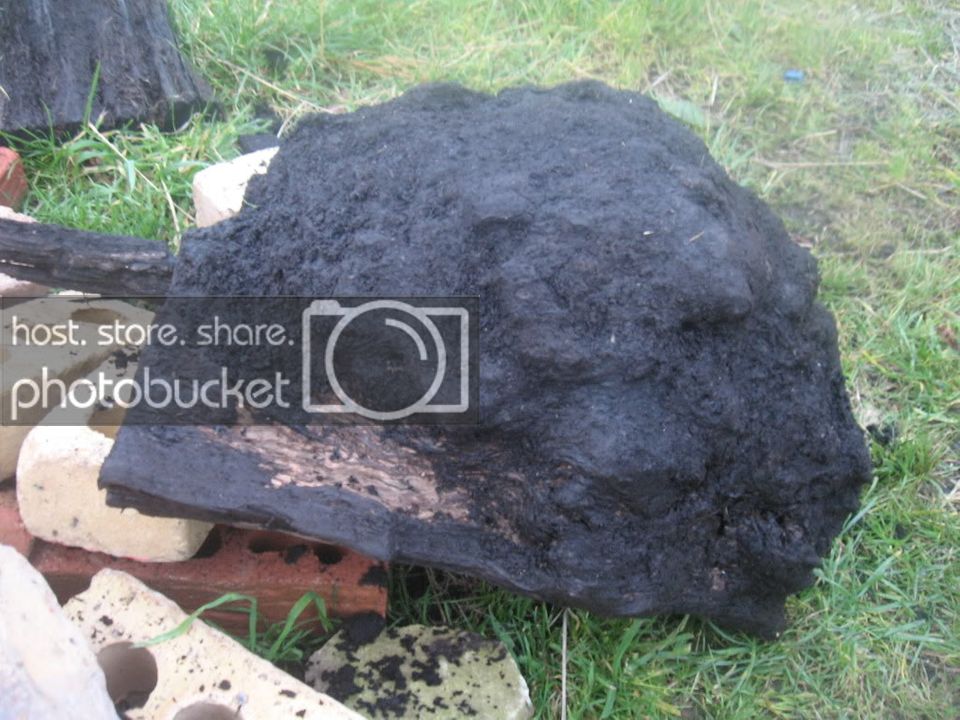
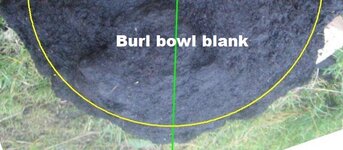
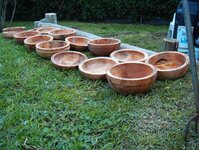
Need advice on drying oak burl, this is extremely wet, jet black and fresh from the bog :biggrin::biggrin:
bogoakburl004.jpg
 
Last edited:
Signed-In Members Don't See This Ad

Wheaties

Member
Joined
May 8, 2009
Messages
714
Location
Omaha, NE
I'm by no means anywhere close to an expert, but I would just seal any open ends and let it sit for a year or two
 

keithkarl2007

Member
Joined
Apr 22, 2008
Messages
1,727
Location
Ireland
I'll never find another piece of bog oak burl again so I'll buy whatever would be best to seal it. I've read about using latex paint, anchorseal, what would you recommend
 

Wheaties

Member
Joined
May 8, 2009
Messages
714
Location
Omaha, NE
I just use paint. Re-paint every couple weeks or so at first until I get a good seal. I've had good luck with that. Now if I had the piece you have, I may think about anchorseal, as I've heard good things. I've also heard that the rate at which air passes through both isn't much different. Have to ask someone smarter than me about that one though.
 

Rojo22

Local Chapter Leader
Joined
Jul 17, 2006
Messages
1,528
Location
Atlanta, Georgia, USA.
If you can get that thing in a plastic container with alcohol, soak it for a couple of days fully immersed and then let it air dry for a couple of months, and you should be good to go. The alcohol displaces the water when soaked, and then the alcohol evaporates, drying much faster than having the water come out.

If you dont want to do it that way, latex or wax will work, but you will be waiting much longer in order to do anything with it.
 

bitshird

Member
Joined
Aug 27, 2007
Messages
10,236
Location
Adamsville, TN, USA.
Keith, I'd be a bit leary about drying it with acetone, I'm not even sure I would try Alchohol on that wood, like you said you'll probably never find another piece, I'd say either Anchorseal, melted Paraffin wax or as a last result latex paint, I have had the best luck with melted paraffin wax, Anchorseal is supposed to be the best , but I've not been able to find it when I have the money, and I tried disolving paraffin in mineral spirits, it did dissolve finally, but made a poor sealer.
 

keithkarl2007

Member
Joined
Apr 22, 2008
Messages
1,727
Location
Ireland
would it be possible to get anchorseal shipped over to Ireland. Some finishes and other items can't be shipped overseas
 

Russianwolf

Member
Joined
Jul 13, 2007
Messages
5,690
Location
Martinsburg, WV, USA.
Keith,
Not to put down the recommendations you've gotten. But this is NOT normal wood. I't been dead for 5000 years. The water is not cellular water any longer as it is in green wood, but more like the Redwood stumps that have been dead for a hundred years here, and the Sinker logs. Neither take the years that are normal to dry for wood of their size.

I will get in touch with a couple people that work with these type woods all the time and see what they recommend for drying.
 

keithkarl2007

Member
Joined
Apr 22, 2008
Messages
1,727
Location
Ireland
Thanks Mike, let me know as soon as you can, very keen to get it sealed straight away. I hope it'll be safe in a refuse bag until its sealed
 

robutacion

Member
Joined
Aug 6, 2009
Messages
6,514
Location
Australia - SA Adelaide Hills
Hi keithkarl2007,

I can understand your concern about preserving such a rarity, remember, that "thing" has been looking after itself for many, many years, so put it to good use and slice it to square sizes that you get the most out of, suck as 2"1/2 square stock. You can get 9 pen blanks out of every 5"1/2 length, make your pepper shakers, bottle stoppers, anything you want...!

Best way to cut it (after clean of dirt) is, look at the part that was attached to the tree, as if it was the base (root) of a tree, cut it as if that was the direction of the grain, let it "bread" after so many years in its "cocoon".

Store it in a dry and dark place over some news paper for a little while, if you feel like using sealant, use it but only on 2 faces, not opposite faces but two that join at a corner, this as 2 effects, first still allow any excess moisture to come out, allowing it to bread, secondly keeps the pieces from twisting or bending in any particular direction, the 2 sealed faces basically "balance" the tendency the other two unsealed faces have to move.

This would be what I would do if that burl was mine, it will take no time (4 to 8 weeks) before you can start using it. Also remember that the smaller the size you cut it, the quickest it will be ready to work, so if you want to start making pens out of that burl, after you get your pieces at 2"1/2 square, slice one or two into pen size blanks, use the same sealant "principal" on the 2 faces if you wish (not necessary) if you are going to turn them soon. Another safe and efficient way to allow timber to dry and keep straight is to make a bundle with timber spacers in between (about 1/4" or so) and rap it very tight with wire or packing strap, don't use tape as it will block air to go in and it will get lose quick.

So in general, see your find as something that is only going to "shine" out of the cocoon, shaped and polished to your satisfaction, that will be your reward...!:wink::biggrin:

Good luck

Cheers
George
 

robutacion

Member
Joined
Aug 6, 2009
Messages
6,514
Location
Australia - SA Adelaide Hills
Oh trust me i won't :biggrin::biggrin:

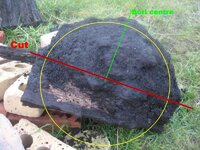
George, I was hoping to leave it as large as possible for a winged bowl or platter

Fair enough Keithkarl2007, that was always another possibility...!
In that case, and if the proportions are right based on the size of the bricks next to it, I would say that the burl is about 15" at is wider point, so you should have about 12" of clean cut, everything going right, and about 8" of depth. This will always be a one shot attempt, if you want to utilize most of the burl as a bowl so, it's worth a go, for sure.
I'm attaching your edited pic, with some drawings of how I would cut it for a bowl, it may help you...!

Another important thing is to try remove the bowl's "guts" before if will become shavings, you will be able to make either a smaller bowl or a few pen blanks, just to name a few! If you don't have a proper "bowl saving" cutter, is easy enough to do it with a good partition gauge (also pics attached).

Your type burl is no longer "green" but, you can process it as if it was, just to be on the safe side, this include the turning of the burl, with a more chances for success to rough turn it as you would normally do with green timber, leaving about 1" thickness all around to give you a safe margin to re-turn it later on.

I would certainly give it a couple of coats of a good timber stabilizer , as soon as it would come off the lathe, for safety and then put it a side to dry for a few weeks. Obviously, whatever the drying time I mention here is based on the principal that we have about 25C on average, so cooler locations will require a little more time, unless the timber is dried artificially!

Don't do the mistake a friend of mine did, he loved Olive wood that much that the day he had the opportunity to get a large block from a olive butt/root, he got home and cleaned that root to almost perfection (you will never get all the dirt/stones/sand, etc.) and store it in the driest and safest place he had in his large shed. He would daily go to that shed to do stuff, mainly turning and other wood objects, and every day he looked at it and wished he could turn it.

Not long after we met, I visit him for a day of wood-turning (boys day, sort of thing...!) at his shed, and as I enter the shed, my eyes nearly come out of my sockets when I looked down under a large shelve and saw on top of a timber pallet, this humongous chunk of olive, that I calculate to be about 100kg+. After a few questions of what in a heck?, we admitted to me, and later on confirmed by his wife that, the olive root has been there "waiting" to dry for 25 years, yes twenty five years...!:eek:

This poor guy din't had a clue what to do with it when he got it, someone told him that olive wood take over 20 years to dry so, he just patiently waited and looked and waited everyday. He got to a point that the 20 years were due but, he completely got stressed out and panicking about the possibility to bugger the whole thing over, a few years before the time was over...! poor guy, he was so scared to touch it that, nearly every day, as he modestly admitted, he would awake up in the morning thinking, yeah, today is the day, have his breakfast and walk to his shed for his "adventure" but as soon as he would see it, he would just go the jelly and give up.

That same day, and after a table conversation back in the house with his wife at the same table over a nice coup of coffee, I convinced him to wait no longer and stop him feeling sick about it, in secrecy for all those years.

Fortunately for me, he had his work shop set-up beautifully, wasn't much he didn't had there in regards to tools and machinery to work with timber.
The rest is History really, I reckon he got a big load off his back and for the way I saw it, that weight was identical to the root, I'm sure!
I got a small piece of it as a special "momento" of the occasion, it still has been untouched since as a reminder...! I can also say that the number of pieces he turned out of that root, were enough to keep him in his dream world for nearly 6 months...!:biggrin:

I hope this info can be of some help to you!

Cheers
George
 

Attachments

  • bogoakburl004.jpg
    bogoakburl004.jpg
    87.7 KB · Views: 146
  • bogoakburl3004.jpg
    bogoakburl3004.jpg
    58.3 KB · Views: 116
  • Partion gouges comparation 006_(1).jpg
    Partion gouges comparation 006_(1).jpg
    71.6 KB · Views: 128
  • Partion gouges comparation 002_(1).jpg
    Partion gouges comparation 002_(1).jpg
    61.3 KB · Views: 124
  • Olive rough blanks 003_(1).jpg
    Olive rough blanks 003_(1).jpg
    46.3 KB · Views: 130
  • Timbers preparation 075_(1).jpg
    Timbers preparation 075_(1).jpg
    81.6 KB · Views: 127
Last edited:

keithkarl2007

Member
Joined
Apr 22, 2008
Messages
1,727
Location
Ireland
I'm still pretty new to turning, I have no means to core the burl. I'd hate to turn half of it into shavings. Bog Oak is pretty hard material and I'm wondering how hard the burl will be to turn when its dry
 

Russianwolf

Member
Joined
Jul 13, 2007
Messages
5,690
Location
Martinsburg, WV, USA.
Here's one of the guys I work with.

Hi Mike,
I've tried drying inside and out . Out side it got to windy and dry out to quick so i now put it into a garden shed which has a slight draft and not to warm , this takes longer but it cracks less.It might take 2/3 months to dry its down to how thick it is.

Thanks Roger.
 

Russianwolf

Member
Joined
Jul 13, 2007
Messages
5,690
Location
Martinsburg, WV, USA.
and another

Hi Mike,

Good to hear from you.

The actual drying process is not really a lot different, the damage can be done in the delay between exposing the wood to the air (which starts the drying process before you are ready) a lot of damage can be done in this sometimes short time as the wood is not just sap wet but soaking from its time underground.

Unfortunately this may have already happened to your friend, and maybe even before he got it.

Seems a strange thing to say but if you get a piece fresh from the bog that has been dug out and you can't move immediately the best thing to do is to keep it wet, very wet!

Patience and luck are vital too, otherwise it is just like normal timber.

Hope it helps and good luck!

Regards Dave
 

keithkarl2007

Member
Joined
Apr 22, 2008
Messages
1,727
Location
Ireland
It was in a puddle of water on the bog when i found it, don't know what made me turn it over but when i did i seen the burl. At the moment its still in the refuse bag
 

robutacion

Member
Joined
Aug 6, 2009
Messages
6,514
Location
Australia - SA Adelaide Hills
It was in a puddle of water on the bog when i found it, don't know what made me turn it over but when i did i seen the burl. At the moment its still in the refuse bag


And is there you should keep it, until you gather all the info you need so that you feel comfortable and confident to tackle it!
Is understandable that some of your concerns are based on the fact, that you admitted not to have much experience with turning, but that is no reason for you not to be able to produce a magnificent bowl out of that rare burl.

If you have a lathe to handle that size raw material, you should have no problems to cut/save the core of the bowl/burl material. As I shown on the pic before, you only need a partition tool, and if you don't have one, you could try to make one, more commonly known as "core knife". One of the most effective and easy to make, are the ones made out of a medium to large size circular saw tungsten used blade. You only need 1 x good tooth on the blade to make this tool, and it goes like this. Try to get a 250 to 300mm diameter used disc, put it flat on a table with the teeth pointing upwards, on your left side at 9 o'clock position, now using a ruler on a straight edge, mark a straight line from the tooth bottom gully, from left to right in a horizontal line, right to the other end on the right. Measure about 1" bellow that line on both ends and make another line, if the blade has many small teeth, don't worry, you only need the one you are using as the "pilot" for all the markings, and you can leave them there, they will not matter, but you can also cut them if you want! If the disc has left and right angled teeth, make sure the pilot tooth on the left, is a left tooth, there is, the pointy bit on the tungsten cutter, is pointing up and NOT on the bottom flat touching the table.
Now, the only thing you need is a handle, and for that the safest way is to get a piece about 1.5 x foot long (good handle length for this tool) of 1" steel rod, or even heavy duty round pipe, cut a (sandwich) groove about 1" to 1.5" long on it the same thickness of the circular saw blade, remove the teeth and cut the end of the knife that goes on the handle side, flat and weld it on the top and bottom, ONLY!
You can use tape or any other rubbery material to rap around the handle for gripping if you also wish, and voila, the core knife is ready to goo...!:biggrin:

There are many other ways to make this type of knife but they require a certain amount of expertize to get the shape and the sharpening end done right, so lets keep it simple, for now...!:eek::wink:

PS: oh... by-the-way, have you measure the burl yet?

Cheers
George
 

Fred

Member
Joined
Feb 18, 2007
Messages
3,557
Location
N.E. Atlanta, Georgia U.S.A.
If I had it I would immediately pressure wash as much of the dirt off as I could while it still is wet from the bog.

I would then get it into a BLACK plastic trash bag until I could buy a plastic garbage can with a good sealing lid and get it in there ASAP. Light might allow some form of fungus to crack up ... pour a bit of alcohol into the bag to help kill anything until you are ready with everything else. Air and light are not what you want right now! :eek::eek:

Get the trash can and then put the burl in it and COMPLETELY cover the burl with denatured alcohol. Maybe one of your better paint supply houses will be able to get you enough of the alcohol. Keep the burl up an inch or so off the bottom to allow for anything that may seep out of the burl - you never can tell what!

Then I would completely cover it in denatured alcohol and put the lid on it and walk away for several weeks. Be sure to check it ever so often and add more alcohol as necessary to keep it covered.

After a bit of time, remove the burl and get it into a heavy duty cardboard box. Seal the lid and put it away in a cool and dry place away from any heat. Let Nature take a whack at it and allow the alcohol to evaporate slowly.

Nature had it for some 5000+ years so you need not be in a rush now. After a bit of time I bet you will have an amazing treasure to work with all courtesy of dear ole Mother Nature. :biggrin:
 
Last edited:

keithkarl2007

Member
Joined
Apr 22, 2008
Messages
1,727
Location
Ireland
UPDATE:
I found another piece today, not as large as the last but still a nice solid piece. Just cut it into slices and have it in a refuse bag. I think i'll try to boil some of these pieces in water and see what happens
 

gallianp

Member
Joined
Dec 20, 2008
Messages
322
Location
Crane, MO
I think robutacion missed his gifted proffesion -- being a man of few words :)rolleyes:) he should have been a lawyer! :tongue:

Hope he knows that I am just pulling his leg.

Paul
 

keithkarl2007

Member
Joined
Apr 22, 2008
Messages
1,727
Location
Ireland
I haven't shown any progress on this since I found it but i cut some of it up today from the smaller burl.
 

Attachments

  • bob 056.jpg
    bob 056.jpg
    51.1 KB · Views: 128

bitshird

Member
Joined
Aug 27, 2007
Messages
10,236
Location
Adamsville, TN, USA.
Keith was it starting to dry?? I don't suppose you have a moisture meter do you? If you of a mind to sell a few pieces let me know, I'd be willing to buy a few from you.
 

keithkarl2007

Member
Joined
Apr 22, 2008
Messages
1,727
Location
Ireland
These pieces along with a few other pieces are dry. I won't be selling any for a week or two. I sent some to a friend on the forum so when he posts a finished pen I'll offer a few pieces.
 
Top Bottom