Made a tool for taking apart long clicks

Signed-In Members Don't See This Ad

ossaguy

Member
Joined
Jan 3, 2010
Messages
1,370
Location
San Diego
Hi all,

I recently made a group of long click pens,and even after measuring with calipers I still ended up with a razor sharp edge you can feel at the nib/barrel transition.It really bugs me if I can feel it.I guess I was in a hurry making them,only to scrutinize them later at home.

One had a migrating clip too,which really bugs me.

So I wanted to take them apart safely so I can add a few more coats of CA and really make sure I got it right.I remember reading here about how they can be hard to get apart.

I made a tool by using a spare nib,and grinding off some of the small end just enough to fit a 5mm allen bolt in,then ground down a 5mm locknut into a cone shape,so there is room for it to thread onto an installed coupler.

Then with holding the pen in one hand vertically,I hook my small slide hammer onto the allen bolt,and just drop the slider.About the 3rd drop it falls out,allowing the exact HF transfer punch to pound out the clicker end.

I had to do six of them,and they all look perfectly OK,so I'm glad that I have a second chance on these.The blanks were so nice,and they cost a lot so I would have hated to cut them in half.I enjoy making these pens,but they have been just the biggest challenge for me to get them right!

I used my expensive Snap-on slide hammer,but HF sells a cheap knockoff for about $20.00 that probably would work just as well for this light-duty application,I would thnk.

I posted a few pics on the last page (6) of my photobucket in case anyone wanted to see.

click http://361.photobucket.com/albums/oo52/ossaguy


I just thought that since it worked so slick,seeing this might help someone else.

Take care,
Steve
 
Signed-In Members Don't See This Ad

bitshird

Member
Joined
Aug 27, 2007
Messages
10,236
Location
Adamsville, TN, USA.
How did you get the click button and mechanistic out with out destroying them or is that just the cost?? I screwed up and made 3 of the long click pencils none of which lasted over a week or two, Now if I can retrieve the wood, I'll convert them to Long click pens. It's odd that the pens last so long, but the pencils were a real piece of junk.
 

BSea

Member
Joined
Dec 28, 2009
Messages
4,628
Location
Little Rock, Arkansas
That's a great Idea. I'll have to make one of those myself. You deserve the "TIP OF THE MONTH AWARD", if there was such a thing.:wink:
 

ossaguy

Member
Joined
Jan 3, 2010
Messages
1,370
Location
San Diego
How did you get the click button and mechanistic out with out destroying them or is that just the cost?? I screwed up and made 3 of the long click pencils none of which lasted over a week or two, Now if I can retrieve the wood, I'll convert them to Long click pens. It's odd that the pens last so long, but the pencils were a real piece of junk.


I just used the exact fitting transfer punch,and made sure it was really square on the end so it pushed square on the mechanism's tube.They didn't get dinged up on the end,and so far they seem perfect in the click action.

Looking at my blanks I can see where I errored.It looks like I got carried away with trying to dull the outer edge of any sharpness,and slightly rounded the ends to much.This allowed a place that the razor sharp nib edge catches your skin.

So my plan now is to take that step out when I add a couple CA coats.Then I'll just lighty square off any CA overhang with the headstock sanding wheel trick.I'm hoping I can get a seamless transition there.Wish me luck!


Thanks,
Steve
 

flyitfast

Member
Joined
Sep 3, 2009
Messages
1,690
Location
San Antonio, TX 78247
Steve,
I second the "TIP OF THE MONTH" award!! I have destroyed one too many of the Clicker mechanisms. Your creation will make a difference.and save some money on blanks, tubes, and parts. :smile-big:
Also, enjoyed cruising thru your album. Great pictures and great creations to make the job easier. Like your "do all" lathe, sharpener, storage, dust collector cart.
Thanks.
gordon
 

bitshird

Member
Joined
Aug 27, 2007
Messages
10,236
Location
Adamsville, TN, USA.
Steve, I guess the click mechanism is probably different between the pen and the pencil any way.
That's a set I wish had worked, I sell quite a few long clicks, and never had one come back other than the label came torn on one corner,and it wouldn't retract, until I cut the offending corner nice way to boots upgrade sales.
 

BruceA

Member
Joined
Jan 27, 2008
Messages
245
Location
Fayetteville, TN, USA.
What is the thread on the nib of the Long Click?

I need this solution! I don't have a grinder or spare nib (yet). But what about this idea - figure out what the thread is on the nib coupling, and find a long nut, like 1/2" or so, to screw onto it? Then, get a bolt with the same thread and screw it into the long nut opposite the nib.

From there, hook on the sliding hammer, like you show.

This would make it easier to just go to Lowe's and buy the long nut and bolt.

Additionally, any thoughts on how to make a sliding hammer for this that doesn't cost $20?

Thanks for this idea!
 

nava1uni

Member
Joined
Mar 30, 2008
Messages
4,936
Location
San Francisco, CA, USA.
This is a great idea and the pictures in your album are really interesting. Your set up is really neat and I like how it all works in such a contained space.

In answer about the slide hammer. To make a slide hammer you can take a piece of threaded rod and screw a nut with a piece that looks like the one in his picture onto the end of the rod. Use JB Weld and it will hold the piece to the nut. Use 4-5 larger nuts and epoxy them together so they form a piece like that on a slide hammer, which can be slide along the rod with some force. Put them over the rod and then JB Weld several large fender washers to the end and you will have a small slide hammer. You really don't need a large slide hammer to separate the parts.
 

ossaguy

Member
Joined
Jan 3, 2010
Messages
1,370
Location
San Diego
That's a nice do-all tool set you made! That seems much simpler,drilling and tapping the threads in the threaded rod.I didn't know of hand what the thread size was,but had the extra nib on hand and the slide hammer already,so I just used what I had.

Maybe next time I'll try the search feature here on the IAP....

Thanks all for the nice comments,though!

Take care,
Steve
 

BruceA

Member
Joined
Jan 27, 2008
Messages
245
Location
Fayetteville, TN, USA.
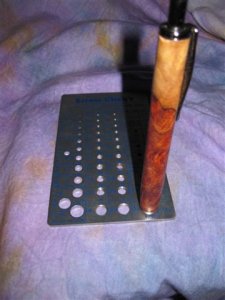
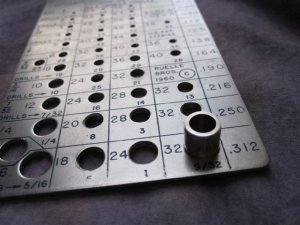
Using a Screw Chek'r for Long Click nib coupler removal

A Screw Chek'r works for removing the nib coupler.
Unscrew the tip and expose the threads.
Screw the pen into the Screw Chek'r in the lowest right hole.
Rock the pen shaft very slightly side to side, pulling up.


Because the coupler is only @ 3/8" long, and the tube is 3/8", it pops out easily.


The Screw Chek'r is only $12.95 from here: Click Link
 
Top Bottom