Jig for celtic knot

Signed-In Members Don't See This Ad

pmpartain

Member
Joined
Apr 13, 2006
Messages
232
Location
Fayetteville, AR, USA.
This is a half baked idea I thought of for the Celtic knot or any other symetrical segment pattern. I started to actually try this out, but thought I'd bounce it off the wall before I went to the trouble.

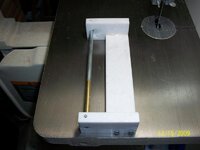
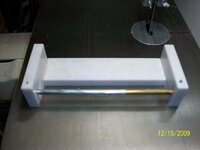
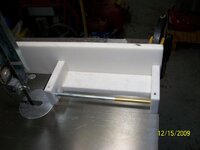
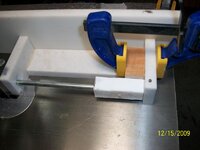
Step 1 turn the blank round to 7/8 or 3/4.

Step 2 get 3/4 or 7/8 inch hex or square nut probably coarse thread to affix to each end of the blank. I'm pretty sure that a 3/4 nut is slightly undersized and the 3/4 bolt is what is pretty close to 0/75, but the nut could actually thread onto the pen blank. The nut should have the pen blank almost perfectly centered and you are guaranteed perfect rotation of the blank for cutting slots whether it is 90 degrees for the square nut or 60 degrees for the hex. I suppose you could find an 8 sided nut as well. ACME threads might work too.

Step 3 proceed as normal. I plan to drill on the lathe with a Beall chuck after the segmenting is done. Should be a pretty good way to get a near perfect pattern I think.

Not exactly a ground breaking idea and someone may have already suggested this. If someone has tried it, I would like to know how the pen turned out.

Any thoughts? Is this a hair brain plot?

Thanks
 
Signed-In Members Don't See This Ad

skiprat

Passed Away Mar 22, 2022
In Memoriam
Joined
Oct 19, 2006
Messages
7,812
Location
In a Skip in Wales
Sounds like far too much effort to me. The only trick about Celtic crosses is that the kerf must be equal to the piece you stick in.
If you have a nicely squared blank ( sides and one end ) then the hard part is done already.
Simply cut about 90% through the blank, insert your piece and trim off any excess. Now rotate your blank and do the other sides.
I think it looks better if you do side 1, then 3, then 2 and 4

By not cutting all the way through, you can be sure that the cross will not have mis-aligned intersections:wink::biggrin:
 

pmpartain

Member
Joined
Apr 13, 2006
Messages
232
Location
Fayetteville, AR, USA.
Well I've been making a few of these lately. First you have to get the blank with four perfectly square paralell sides. Next you have to get the thing perfectly alighed in the drill press and drill down the exact center. And then you have to delicately get the thing to round without it blowing up on you . I've seen people turn the blank round first, segment and then drill on the lathe to eliminate some alignment problems, but with the blank round you have to get the cuts aligned with each other. Using a pre-made nut eliminates that last problem. At least in my brain it does.

Wheaties - what I'm saying is using two regular machine nuts, you can put a round pen blank (cylider) between them and have the flat sides of the nuts to hold the pen blank in place while you cut it. A drawing would help, but I'm at work and my boss expect me to work on his stuff. Can you believe that?
 

Daniel

Member
Joined
Jan 1, 2004
Messages
5,921
Location
Reno, NV, USA.
sounds like you are trading one need for precision for another. you still have to get the flats of the nuts to align with each other. And stay that way.
 

pmpartain

Member
Joined
Apr 13, 2006
Messages
232
Location
Fayetteville, AR, USA.
Yep. That could be a problem. I cut on an MDF sled and thought that I could just keep the flats of the nuts on the sled pushed tight as I cut. May be a problem though. Looks like I am just gonna have to try it and see. Just getting frustrated with less than perfect patterns. Most people don't see at least right away, but I'm sure you guys would see it.
 

jleiwig

Member
Joined
Jan 10, 2007
Messages
1,860
Location
Monroe, Ohio, USA.
Why not just two wood or aluminum blocks at each end with 3/4" holes drilled in the block and a setscrew at each end. Much easier than a nut in my mind, and the setscrew will keept it aligned, but be below the surface so you could still rotate it on all 4 sides. I'd also make diagonal witness marks on the ends so you would know if a blank rotated out of alignment.
 

pmpartain

Member
Joined
Apr 13, 2006
Messages
232
Location
Fayetteville, AR, USA.
I thought about making blocks like you are talking about. I didn't think about the set screw or the alignment marks. I have access to metal working equipment, but thought it would be easier to find something pre-made. Could drill and tap for a set screw in a nut as well though. I think the threads on the nut could bite into the wood and jam the thing into place. Would require an exact fit for that to work regularly though.

Thanks for the youtube vid!
 

KenV

Member
Joined
Oct 28, 2005
Messages
4,720
Location
Juneau, Alaska.
I think you are trying to get as 6 sided set of segments instead of the conventional 4 sides (HEx vs SQUARE). Some epoxy a nut on the shaft for a triangular point tool so they can easily index the three faces uniformly. Generally bigger is better to provide tolerance for errors when milling the blank.

The diameter of the threads on a nut will vary slightly, but the nominal size is the root of the thread - 3/4 7/8 and 1 inch are pretty common.

Want to lock things down -- drill and tap the side of the nut for a set screw -- say 1/4 by 20 or 8mm by 1mm --

registration against a fence with flats on the table and points against the fence will match the nuts on the ends.


You cut against 3 faces instead of two.


Or you can mill a hex shape on the wood with a router table, a jointer, or a hand plane.

Should work if you are patient and careful.

I think Ron Sardo published an celtic knot pen in WoodTurning Design a couple of years ago on a hex based blank -- bloodwood in holly perhaps. Ron is a fine segmented turner.
 
Last edited:

pmpartain

Member
Joined
Apr 13, 2006
Messages
232
Location
Fayetteville, AR, USA.
My thought process went like this. I'm trying very hard to get exactly uniform celtic konts. Problem 1 - perfectly square sides and ends on a blank. Problem 2 - perfect drilling on a drill press when I don't have a PH Designs vice. The square sides and ends problem is fixed by turning round first. Drill on the lathe to solve problem 2. Problem 3 - exactly match the knot material to the saw kerf and allow room for glue. Just gotta deal with that one.

New problem - Exactly rotating a cylinder for slicing on the bandsaw. Solution - flat spots on the cylinder to align. Ken has a solution for that, but by using a pre-made metal nut I don't have to make any efforts. Just buy the nuts, attach the round pen blank to the nuts, hold tight on the bandsaw sled fence, and I'm on the road again.

Anyway, this is a very simplisitc idea. I like the KISS method (keep it simple stupid). Thanks for the suggestions. I'll be trying the idea out as soon as I get home from Fastenal down the street.

One last question though. Use CA glue or wood glue for the knot segmenting? I've been sticking with wood glue cause I think it is better. What I think might not be right though.

Thanks again for the thoughts on this.
 

randyrls

Member
Joined
Feb 2, 2006
Messages
4,829
Location
Harrisburg, PA 17112
One last question though. Use CA glue or wood glue for the knot segmenting? I've been sticking with wood glue cause I think it is better. What I think might not be right though.

Thanks again for the thoughts on this.


I use medium or thick CA. Make sure you get even and complete coverage on the segments. When doing the FIRST segment, try to get the edges straight. On later segments, make sure the previous inlays are aligned. Don't pay as much attention to the edges.

I have a couple of wood scraps made into an "L" shape to help align the pieces during gluing. Cover with Saran wrap to keep the glue off.
 

leehljp

Member Liaison
Joined
Feb 6, 2005
Messages
9,330
Location
Tunica, Mississippi,
PM,


The hex sided nut idea sounds great to me. I have seen crazier ideas produce great results. New ideas are hard to convey and only in the eye of the beholder can the concept come to fruition. GO for it! I think it can be done.

I would turn a 1 inch blank and get a couple of 1 inch nuts and tack it with CA. The reason I would go with 1 inch is to allow enough thickness to not saw all the way through, yet have enough to complete the knot when turned. Leave about 1/8 inch thickness and you will not have as much alignment problems. IF this is not clear, I will see if I can find the pictures of the square blanks in which they do not cut all the way through.
 

pmpartain

Member
Joined
Apr 13, 2006
Messages
232
Location
Fayetteville, AR, USA.
Randy, Thanks for the glue tip. I tend to leave the two halves of the blank connected like Hank suggests. I just slide an oversized thin piece into the kerf, allow the glue to dry, and trim to the edges of the blank. I like the Saran Wrap trick though.

Hank, thanks for the tip on the 1" round. I was going for 3/4" beacause I don't cut all of my blanks and most of the ones you buy are 3/4 to 7/8 square. I was thinking they were big enough but maybe not.

I guess my main problem here is that I don't have a joiner, or a nice planer, and a semi- crummy table saw, so it is not all that easy to get a perfectly squared up blank. However, I can make round ones just fine!

Thanks again.
 

AceMrFixIt

Member
Joined
Oct 1, 2008
Messages
625
Location
Jacksonville, FL
I had problems drilling in the center after segmenting. I made a jig so I can drill, then trim the blank to center the hole. After that I do the segmenting. It has worked great so far. The major issue is drilling in the center so the segments turn to the same size.
 

pmpartain

Member
Joined
Apr 13, 2006
Messages
232
Location
Fayetteville, AR, USA.
Rick, how do you trim after drilling? Do you have a locator for the center hole use the track for the miter gage or something? Are you segmenting after you drill the hole? That is a very good idea! My drilling jig always hits the center of the blank at the top of the hole, but somehow does not go parallel through the blank. I suspect there is some mis-alignment that happens when I clamp the blank into the vice. I have checked and re-checked the table alignment on the drill press and that seems ok. I guess the bit could wander, but I was working with the cigar kit and using a 10MM bit. I don't think that could flex and wander much. The drilling vice is firmly clamped to the drill press table also. I chuck 3/8 solid rod in the drill press, clamp that rod with the center drilling jig, and bolt the jig to the drill press table. Still the problem persists.
 

AceMrFixIt

Member
Joined
Oct 1, 2008
Messages
625
Location
Jacksonville, FL
Rick, how do you trim after drilling? Do you have a locator for the center hole use the track for the miter gage or something? Are you segmenting after you drill the hole? That is a very good idea! My drilling jig always hits the center of the blank at the top of the hole, but somehow does not go parallel through the blank. I suspect there is some mis-alignment that happens when I clamp the blank into the vice. I have checked and re-checked the table alignment on the drill press and that seems ok. I guess the bit could wander, but I was working with the cigar kit and using a 10MM bit. I don't think that could flex and wander much. The drilling vice is firmly clamped to the drill press table also. I chuck 3/8 solid rod in the drill press, clamp that rod with the center drilling jig, and bolt the jig to the drill press table. Still the problem persists.

I will post some pics for the jig.
 

AceMrFixIt

Member
Joined
Oct 1, 2008
Messages
625
Location
Jacksonville, FL
This is what I use to center the hole for the knot. Can be used on table saw or band saw. I set this one up for 7mm.
 

Attachments

  • jig.jpg
    jig.jpg
    42 KB · Views: 471
  • jig2.jpg
    jig2.jpg
    36.8 KB · Views: 373
  • jig3.jpg
    jig3.jpg
    39.3 KB · Views: 429
  • jig4.jpg
    jig4.jpg
    28.5 KB · Views: 336
  • jig5.jpg
    jig5.jpg
    47.2 KB · Views: 453
Last edited:

pmpartain

Member
Joined
Apr 13, 2006
Messages
232
Location
Fayetteville, AR, USA.
So you drill the blank. center up the hole on this jig, do the segmenting. drill out the hole again, and then turn? That is an approach I never thought of. Did I get that sequence right?
 

randyrls

Member
Joined
Feb 2, 2006
Messages
4,829
Location
Harrisburg, PA 17112
I've seen people turn the blank round first, segment and then drill on the lathe to eliminate some alignment problems, but with the blank round you have to get the cuts aligned with each other. Using a pre-made nut eliminates that last problem. At least in my brain it does.

I am going to experiment with the round blank technique. One tip when doing this is to mark the round blank at the vertices (that's my word for the day) :cool: corners ie. for a seven sided knot you need seven even marks around the blank.

Using any spreadsheet program put the same number in a column of cells. It doesn't matter what the number is as long as the numbers are identical. The number of cells must be the number of sides in the finished product. Now convert the cells into a pie chart. Size the chart to about a 2 inch diameter, print and mark the blank. Make sure the center of the pie chart and the center of the blank are the same.

Example: Put the number 4 in 7 cells. Make the 7 cells a pie chart and attach to the blank. Mark.
 

GaryMGg

Member
Joined
Nov 23, 2006
Messages
5,786
Location
McIntosh, Florida, USA.
i found this video on youtube. and this is the way i do celtic knots. http://www.youtube.com/watch?v=Y9uQv5sKibk


That's Alex Lesniak http://www.penturners.org/forum/member.php?u=5561

Great job Alex. :good::good:

Imagine growing up with access to a fully-equipped, professionally outfitted shop. :cool:


I made a TS sled for mine because I like the cut and control better than I have from my band saw
but it's a minor difference.

PM, I also posted a CK Tutorial with a simple TS jig some years ago; it's in the library.
Making a square blank is a straight forward Table Saw operation as is cutting the ends square.
And, if the blank is square, drilling thru center isn't that difficult.

There's nothing wrong with thinking and experimenting to improve on pre-existing techniques.
However, I'd suggest another technique:
If you want to make multi-faceted (other than 4) blanks where each facet is equidistant
from a hole pre-drilled on the lathe, think of a router box mounted to your lathe and indexing.
The facets are cut while the blank is mounted and everything ends up matching.
Drill once. Make N facets. Move blank to TS, BS or even a hand saw and kerf for segments.
Return the blank to the lathe, redrill the hole using the original pilot, and turn.

Cheers,
G
 

pmpartain

Member
Joined
Apr 13, 2006
Messages
232
Location
Fayetteville, AR, USA.
That kid impresses me. He is showing a lot of maturity and drive to start prepping for college that young. When I graduated high school, I didn't even know what my major was going to be!

The router jig would be the way to go Gary. But being naturally lazy, I wanted to avoid making a jig.

I did try out the nuts. Ruined a maple and an oak burl blank in the process. I actually got the oak done and ruined the thing during assembly.

Here is how the process went.

Get a large blank and turn round to fit inside a 7/8 nut. Leave plenty of meat for the threads to grab onto. The nuts threaded right onto the wood and stuck in place really well. It is a bit tough to get the two nuts to line up with each other, but once done they don't move.

On to the bandsaw for slicing. I have a sled and use and cut the slices at 50 degrees. The round blanks break easily when sliced because there is a tiny section of wood remaining to hold the pieces together. That's why you need a large blank to start with and don't slice in so far. At least if you want to leave the two pieces attached for gluing. Also, the middle of the blank will be un-supported between the two nuts and it helps to fill that space with scrap wood.

Ok, got the segmenting done, so the blank goes back onto the lathe. Turn the thing down to fit in a 3/4 beall collet chuck.

Slice nib and cap end apart on the bandsaw.

Drill on the lathe and turn.

Alignment is very good with this method. The main difficulty I had was slicing the round blank and keeping the two pieces connected for gluing.

I need to try a non-burl blank because I don't think it will break as easily. I also plan to get some square nuts for the four sided knot.

I'll try again soon, but working in the garage these days is frustrating. Takes a lot to heat the thing up from below freezing so that the finish will cure.

All in all this is a fairly easy way to get a very accurately aligned six sided knot. Got a few bugs to work out. I'm sure there are better ways to go about this. Gary has a better way for sure, but requires some work. I just had a thought that the Beall pen wizzard would face off a blank pretty well. Too bad I don't have one!
 

Rmartin

Member
Joined
Jan 14, 2007
Messages
1,263
Location
Columbus, Ga, USA.
I bought some hex nuts and all thread a couple weeks ago to do just what you are suggesting. I haven't set up a jig yet, but I believe I can make it work. I use a hand miter saw from Sweden. There is a good tute in the library which uses the same type miter saw. In it, he uses a round blank locked in place with a circle pasted to the edge of the blank for alignment.
 
Top Bottom