2nd kitless~Polymerization

Signed-In Members Don't See This Ad
See more from creativewriting

Joined
Aug 7, 2009
Messages
700
Location
Jamestown, NC
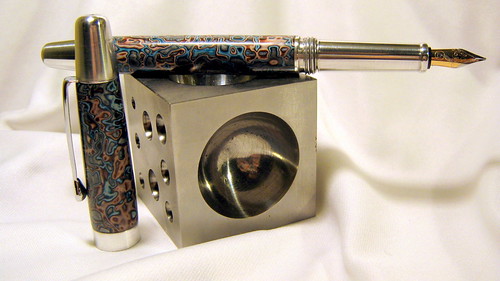
Well here is my second attempt at going kitless. Again I used aluminum (I really like the weight) and polymer clay. The nib is a small steel heritage from Lou. I figured out how to polish the aluminum a little better and added a clip.

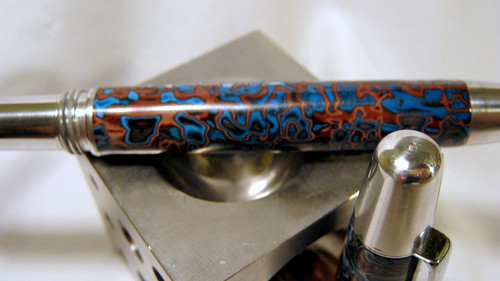
I have been trying to do Mokume with polymer for years and have never been satisfied with the results. I have always wanted that "Pop" of color and could never find it. Finally I stumbled upon this method after screwing up a few other pieces. I was blown away by the color and contrast.

Thanks for looking!
4620139781_9269288632.jpg

4620139705_9b224b0018.jpg

4620753960_7a792c49f0.jpg
 
Signed-In Members Don't See This Ad

ldb2000

Member
Joined
Sep 11, 2007
Messages
5,381
Location
Laurence Harbor, NJ, USA.
Beautiful Keith . I love the look . Glad to see your perfecting your finish and you got your clip problem worked out , threaded ?
I found a finish I'm going to test and see how it works , I'm waiting for it to arrive . From what they tell mne it sounds like it might just be what we are looking for . It puts on an ultra thin coat , 2 to 3 microns thick and is chip , scratch and wear resistant . It's not Epoxy but is a solvent based finish . I'll keep you updated .
 

Toni

Member
Joined
Feb 23, 2010
Messages
2,042
Location
Phenix City, Alabama
Keith!! LOVE IT!! That blue with the copper color really POP!!!

Funny thing about Mokume Gane I feel the same way. I havent really found a technique that I liked that didnt result in heaps of scraps. Very nicely done!!
 
Joined
Aug 7, 2009
Messages
700
Location
Jamestown, NC
Butch, I am all ears. It almost sounds to good to be true, but I will keep my fingers crossed. The polish that I used helps with finger prints, but it would be great to find something to help with wear. I use the faux leather one I posted everyday and it hasn't turned anything black or rotted my finger off yet:wink:!
 
Joined
Aug 7, 2009
Messages
700
Location
Jamestown, NC
Toni, MG has frustrated me for years. This one I had very few scraps and it was built right on the pen so no seems. When I started slicing away at this one I got so excited I stayed up until midnight just to get a picture up.
 
Joined
Aug 7, 2009
Messages
700
Location
Jamestown, NC
Thanks Skip. I was really trying to stay simple so I didn't distract from the clay. My intentions for going kitless was to find a better canvas to highlight the clay and the colors you could achieve with it. Thanks again for looking!
 

wizard

Member
Joined
Aug 27, 2009
Messages
3,569
Location
Houston, Texas
That is one of the most beautiful pens I have ever seen. I collect very nice fountain pens. I attempt to make some myself :rolleyes:. But this beats them all. I LOVE THIS PEN !! You and Toni should design stuff together. You are both so talented. The photography is excellent too!!! Regards, Wizard
 
Last edited:

bgibb42

Member
Joined
Jun 6, 2009
Messages
642
Location
Hull, GA
That is a spectacular piece of work! My only tiny constructive criticism would be that it looks a little long for my tastes. Otherwise, the clay work is stunning, and the styling is very classy!
 
Joined
Aug 7, 2009
Messages
700
Location
Jamestown, NC
My only tiny constructive criticism would be that it looks a little long for my tastes

Your criticism is alright by me. If we were all the same it would be a boring site. The pen is 6" capped. Nib tip to end is almost 5.75". It is slightly (.25") longer then my last, but the weight is still very nice.
 

glycerine

Member
Joined
Aug 7, 2009
Messages
3,462
Location
Fayetteville, NC
By the way, after your finest grit of micromesh or whatever you're using (on the aluminum), try some plastic polish if you have not already. If you use enough of that, it should take out those "scratches" and shine it right up.
 
Joined
Aug 7, 2009
Messages
700
Location
Jamestown, NC
By the way, after your finest grit of micromesh or whatever you're using (on the aluminum), try some plastic polish if you have not already. If you use enough of that, it should take out those "scratches" and shine it right up.

Thanks Glycerine. After I looked at the photos I went back and worked on it a little more. When your holding it you don't notice, but the darn camera brought everything out. I used Mothers (not literally, it's the brand) aluminum polish and I can see myself in it. This afternoon I am going to put it on the buffer and see what happens.
 
Joined
Aug 7, 2009
Messages
700
Location
Jamestown, NC
what size thread are you using.
Right now I am using a .5" x 20. It is what I had and I didn't want to invest in a bunch of taps in the begining. I am going to start experimenting a little now that I know the basic size I am going for.
 

glycerine

Member
Joined
Aug 7, 2009
Messages
3,462
Location
Fayetteville, NC
Thanks Glycerine. After I looked at the photos I went back and worked on it a little more. When your holding it you don't notice, but the darn camera brought everything out. I used Mothers (not literally, it's the brand) aluminum polish and I can see myself in it. This afternoon I am going to put it on the buffer and see what happens.

Ok, yeah. The plastic polish actually has very fine grit in it, like an auto rubbing compound, so it will continue to "sand" the finish. I think the aluminum polish just has chemicals to get rid of any oxidation and probably want remove any more scratches, but I could be wrong.

I use the HUT brand plastic polish:

d106.jpg
 

JohnU

Member
Joined
Jan 31, 2008
Messages
4,954
Location
Ottawa, Illinois
Stunning!!!! Great work Keith! I like it all from top to bottom. Your efforts and hard work really show. I hope to see this one on the Home Page!
 
Joined
Aug 7, 2009
Messages
700
Location
Jamestown, NC
Thanks Mike. This one is a little longer then the first one I made. The first cap I made was all one piece. The top finial on this on is threaded so I can put a clip on it. I made it a little longer in case I screwed up (which I do often). For the next one I will go back to the original size which is about .25" shorter then the bottom finial.
 

workinforwood

Member
Joined
Mar 1, 2007
Messages
8,173
Location
Eaton Rapids, Michigan, USA.
Looks Awesome Keith. I love the entire pen. I don't know if it's Mokume..but who cares! Get some Aluminum Polish over at Belle Tire..it's like $5 for a jar and lasts forever. That polish will amaze you.
 
Joined
Aug 7, 2009
Messages
700
Location
Jamestown, NC
Thanks Jeff. It's layered and manipulated much like that of metal mokume gane. Making it out of polymer we tend to get a little crazy with our colors. The mothers polish works really well. The funny part was I didn't even see the scratches until I polished and took the photo. The mirror finish shows everything. Napa had about 10 different aluminum polishes so I went with what they recommended. I also got some Brasso which didn't do a darn thing for me.
 

cnirenberg

Member
Joined
Jan 26, 2004
Messages
2,700
Location
Fort Myers, Fl
Keith,
Now that is one stunning looking pen. I really like the polymer clay contrast with the Aluminum. Nice threading job too. Thanks for posting this.
 

workinforwood

Member
Joined
Mar 1, 2007
Messages
8,173
Location
Eaton Rapids, Michigan, USA.
It's a tough pen to critique. I love everything about it, the blank, the finish, the styling and shape and proportions. I don't even think it looks too scratchy really. Finally..spotted something...you have a little nipple dimple on the very center top of the cap. Better just send that to me to fix and store away and you start practicing again. :wink::biggrin:
 
Signed-In Members Don't See This Ad
Joined
Aug 7, 2009
Messages
700
Location
Jamestown, NC
Nipple dimple...that's great. There is a small indentation in the top and I actually left it there intentionally. I turn and file most of it off at the end, but for some odd reason I like the look of the small indentation. It's almost like a signature for me...I know it sounds weird.......but a little nipple is good...nipple dimple that is!
 
Top Bottom