
You are using an out of date browser. It may not display this or other websites correctly.
You should upgrade or use an alternative browser.
You should upgrade or use an alternative browser.
Wood w/sleeves
- Thread starter Hippie3180
- Start date
Signed-In Members Don't See This Ad
See more from Hippie3180


Thank you so much!
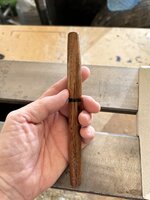
This is a handcrafted fountain pen, only the converter and nib were purchased. We are working towards being able to sell finished fountain pens down the line.


Clarification, I assume that do you do the drilling, tapping, thread cutting on the sleeves before gluing them into the drilled cap and barrel blanks, is that correct?
The "drill a small hole" part from this last week, didn't register, but as you noted "you learn about this quickly", oh boy did I.

Signed-In Members Don't See This Ad
its_virgil
Member
Looks good from here. Each one gets easier as you home the skills involved.
Lew
Member
Beautiful. I really like the look of the walnut.
egnald
Member
Really great. - Dave
Hippie3180
Member
Yes, ebonite. We need to work out a way to get our cap walls a bit thicker, we ended up losing our cap threads due to the ebonite wall being so thin. We're still working things out, but I think it was still pretty successful for the first one.Nicely done!
I assume ebonite for the sleeves?
Beautiful Work. Are you going to provide the kits for these?It's very basic and just a prototype to see how it all works, but this is our first wood fountain with sleeves. We had some walnut around the shop so nothing fancy, still some kinks to work out, but overall it was a success.
MedWoodWorx
Member
Nice work! Well done! What did you use as lining?It's very basic and just a prototype to see how it all works, but this is our first wood fountain with sleeves. We had some walnut around the shop so nothing fancy, still some kinks to work out, but overall it was a success.
Hippie3180
Member
Beautiful Work. Are you going to provide the kits for these?
Thank you so much!
This is a handcrafted fountain pen, only the converter and nib were purchased. We are working towards being able to sell finished fountain pens down the line.
Hippie3180
Member
Ebonite.Nice work! Well done! What did you use as lining?
sorcerertd
Member
That looks great! Don't dismiss the beauty of walnut just because it's common. Walnut is my test pen go to, too, since there's always some around the shop.
Roly
Member
Do you drill the blank and then turn the ebonite liner to fit? Would it work if you drilled the blank and filled it with epoxy before drilling it to size. For some reason I can't get my mind around the best technique, possibly old age setting in.
its_virgil
Member
I make the liner/sleeve first then drill the blank and glue in the liner. Some planning and calculations required.
Do a good turn daily!
Don


Do a good turn daily!
Don
Aces-High
Member
Gabe Castro has at least one good YouTube on this.
Hippie3180
Member
We do the same.
I have a question for you on the finishing process.
When you sleeve the wood, how do you finish the pen? I assume a CA finish on the wood, but do you have to polish the ebonite to a luster first and then CA the whole thing and then sand and polish again?
When you sleeve the wood, how do you finish the pen? I assume a CA finish on the wood, but do you have to polish the ebonite to a luster first and then CA the whole thing and then sand and polish again?
Hippie3180
Member
I'm not sure what others do, but we applied ca over the wood + ebonite and sanded/polished as normal. We applied ca to the section as well so that it would all have the same sheen.I have a question for you on the finishing process.
When you sleeve the wood, how do you finish the pen? I assume a CA finish on the wood, but do you have to polish the ebonite to a luster first and then CA the whole thing and then sand and polish again?
Sorry for all the questions. Clarification... so the small part of the ebonite was just turned and sanded along with the wood it was glued against and was not polished prior to application of the CA?I'm not sure what others do, but we applied ca over the wood + ebonite and sanded/polished as normal. We applied ca to the section as well so that it would all have the same sheen.
Chriscb
Member
My process is to drill the cap and barrel first, and then turn the sleeves to size. I've found that it's best to get the fit slightly loose to allow for the epoxy to get a good bond. I also roughen the sleeves prior to glueing.
As for finishing I'm from the 'don't use CA as a finish' school. It's a glue - so glue with it.
My finishing process depends on the wood I'm using but the aim is always to produce a finish that compliments the wood. And I confess that I'm not a fan of super shiny 'showroom' gloss for wooden pens - I reserve that for Acrylics. For hardwoods such as Pink Ivory or Cocobolo I sand down to 320 grit and apply the first of 4 coats of finishing oil to the wood. Any excess oil on the exposed liner is wiped off. The oil will protect the wood and produce a sheen rather than a deep shine and also allow the user to actually feel the wood - the grain or burrs or other indentations. The user can restore the finish with a soft cloth.
Depending on the colour of the acrylic I will clean them in an ultrasonic bath prior to gluing.
Regards,
Chriscb
Hippie3180
Member
So once the ebonite and wood are epoxied together and turned to your desired shape we sand lightly until it all feels smooth, clean up to get rid of sanding dust etc. and apply ca. to the pen body, including the ebonite ring at the thread end of the body being careful not to get ca on the threads. Then sand lightly and polish as normal. We also apply ca to the section again being careful with the threads. Basically treat the ebonite as you would the wood, being careful with the threads.Sorry for all the questions. Clarification... so the small part of the ebonite was just turned and sanded along with the wood it was glued against and was not polished prior to application of the CA?
Thanks for your patience in providing the additional level of detail.So once the ebonite and wood are epoxied together and turned to your desired shape we sand lightly until it all feels smooth, clean up to get rid of sanding dust etc. and apply ca. to the pen body, including the ebonite ring at the thread end of the body being careful not to get ca on the threads. Then sand lightly and polish as normal. We also apply ca to the section again being careful with the threads. Basically treat the ebonite as you would the wood, being careful with the threads.
Thank you Chris. I like the idea of drilling the cap and barrel blanks first. It makes sense that it is easier to adjust the outer diameter of the sleeves (within reason) than to make the drilled hole in the blank larger (or smaller, doh!).My process is to drill the cap and barrel first, and then turn the sleeves to size. I've found that it's best to get the fit slightly loose to allow for the epoxy to get a good bond. I also roughen the sleeves prior to glueing.
As for finishing I'm from the 'don't use CA as a finish' school. It's a glue - so glue with it.
My finishing process depends on the wood I'm using but the aim is always to produce a finish that compliments the wood. And I confess that I'm not a fan of super shiny 'showroom' gloss for wooden pens - I reserve that for Acrylics. For hardwoods such as Pink Ivory or Cocobolo I sand down to 320 grit and apply the first of 4 coats of finishing oil to the wood. Any excess oil on the exposed liner is wiped off. The oil will protect the wood and produce a sheen rather than a deep shine and also allow the user to actually feel the wood - the grain or burrs or other indentations. The user can restore the finish with a soft cloth.
Depending on the colour of the acrylic I will clean them in an ultrasonic bath prior to gluing.
Regards,
Chriscb
Clarification, I assume that do you do the drilling, tapping, thread cutting on the sleeves before gluing them into the drilled cap and barrel blanks, is that correct?
Chriscb
Member
Yeh - all the tapping etc is completed prior to turning down the inserts. They are mounted on a mandrel and turned to a close but not tight fit - then rough sanded to give the epoxy a good hold. An important step not previously mentioned takes account of air pressure. If you're pressing a close fitting insert in to a solid outer, the air has to go somewhere. Some will drill the hole in the wood a little longer than needed, and whilst this is a good solution, it will impact the final pen design and dimensions. My solution - not unique - is to drill a very small hole through the bottom of the inserts thus allowing the trapped air to escape.Thank you Chris. I like the idea of drilling the cap and barrel blanks first. It makes sense that it is easier to adjust the outer diameter of the sleeves (within reason) than to make the drilled hole in the blank larger (or smaller, doh!).
Clarification, I assume that do you do the drilling, tapping, thread cutting on the sleeves before gluing them into the drilled cap and barrel blanks, is that correct?
Hippie3180
Member
We drill a small hole in the inserts as well,you learn about this quickly and we score the outside of our inserts before epoxy.
Feeling pretty stupid right now, LOL.We drill a small hole in the inserts as well,you learn about this quickly and we score the outside of our inserts before epoxy.
The "drill a small hole" part from this last week, didn't register, but as you noted "you learn about this quickly", oh boy did I.
Both you and Michele warned me about the trapped air/pressure and for some reason it didn't register until my epoxy was hardening and the sleeve didn't want to seat all the way down. I brute forced it with a squeeze clamp and that worked, but I have learned my lesson, a small hole it is. I can always drill out any excess after it cures.Yeh - all the tapping etc is completed prior to turning down the inserts. They are mounted on a mandrel and turned to a close but not tight fit - then rough sanded to give the epoxy a good hold. An important step not previously mentioned takes account of air pressure. If you're pressing a close fitting insert in to a solid outer, the air has to go somewhere. Some will drill the hole in the wood a little longer than needed, and whilst this is a good solution, it will impact the final pen design and dimensions. My solution - not unique - is to drill a very small hole through the bottom of the inserts thus allowing the trapped air to escape.