Wish I could find the secret to Celtic knots

Signed-In Members Don't See This Ad

navycop

Member
Joined
Nov 4, 2010
Messages
2,334
Location
Virginia Beach, VA 23454
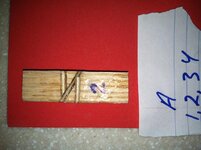
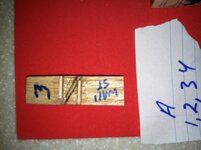
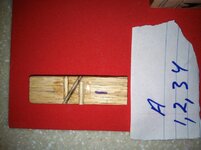
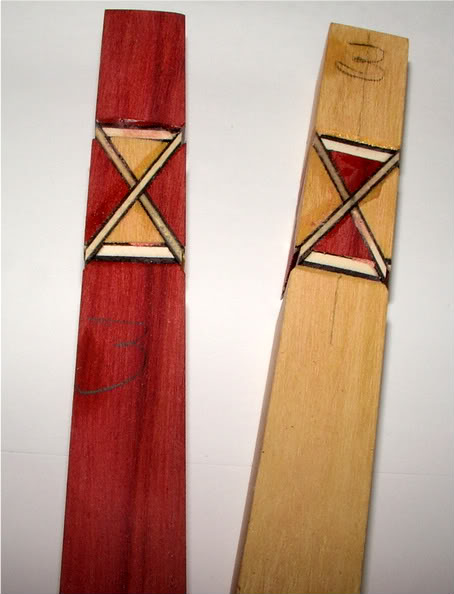
My first attempt I numbered the sides wrong. I numbered them 1,2,3,4 .
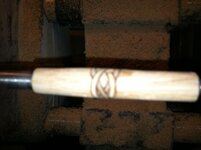
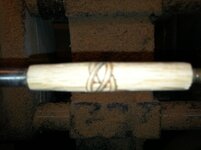
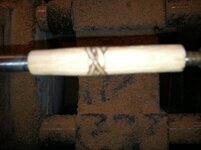
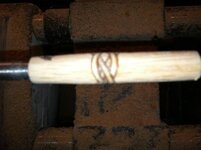
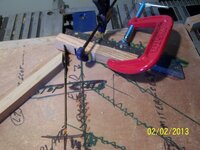
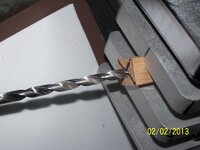
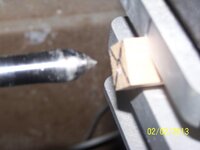
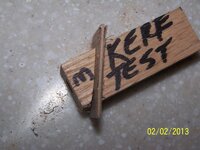
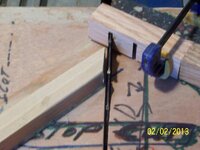
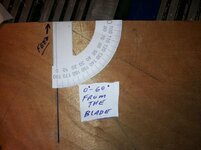
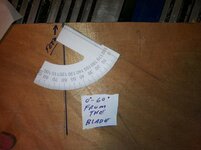
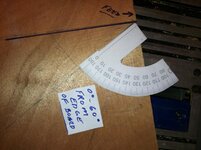
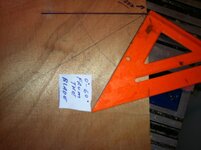
This time I numbered them 1,3,2,4, cut it on a sled at 60 degrees with a thin kerf saw blade. I just turned it and it came out no where near as good as yours. I will post pictures (of blank and saw blade) after I get back from grocery shopping.
 
Signed-In Members Don't See This Ad
There are 3 necessary criteria for a good double-cross (a.k.a. celtic knot).
  1. The fill material must be the same thickness as the saw kerf. Otherwise, the lines will get progressively out of alignment.
  2. The cuts must be made in the same spot (longitudinally) on the blank. If not, then the knot will come out angled.
  3. The blank must be drilled down the center of the segmentation. Off-center drilling will result in a knot that is larger on one side than on the other.
The best tips I have are:
  1. Start with a perfectly square blank.
  2. Don't cut all the way through the blank. This keeps you from misaligning the knot when you glue.
  3. Cut your inlay segments a tiny bit smaller than the blank so they don't stick out when glued. This keeps the blank from getting out-of-square as you go. I like to cut my inlays out of square stock (slightly smaller than the blank) at the same angle. That way, the grain lines up so everything contracts and expands in the same direction. This helps keep the knot from standing out over time.
  4. Use a stop-block or fine scribe line to align each face when you cut.
  5. After it's all cut and glued, find the center of the design; transfer that mark to the ends; turn the blank round; and then drill on the lathe in a good chuck (preferably a collet chuck).
I hope that helps,
Eric
 
Mike

I think we had this discussion before. I like what Eric posted. It sums things up pretty well.

Look forward to your photos. We will get to the bottom of this so that you can put out some great looking knot pens. When we see the photos it will help others to give the advice needed.

One thing I would do differently than Eric is use this chuck http://www.pennstateind.com/store/CSCPENCHK.html and drill the blank when it is square. This way you are dead center because you can find the center very easily on a square blank. Being you worked everything off a square blank it is natural to drill it from there also. This chuck was one of the best inventions for pen making in my opinion and well worth the money. I use it alot.
 
Last edited:
Okay. This is picture heavy so I have to two post.
Post 1.
 

Attachments

  • Picture 002.jpg
    Picture 002.jpg
    58.1 KB · Views: 329
  • Picture 003.jpg
    Picture 003.jpg
    39.7 KB · Views: 304
  • Picture 004.jpg
    Picture 004.jpg
    51 KB · Views: 286
  • Picture 001.jpg
    Picture 001.jpg
    51.3 KB · Views: 363
Mike
From what I can see on the last picture in the second set because some photos are too blurry it is hard to make out, but it looks like the only thing wrong is that is still not 60 degrees. That is OK you can use 45 degrees if you choose to. Now that I look at it more so in the first set of photos can't be right. You have to end up with a cross in there. I will post mine again. In photo 4 there should be a cross such as I show. Again forget the color differences in mine.


penXblanks-1.jpg
 
Last edited:
Can you explain each step you are doing exactly as you do them???

I can now see how you don't see a cross because you did not saw all the way through. But still you should have a cut that is running opposite of the one on the opposite side.


http://content.penturners.org/librar...celticknot.pdf


The more I look at the photos of the finished knot it looks like it was not drilled in the center. This is a must. Maybe you can explain your drilling method also.
 
Last edited:
Mike,

If you want, lets setup a trip to your shop and use your tools. We have done it at my place several times but using your tools, we can tweak the process to fit what you have.

Let me know if you want to do that.

Fred
 
Mike,

If you want, lets setup a trip to your shop and use your tools. We have done it at my place several times but using your tools, we can tweak the process to fit what you have.

Let me know if you want to do that.

Fred

Sounds Great.. I'll PM you. In the meantime (when the kids will let me on the computer) I will upload pictures of my process...
 
Last edited:
Here is my sled with the stop block and sample blank. Hope you can see the little gap I leave at the top after the cut. The veener seems to fight snugly. Also I dimple the blank with the 60 degree center and then drill with a center bit. After that comes the regular bit. My vise is mounted sideways on my Shopsmith set up in the horizontal boring mode.


Hope that helps...
I noticed there is a gap between the stop block and the blank. I think that is because I raised the saw to high after I clamped it for the picture. There is no gap in reallife...
 

Attachments

  • 23jan2013 109.jpg
    23jan2013 109.jpg
    62.1 KB · Views: 208
  • 23jan2013 115.jpg
    23jan2013 115.jpg
    43.2 KB · Views: 195
  • 23jan2013 114.jpg
    23jan2013 114.jpg
    29.7 KB · Views: 193
  • 23jan2013 116.jpg
    23jan2013 116.jpg
    55.5 KB · Views: 194
  • 23jan2013 110.jpg
    23jan2013 110.jpg
    48.2 KB · Views: 200
Last edited:
Mike is that a test piece that you have clamped up in the jig??? What angle is that jig set at?? To me it looks like 30 degrees.:smile:
 
If I had to guess It looks like the blank may have moved when you cut the kerf. Sometimes the saw blade can pull the blank and cause alignment issues. I use a chopsaw and clamp a block to use as a stop.
 
Mike is that a test piece that you have clamped up in the jig??? What angle is that jig set at?? To me it looks like 30 degrees.:smile:

I agree with JT on this one. My initial thought was your angle is too shallow. You might think it is 60 but the other angle is 60 and what you are cutting is only 30.

You need to increase your angle. It doesn't have to be any angle special but each cut needs to be the same angle. Find a larger angle, clamp it down and give it another shot.....
 
PTownSubbie;1498533 You need to increase your angle. It doesn't have to be any angle special but each cut needs to be the same angle. Find a larger angle said:
I will try the 45 degree angle side. I know it is a true 45 because of the triangle I used. Maybe I read the speed square wrong on the 60 degree one. I held it at the pivot point and rotated like instructions say. Just not sure if I did correctly.
 
Mike,
I'd guess the clamp being used is NOT sufficient to prevent the blade from lifting the blank a hair while you're making the cut.
It doesn't take much movement on each cut for the whole thing to be off because the error is compounded four times.
 
PTownSubbie;1498533 You need to increase your angle. It doesn't have to be any angle special but each cut needs to be the same angle. Find a larger angle said:
I will try the 45 degree angle side. I know it is a true 45 because of the triangle I used. Maybe I read the speed square wrong on the 60 degree one. I held it at the pivot point and rotated like instructions say. Just not sure if I did correctly.


Mike that was what I was basing my thoughts on. If the one on the left is 45 then 60 has to be steeper than that and that looks like less than 45 degrees to me. I do think you are getting confused on your angles.

Also I look at the blank in the jig and you have 2 cuts on the bottom side. That should not be.
 
Last edited:
I am starting from scratch with a new sled. Here are the angles I got. I just took these quick with phone so protractor is not lined up to good. Just as a referance. Which line would I use? From blade or edge of board.
 

Attachments

  • 5feb13 031.jpg
    5feb13 031.jpg
    59.7 KB · Views: 154
  • 5feb13 032.jpg
    5feb13 032.jpg
    56.1 KB · Views: 140
  • 5feb13 034.jpg
    5feb13 034.jpg
    63.2 KB · Views: 137
  • 5feb13 035.jpg
    5feb13 035.jpg
    47.3 KB · Views: 131
Last edited:
Your 60 degree angle from blade to blank will give you a 30 degree cut on the blank from cut to face of blank. this is a very common problem reading angles. The only one that comes easy is the 45 degree because the asked angle and the complementary one are the same. Everything else requires head scratching and hair pulling along with a few words that would get me banned here, thank goodness. Check your cut with the protractor, you will see they are 30 degrees to the blank. hope this helps as it is respectfully submitted.

Charles
 
I am starting from scratch with a new sled. Here are the angles I got. I just took these quick with phone so protractor is not lined up to good. Just as a referance. Which line would I use? From blade or edge of board.

You want the 3rd picture. You want a steeper angle which will open the knot further......

Just be careful of the blade. It will be close to the blank when you cut it. Hold downs work great for this.
 
As mentioned you want the steeper angle. Also you always measure against the blade and not from the edge of any board.
 
Back
Top Bottom