What is the trick with aluminium dust?

Signed-In Members Don't See This Ad

DaveTas

Member
Joined
Feb 1, 2020
Messages
25
Location
Tasmania, Australia
Hi Folks,

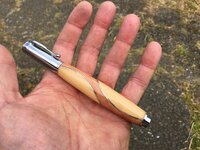
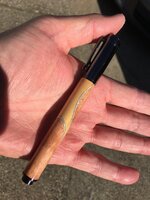
These were my first attempts at segmenting with aluminium as an accent. As soon as I sanded higher than 200 the aluminium dust would get into the wood. I used denatured alcohol / metho but it stopped working as the dust got finer with higher grit sanding. I ended up going back to 150 and it would clean off again.

Is there a trick I am missing here? I like the look but honestly don't want to try again without a better technique.

Dave


BTW The woods are Tasmanian Huon Pine, and Australian Redgum. I used a CA finish, polished with MM and Maguiers. The kit is Magnetic Cap from Steve's Woodcrafts. https://www.steveswoodcraft.com.au/collections/pen-kits/products/magnetic-cap-pen-kit
 

Attachments

  • 990BDD92-6428-469C-BEA8-35AC85E0A790.jpeg
    990BDD92-6428-469C-BEA8-35AC85E0A790.jpeg
    304.1 KB · Views: 294
  • FFFBBF65-83F8-4694-8028-FB170A680F70.jpeg
    FFFBBF65-83F8-4694-8028-FB170A680F70.jpeg
    308.7 KB · Views: 271
Signed-In Members Don't See This Ad

Wagner11

Member
Joined
Jul 8, 2017
Messages
135
Location
Indiana
I had good results with a pencil eraser once. Seems to kinda pick up the shavings.

Sent from my SM-S260DL using Tapatalk
 

Charlie_W

Member
Joined
Nov 16, 2011
Messages
5,918
Location
Sterling, VA USA
You can also seal the wooden portion of the pen with CA before any sanding which may help some. Depends on how porous the wood is. Also note that you would need to repeat the CA application as you sand.

As Ken said, the skew is your friend for this type of work. Any sanding will result in the wood sanding more than the metal leaving a noticeable variation in the finished pen.

Good luck!
 

leehljp

Member Liaison
Joined
Feb 6, 2005
Messages
9,326
Location
Tunica, Mississippi,
Most folks do recommend the skew, but I never became proficient with a skew in the way a skew is supposed to be used (other than laying it flat on the tool rest, which I don't like), so I learned by using a flat end scraper that I shaped to my own design. It lays flat on the tool rest and gives a solid feel when turning. Make sure it is razor sharp. I keep a hone next to the lathe and swipe the tool a couple of times across the hone about every minute or so. Gently use the scraper and it will make the blank smooth without having any sanding dust.

One caveat: Soft woods do better with a skew; hard woods do better with a scraper. BTW, most carbide inserts are basically a scraper, except for the Magic Skew in which the insert is angled such as / instead of -- when viewed from the end.

I began using the scraping method about 12 years ago quite by accident as I had the same problem. I was using silver/lead solder as dots in the blank and that solder smeared like pencil lead. UGLY. No way to get it off. I also had brass in the segments. Then, I spent time shaping, sharpening and honing my scraper for about an hour. Once I did that and used the scraper lightly, it came out clean and beautiful.

The silver dots below smear terribly with sanding.


jttheclockman

Member
Joined
Feb 22, 2005
Messages
19,132
Location
NJ, USA.
As Ken and Hank mentioned the answer is not to use sandpaper. Is that a trick, no just reality because not only do you get cross contamination with metals such as you found out with the aluminum, you will get cross contamination when segmenting with various colored woods. Weather you use a skew in the traditional way it was meant to be used or as a scraper that is my go to tool for any woods or metals. Yes a scraper will get you there as well as any other turning tool if you are proficient enough to turn a true round blank. Many people have a hard time rubbing their fingers across the tool rest and keeping the tool steady all the way across. This comes with practice. Thus the scraper method will be easier. I will again use my Gabon Ebony and Holly pen as an example. If I would have used sandpaper to sand down my blank I would surely get cross contamination and would be impossible to sand out. No mater how many times you tried sealing the wood. I used a skew and works well and I have promoted this method here for many many years now whenever this subject comes up. Try it and you will be surprised how well it works. You do not need to sand wood blanks below 400 grit if adding a CA finish and this is where people go wrong. Heck many times I do not go above 250 grit. You will not see the difference after top coated. Use a skew and not sure what the equivalent grit size is when done but it is as smooth as a baby's bottom.
IMGP0881.JPG
 

DaveTas

Member
Joined
Feb 1, 2020
Messages
25
Location
Tasmania, Australia
Thanks everyone, I will give it a go again.

No sanding and/or CA sounds like the trick. I don't mind skew either. I tried the Minwax dipping method on the fat one first. I found after the first dip that it had dulled the aluminium, so I sanded it off with 150 and then did the CA. that kept it bright.

This was also only my 2nd attempt at CA finish, everything else I have done I have sanded to 600 and then MM etc to get a mirror finish. I do like the CA though and will keep going with that now.
 

Lew

Member
Joined
Oct 28, 2020
Messages
389
Location
Fair Oaks Ranch, Texas
Most folks do recommend the skew, but I never became proficient with a skew in the way a skew is supposed to be used (other than laying it flat on the tool rest, which I don't like), so I learned by using a flat end scraper that I shaped to my own design. It lays flat on the tool rest and gives a solid feel when turning. Make sure it is razor sharp. I keep a hone next to the lathe and swipe the tool a couple of times across the hone about every minute or so. Gently use the scraper and it will make the blank smooth without having any sanding dust.

One caveat: Soft woods do better with a skew; hard woods do better with a scraper. BTW, most carbide inserts are basically a scraper, except for the Magic Skew in which the insert is angled such as / instead of -- when viewed from the end.

I began using the scraping method about 12 years ago quite by accident as I had the same problem. I was using silver/lead solder as dots in the blank and that solder smeared like pencil lead. UGLY. No way to get it off. I also had brass in the segments. Then, I spent time shaping, sharpening and honing my scraper for about an hour. Once I did that and used the scraper lightly, it came out clean and beautiful.

The silver dots below smear terribly with sanding.

That is one beautiful pen. Maybe one day
 

AdrianB

Member
Joined
Nov 2, 2020
Messages
3
Location
Pennsylvania
I am also interested in mixing aluminum with wood.

So sanding is a no go, but what about Micro Mesh after turning, and before the CA finish?
 

jttheclockman

Member
Joined
Feb 22, 2005
Messages
19,132
Location
NJ, USA.
I am also interested in mixing aluminum with wood.

So sanding is a no go, but what about Micro Mesh after turning, and before the CA finish?
MM is sanding. Just finer grits and it will contaminate the pads so I would not do it. There really is no reason to sand if you can use a skew or even any of your tools that you can control for very fine cuts. Does not have to be a skew. I just find a skew gives me that smooth finish. But could do with a scraper or even a gouge if sharp. Carbides will get you there too. No need to sand to get blank so smooth that CA will not stick to it. You just do not want to see tool marks under the clear CA.
 

leehljp

Member Liaison
Joined
Feb 6, 2005
Messages
9,326
Location
Tunica, Mississippi,
Adrian, What John said is absolutely TRUE.

The problem here is a "mindset" ("world view" in other areas). I deal with that all the time. No, you do NOT have to sand to get something smooth. It might take practice at first making the wood smooth with tools. It takes a sharp tool. ("Sharp" is subjective, but the meaning here is that it is sharp enough to shave with. I had some "discussions" on another forum with a forum friend who said that turning tools do not need to be that (razor) sharp, because that is what sandpaper is for. I have had a few on this forum over the years say that "razor" sharp is too sharp as the blade will dull to quick. It doesn't. But I hone my tools 2 - 4 times during turning of a pen blank. It stays razor sharp.

OK, now we have the idea that we cannot get a fine smooth finish with normal tool edges, they must be sharp. Sharpening like that also takes practice that gives HUGE rewards! You will not like mediocre or "good enough" sharp tools after that!

Next, practice getting the feel of the sharp tool on wood, get the "touch" - recognized by the feed back. Look at the blank and see how smooth it is without using sandpaper. Practice until you get the desired results.

THEN CA. I am not sure how proficient you are with CA, but I will give you my experience. You need calipers and there is a need of building up the CA to a thick enough level so that you will NOT sand through the CA. (Yes, you can sand the CA, but there is an alternative) You do NOT want to sand through on a segmented blank with metal. Even if you do not sand through where the metal is, there will be a "light" spot once you re-apply CA over the sanded through spot. To some, it becomes obvious.

It is hard to build up layers (CA Thickness) like the above using paper towel. It can be done but takes a while. Use an applicator of plastic pen parts bag or something similar to build up the thickness. Measure the blank BEFORE adding CA and write it down. After building up a good thickness of, say .01", or .02" or even .03", then you can sand that gently or use the sharp tool to turn it down to a smooth finish. I use a scraper for this, but other sharp tools can do this too. Just do not be aggressive. Patience is a virtue on the first two or three blanks. Get the "feel" and then things get a little easier and less time consuming.
 
Last edited:

jttheclockman

Member
Joined
Feb 22, 2005
Messages
19,132
Location
NJ, USA.
("Sharp" is subjective, but the meaning here is that it is sharp enough to shave with. I had some "discussions" on another forum with a forum friend who said that turning tools do not need to be t

Tools need to be sharp in all aspects of woodworking or else they become dangerous. You start forcing things and now can tend to lean into something that can cause harm. Sharp tools will get you there better and safer. This goes for tablesaw blades as well as turning tools or planer blades and the list goes on. Practice will get you to the point of no sanding. I watch some of the old timers turn spindles and do coves and beads and other ornamental cuts and always am amazed how easy they make it look. My mind can not think in those 3d dimensions at times. I need photos to copy from. But do it enough and you too can become that good.
 

Chasboy1

Member
Joined
Jan 11, 2019
Messages
180
Location
Morristown, NJ
I just stumbled on this thread and I'm curious.
  1. Is sheet copper usable for applications like the OP's pen?
  2. In learning to use the skew, l learned that 'riding the bevel' gave me more control, but I did have a problem with vibration that left ribs in the work. I haven't used one since I got my carbide chisels.
  3. I also use my heavy skew in scraper mode. I find that the weight of it allows me to smooth out convex areas well, but they still need sanding.
  4. I have a set of rectangular cabinet scrapers that I can sharpen and if I take enough care will provide a surface not requiring sandpaper.
  5. I'd appreciate any advice, tho' I'm still heavy into my 'acrylic discovery period'.
 

jttheclockman

Member
Joined
Feb 22, 2005
Messages
19,132
Location
NJ, USA.
Absolutely on the sheet copper. Copper, brass, aluminum, acrylics, woods, paper, cardboard and many other items work when segmenting. Again sharp tools is the key. I prefer the skew but other tools will get you there also if you can control light cuts
 

Chasboy1

Member
Joined
Jan 11, 2019
Messages
180
Location
Morristown, NJ
as a former metal shop teacher I had plenty of 'discussions' with aluminum and any abrasive activity with it results in lots of grime, so when I read the OP's post it made sense. I still haven't found a favorite chisel yet. I guess part of my problem is my 'practicing' is always when I'm doing a project.
 

howsitwork

Member
Joined
Jul 9, 2016
Messages
2,316
Location
Thirsk
as a former metal shop teacher I had plenty of 'discussions' with aluminum and any abrasive activity with it results in lots of grime, so when I read the OP's post it made sense. I still haven't found a favorite chisel yet. I guess part of my problem is my 'practicing' is always when I'm doing a project.
favourite chisel is the sharp one in your hand at the time....

I "like" using my HSS roughing gouge as a skew due to its weight damping any tendency for vibration. I then switch to my favourite 1/2" round car skew, freshly sharpened and diamond honed used as a skew although for a really , really fine detailed finish cut I might uses it in scraper mode.
 

LK&T

Member
Joined
Dec 1, 2020
Messages
139
Location
Sedro Woolley, WA
I just stumbled on this thread and I'm curious.
  1. Is sheet copper usable for applications like the OP's pen?
  2. In learning to use the skew, l learned that 'riding the bevel' gave me more control, but I did have a problem with vibration that left ribs in the work. I haven't used one since I got my carbide chisels.
  3. I also use my heavy skew in scraper mode. I find that the weight of it allows me to smooth out convex areas well, but they still need sanding.
  4. I have a set of rectangular cabinet scrapers that I can sharpen and if I take enough care will provide a surface not requiring sandpaper.
  5. I'd appreciate any advice, tho' I'm still heavy into my 'acrylic discovery period'.
Skew chisel vibration is something I've dealt with for awhile, but it really came to a head when turning pen blanks. Before making pens I was a bit nonchalant about it because my turned pieces let me use sandpaper........generously. Pen blanks, with their really tight tolerances, don't leave much room to play. Sanding out big defects like "vibration ribs" can't be done unless you leave enough material to sand down to your final diameter. I made my first few pens that way, and it works okay but my tendency was to get smaller than I want and it takes a long time. So, I worked on my skew technique a lot. First, get that thing sharp. As a reference, I sharpen mine through 3000 grit and then strop on leather. While using the skew, I found two things that made a big difference in vibration. One is a very light touch. I rub the bevel, but it almost doesn't feel like I'm rubbing the bevel. It feels a lot like I'm hovering the cutting edge along the blank and taking tiny cuts, but of course the bevel has to be touching or there would be a catch (I think.....). I'm pressing down just enough to control the tool and try not to use any more force than that. Second, the cutting edge must be oriented correctly. I found this was extremely important, and when I do it right the vibration goes away completely. I put the cutting edge about 45-50 degrees from perpendicular to the blank, and that seems to be the magic number for me. Also, practice practice practice. The skew is very much a "feel" kind of tool that needs some time in the saddle to develop.
 

leehljp

Member Liaison
Joined
Feb 6, 2005
Messages
9,326
Location
Tunica, Mississippi,
Skew chisel vibration is something I've dealt with for awhile, but it really came to a head when turning pen blanks. Before making pens I was a bit nonchalant about it because my turned pieces let me use sandpaper........generously. Pen blanks, with their really tight tolerances, don't leave much room to play. Sanding out big defects like "vibration ribs" can't be done unless you leave enough material to sand down to your final diameter. I made my first few pens that way, and it works okay but my tendency was to get smaller than I want and it takes a long time. So, I worked on my skew technique a lot. First, get that thing sharp. As a reference, I sharpen mine through 3000 grit and then strop on leather. While using the skew, I found two things that made a big difference in vibration. One is a very light touch. I rub the bevel, but it almost doesn't feel like I'm rubbing the bevel. It feels a lot like I'm hovering the cutting edge along the blank and taking tiny cuts, but of course the bevel has to be touching or there would be a catch (I think.....). I'm pressing down just enough to control the tool and try not to use any more force than that. Second, the cutting edge must be oriented correctly. I found this was extremely important, and when I do it right the vibration goes away completely. I put the cutting edge about 45-50 degrees from perpendicular to the blank, and that seems to be the magic number for me. Also, practice practice practice. The skew is very much a "feel" kind of tool that needs some time in the saddle to develop.
This is an excellent description! And this is the basic technique I learned a few years ago with a scraper - touch, feel, barely cutting, tiny cuts, light touch, tight tolerances, no room to play on a pen, technique, sharp, hone, barely use of force, practice. "Surgical" precision comes to mind also.

Excellent description. Sometimes it get hard to describe all of those characteristics in one post so that it is understood correctly. THANKS for posting this.

After learning those points, it became a two point reward: clean blank and smooth blank all in one.
 
Last edited:

Chasboy1

Member
Joined
Jan 11, 2019
Messages
180
Location
Morristown, NJ
Skew chisel vibration is something I've dealt with for awhile, but it really came to a head when turning pen blanks. Before making pens I was a bit nonchalant about it because my turned pieces let me use sandpaper........generously. Pen blanks, with their really tight tolerances, don't leave much room to play. Sanding out big defects like "vibration ribs" can't be done unless you leave enough material to sand down to your final diameter. I made my first few pens that way, and it works okay but my tendency was to get smaller than I want and it takes a long time. So, I worked on my skew technique a lot. First, get that thing sharp. As a reference, I sharpen mine through 3000 grit and then strop on leather. While using the skew, I found two things that made a big difference in vibration. One is a very light touch. I rub the bevel, but it almost doesn't feel like I'm rubbing the bevel. It feels a lot like I'm hovering the cutting edge along the blank and taking tiny cuts, but of course the bevel has to be touching or there would be a catch (I think.....). I'm pressing down just enough to control the tool and try not to use any more force than that. Second, the cutting edge must be oriented correctly. I found this was extremely important, and when I do it right the vibration goes away completely. I put the cutting edge about 45-50 degrees from perpendicular to the blank, and that seems to be the magic number for me. Also, practice practice practice. The skew is very much a "feel" kind of tool that needs some time in the saddle to develop.
I agree about your description. This is very informative and speaks my kind of language. Catching when using a skew for a shearing cut was quite an 'adventure' when I first learned about it. After learning about riding the bevel, I felt more control. I was never sure of the angle which you supplied above. Thanks!
 

LK&T

Member
Joined
Dec 1, 2020
Messages
139
Location
Sedro Woolley, WA
I agree about your description. This is very informative and speaks my kind of language. Catching when using a skew for a shearing cut was quite an 'adventure' when I first learned about it. After learning about riding the bevel, I felt more control. I was never sure of the angle which you supplied above. Thanks!
Moving the cutting edge angle to 45 degrees was a little like magic. Before, I was thinking that being closer to perpendicular would give a better shearing cut and surface finish, but at 45 it's just as good. Better, really, because there's no vibration. My last couple pens with wood barrels have not been sanded at all before putting on a finish and come out beautiful! Even difficult figured maple turns out sweet.
 

Todd in PA

Member
Joined
Feb 16, 2021
Messages
658
Location
Port Matilda, PA
Good info here. I saw a pictures of someone's aluminum segmented pen and thought it looked great, so I grabbed a little piece of aluminum at Lowe's, thinking I'd glue it into something and try my luck this weekend. I think I'll be returning that purchase. I'm new and this is sounding way over my skill level. I rely heavily on sanding. My sharpening and lathing skills are novice. I'll circle back to this idea in a couple of years once I'm able to get a blank sufficiently smooth with a chisel. 😁
 

jttheclockman

Member
Joined
Feb 22, 2005
Messages
19,132
Location
NJ, USA.
Good info here. I saw a pictures of someone's aluminum segmented pen and thought it looked great, so I grabbed a little piece of aluminum at Lowe's, thinking I'd glue it into something and try my luck this weekend. I think I'll be returning that purchase. I'm new and this is sounding way over my skill level. I rely heavily on sanding. My sharpening and lathing skills are novice. I'll circle back to this idea in a couple of years once I'm able to get a blank sufficiently smooth with a chisel. 😁
Todd, hello and welcome. Glad you found the thread but do not let it intimidate you. What we do here is try to help with giving advice and many people take a little bit from each reply and find their own methods. Now I will say this. Turning is using tools to get to the desired shape and sometimes that is sandpaper. Now if you have to rely on sandpaper to do your shaping than you need to practice using turning tools or find a teacher who can show you the proper methods. There is a ton of videos that show every tool possible. Pretty soon you too can turn things with confidence. If you can get the shape of your pens down to almost perfect, then switch to a scraper of some sort. As I said a skew can be a scraper if you hold it horizontal to your work piece. There are scraper designed to do just this. But practice for a few hours and you will get the feel. Learn on scrap wood found somewhere. Good luck.
 

leehljp

Member Liaison
Joined
Feb 6, 2005
Messages
9,326
Location
Tunica, Mississippi,
Good info here. I saw a pictures of someone's aluminum segmented pen and thought it looked great, so I grabbed a little piece of aluminum at Lowe's, thinking I'd glue it into something and try my luck this weekend. I think I'll be returning that purchase. I'm new and this is sounding way over my skill level. I rely heavily on sanding. My sharpening and lathing skills are novice. I'll circle back to this idea in a couple of years once I'm able to get a blank sufficiently smooth with a chisel. 😁
. . . and Todd, if you are not yet proficient with sharpening, and you can afford a carbide insert tool, - they stay sharp much longer than HSS tools that need to be sharpened often and honed a couple of times during the turning of a pen. If you want to begin trying soon, get a good set of carbide insert tools.

Some segmented pen blanks use the aluminum from cola cans. Works well.
 

Todd in PA

Member
Joined
Feb 16, 2021
Messages
658
Location
Port Matilda, PA
I don't mean to hijack this thread for tool questions, but...

I bought my chisel set at Harbor Freight with the lathe. I'm thinking that was a mistake in terms of steel quality. So before I buy another set, carbides, I need to ask: What brand do you recommend? Do I need a whole set, or just 1 round and 1 square?
 

eteska

Member
Joined
Oct 29, 2019
Messages
261
Location
Wisconsin
I don't mean to hijack this thread for tool questions, but...

I bought my chisel set at Harbor Freight with the lathe. I'm thinking that was a mistake in terms of steel quality. So before I buy another set, carbides, I need to ask: What brand do you recommend? Do I need a whole set, or just 1 round and 1 square?

Hi Todd. I can not speak to. Which brands people are buying but there not terribly hard to make either. I used 1/2 inch square stock drilled and tapped a hole for the carbide cutters I bought on Amazon. If memory serves think I got 10 for about $25. I have made several now for different cutters round, square, square radius (my go to for most things), and a diamond shaped one.


Sent from my iPhone using Penturners.org mobile app
 
Top Bottom