Weird Question

Signed-In Members Don't See This Ad

suffolk.reef

Member
Joined
Feb 13, 2013
Messages
20
Location
Suffolk, VA
I do not know if I am posting in the right section but it is during the final finishing/shaping stage that I am having an issue. I turned out a couple of pens today and I am an seeing the tubes through the blanks near the ends. The obvious is I have to turn them down thin to the bushing but I am seeing the tubes. Is it the acrylic blank make up or some other weird issue that I am having a brain fart and can not figure it out.
IMG_20130921_193131_510.jpg

IMG_20130921_193117_698.jpg

IMG_20130921_193153_344.jpg
 
Signed-In Members Don't See This Ad
After you paint the inside of the blank (reverse painting) let the paint dry over night. If you are using CA to glue your tubes in, try 5 minute epoxy instead. The Epoxy will not effect the paint inside the blank where CA does. You can also put a drop of the same color paint into the epoxy when mixing it, that will give you complete color coverage.
_________________________________________________
Everyday I'm vertical is a great day
 
The second photo appears to be cracks in the end. Most likely due to a bur on the ends of the brass tube. End mils I think cause more problems like this than other methods.

Also it shows ripples in the finish which means there's more to do on the finish.
 
You can also paint the brass tube. But the paint can peal off as it is pushed in. Also the CA glue will show against the painted tube. That is between the brass tube and the pen blank. That is not an issue for me on a busy blank. But you have one color. So painting the inside of the pen blank is a must. You can also paint the tube as well. For double safety.
 
Thank you for all the info. I got some model paint today and reversed painted the blanks for the next two projects. I never noticed the ripples ed. I'm changing out my easy tool tonight do yo think it could because it is dull or nor sanding. I start out wet sanding at 800 then 1000 the micromesh.
 
After using the EWT, it would be best to start at 400 or 600 grit to get the tool marks out and work your way up the micro mesh. A plastic polish or buffing is also a great step to add for the flawless shine.

Great start. It looks like you have done well with your fit. And +1 on the reverse painting. Epoxy is your best bet for getting the inside covered.
 
Jay; this may sound harsh, but you must paint the inside of the drilled blank on every acrylic blank. About half the acrylics are not truly opaque and you will see the brass tube if you don't do this. Give each blank about a 1 or 2 second pffft of spray paint at each end. You can change the apparent color of the blank by using a different color. Both these blanks started our as white pearlescent blanks. One painted pink, the other baby blue.


The EWT isn't the best tool for acrylics. It tends to be "grabby" and will pit the acrylic. You want the acrylic to come off in ribbons. If you are getting hard little gritty pieces, you are not getting the best finish. The tool tip on top will work well for wood, but is grabby and tends to pit acrylics. The tool tip on the bottom will peel endless ribbons from the hardest and chippiest acrylic, but leaves a rough surface on wood.


I hope this helps...
 
Thank you for all the info. I got some model paint today and reversed painted the blanks for the next two projects. I never noticed the ripples ed. I'm changing out my easy tool tonight do yo think it could because it is dull or nor sanding. I start out wet sanding at 800 then 1000 the micromesh.

As a general rule for beginners (and some old hands), start at half the grit and sand twice as long as you think you should. I am not sure why, but it seems to be a bragging point with a lot of turners as to what grit they start sanding with. :confused: You have to take a look at the finish once you are done shaping and go from there.

I can't advise on the EZ tools. I don't use the carbide tools for pen turning.
 
Buzzzz4 pretty much covered it on all counts. Few of us can turn well enough to start sanding at 800 for our best work. When I first started I would work my way up from 180! Shouldn't need that on acrylic but 400 wet is where I start. If you have trouble with rogue scratches, switch to Abranet 400 then 600. That will work well for wood/CA finishes also.

If you are having trouble with chips like Randy mentioned, try rolling your EWT over about 30-45 degrees to slice more like you would a skew. Or you could get a different cutter bevel :cool:. Whatever cuts your ribbon!:biggrin:

Harry
 
Few of us can turn well enough to start sanding at 800 for our best work. When I first started I would work my way up from 180! Shouldn't need that on acrylic but 400 wet is where I start. If you have trouble with rogue scratches, switch to Abranet 400 then 600. That will work well for wood/CA finishes also.

I am not sure why, but it seems to be a bragging point with a lot of turners as to what grit they start sanding with. :confused:

The answer to both of these is the same. How sharp is your chisels? If you sharpen good, like very very good you will need very little sand paper if any at all.


I completely agree with that, but my real point was that I judge a turner on what the finished product looks like, not what grit sandpaper he started with.
 
I know you had several different tips and trick above.

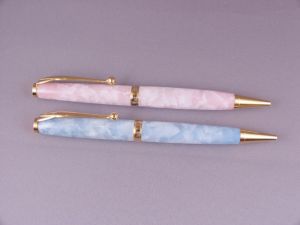
I agree with much of it. Painting acrylics is a must. There is a very FEW that don't need it, but I tend to put it into my workflow anyway. Acrylics get drilled.. then painted, then set aside for at least a day to dry (often longer) before the next steps.

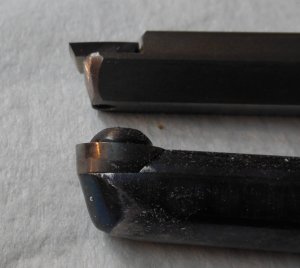
What sand paper you start with is a factor of several things, but if you are new to acrylics, the odds are great that 800 is too high no matter how sharp your tools. Turning acrylics has a different "feel" than wood. The ripples in the finish that Ed pointed out look "more than 800 grit" to me... Maybe 320 or 400 would be a better point to get those out. Also since those are all "around the pen" ripples it would be best to do some work "the long way" on the pen. That could be sanding with the lathe off or it could be buffing as well.

Welcome to the world of acrylics! They are a different beast but worth the time. One last note - just when you think you have it figured out you will pick up a new acrylic and have to start over. There is a variety of types out there and they don't all "act" the same!
 
Thank you all for the advice and great tips and advice. I have been out of town for the past few days and will be getting back into the shop soon to apply the advice. I was able to pick up several little jars of model paint from the neighbor kid so that was a + and saved a little $$$. Once I turn another pen I post the progress that I made.

Happy turning.

Jay
 
Putting one or two drops of paint into your epoxy while mixing it up to glue in tubes helps a lot in my experience. I did reverse paint one blank but I wound up needing to redrill afterwards because the tube no longer fit, now I just mix the paint in the epoxy and make sure it covers the whole tube.
 
Back
Top Bottom