Tube and back painting - oversized drills?

Signed-In Members Don't See This Ad

egnald

Member
Joined
Jun 9, 2017
Messages
3,115
Location
Columbus, Nebraska, USA
Greetings from Nebraska. My latest project (a Rhinoplastic rainbow of cigar pens) has not been going very well, I back painted my blanks, but still wound up with areas where the tube shows through. I must have somehow scraped the paint away when I was gluing the tubes in - very frustrating.

I have spare tube sets and another batch of blanks on order already. This morning, I found the specialty drill bits for plastics on McMaster-Carr available in inch, metric, letter, and wire gauge sizes. I ordered an "X" (0.397", about 3 thousandths over the 10mm, 0.3937) and a "Y" (0.404", about 10 thousandths over) so I can have a little more clearance to accommodate the paint thickness. I understand that typical paint thicknesses are on the order of 5 thousandths, so if I both back paint and paint the tubes I should still wind up with a snug fit.

Do any of you use over-sized drill bits for working with plastics when back and tube painting? Am I on the right path or are there alternatives that might work just as good as (or better than) oversized drills?

Regards,
Dave (egnald)
 
Signed-In Members Don't See This Ad

carlmorrell

Member
Joined
May 14, 2013
Messages
691
Location
Cary, NC
I have had the same issue. A good investment is a 115 piece drill index. It has both fractional and letter drills. I like to use tamiya paints for backpainting. Been modelling with them since the 80s. Even black I put two coats on. White 3. I wait a day after painting. Even then I still want the tube to slide in easily. Test before glue! I also use Optivisor magnification, a 1/8" camel hair brush and a lot of light.

Here's another thing I do. After painting I keep the blank vertical. After 5-10 minutes, pick it up and wipe off the bottom and move it to a clean place on my wax paper. I feel if I leave the blank horizontal, the paint will migrate to the gravity side!

Certainly not the only way to skin a cat, just my way, YMMV!
 
Joined
Feb 25, 2010
Messages
1,799
Location
webberville, mi
I've done a fair number of pens with painted tubes and blanks. I've settled in on a process where oversize drills aren't needed. I'm sure we all do a "test fit" before painting and again after. Whenever I suspect the fit is tight enough that it might cause a scratch I'll take a transfer punch (PSI sells them as a "disassembly set" - their part number: PKDISET). I wrap a small piece of 220 tightly around the punch and use it to ream the inside of the blank. It usually does the trick and has a side bonus of smoothing out the inside of the hole.
Also, I used to paint with acrylics and a brush. Now I have 3 cans of spray paint - white, black and grey. I find that these cover well with a thinner coat. While there can be a drastic result difference between the three on the finished pen, you can kind of plan on it whether you want brighter colors, darker or whatever.
 

jttheclockman

Member
Joined
Feb 22, 2005
Messages
19,140
Location
NJ, USA.
I am going to double down on what Ted said. I do the same things. Mostly spray paints these days and works well. Do enough pens and you will know when that drill hole is just right.
 

PaulWitmer

Member
Joined
Jan 13, 2014
Messages
211
Location
Barrie ON Canada
Likewise, I also follow Ted's and John's processes as described when I need to paint the tubes. A little abrasive and paint resolves any issues I had in the past.
Paul
 

Curly

Member
Joined
Nov 20, 2010
Messages
4,846
Location
Saskatoon SK., Canada.
I'll be a maverick and not quite do what the 3 esteemed pen turners before me do. I take a dowel and saw a slit in it and wrap a strip of sandpaper around it starting with some in the slit and the wrap trailing when turned in a drill. Slip it in the hole and spin away moving back and forth but not leaving or dwelling at the mouth of the blank. Basically make a flap sander. Check your fit often to prevent overdoing things. You can do the same with a metal rod but a dowel is pretty easy to slit on a bandsaw or by handsaw.
 

qquake

Member
Joined
Feb 8, 2004
Messages
5,014
Location
Northern California
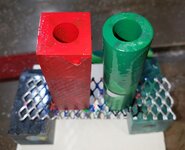
I never use oversize drill bits, and have rarely had a problem. Like Carl, I too let the blank dry vertically. I set it on end on a piece of mesh so the paint can drain out, and air can get into the bottom of the blank.
 

Attachments

  • 015.jpg
    015.jpg
    290.1 KB · Views: 91

Charlie_W

Member
Joined
Nov 16, 2011
Messages
5,918
Location
Sterling, VA USA
Great advice above!
I second the vote for the 115 piece drill bit set. I measure the tube and find a drill about 0.010 larger.
Primer spray paints. Sometimes I will put the painted tubes in a toaster oven for a bit to cure the paint...200 degrees.
I also prep the tubes first by not only scuffing but also use a flat file and take the "sharp" off the end edges. These sharp edges make a great scraper when sliding into your painted blank....which you don't want.
 

TonyL

Member
Joined
Mar 9, 2014
Messages
8,915
Location
Georgia
One should be able to cover/paint the brass and paint the inside inside of the barrels while using the recommended drill size. I am definitely NO expert, machinist, or precision driller. As long as I use epoxy, I very, very seldom risk scraping any paint off. I do slowly twirl the pained tube (coated with epoxy),as I insert it Happy turning with whatever approach works for you. :)
 

carlmorrell

Member
Joined
May 14, 2013
Messages
691
Location
Cary, NC
What I have found is to never trust the recommended drill sizes. In fact the last project I worked on called for 7mm drill. No way was that the correct drill bit. I was drilling alumilite and no backpainting required. I ended up using a 9/32. It was the perfect bit for the tubes. 9/23 - 7mm = .0056 inches. Is that considered oversize?
 
Top Bottom