
Dragnet
Member
I primarily make spiral segmented pens, and one of the most tedious/time consuming aspects of this is hand-sanding each individual segment prior to glue-up. After slicing my blanks into small segments (usually 3-4mm) using my dewalt table saw and diablo 7 1/4" ultra finishing blade, I typically just lay a couple 9x11 sheets of sandpaper down (usually 150 grit and 240 grit) and sand each segment front and back on each by hand. However with up to 35 segments per pen, this can take quite a bit of time and often results in tired fingers and gloves that develop significant wear, sometimes forming holes. In order to achieve a good fit, especially with spiraling, however, I've found this step to be absolutely necessary.
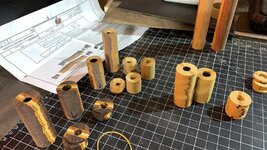
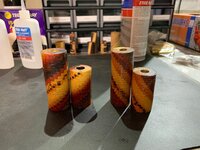
I was wondering, though, if this process could be carried out using a mini sander or some other device? Part of the problem of course is the size of the segments, which in my case can be barely thick enough to grasp firmly with 2-3 fingers. I've attached photos showing a few of the blanks with segments sanded and placed on the tube, along with one showing 2 pen blanks after the glue-up.
For those who make pens like these, I'm curious as to how you sand and if anyone may have suggestions on other methods I could try to make things easier on myself.
Thanks in advance!


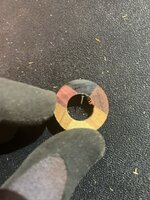
") . I also use the cone trick.. for sanding the face, however, I just place a 9x11 sheet down and do by hand, typically 4-5 seconds for each face. I guess with segments 1.8mm thick, it would be difficult to get any kind of grip, even if you have fingers as small as mine.
. I also use the cone trick.. for sanding the face, however, I just place a 9x11 sheet down and do by hand, typically 4-5 seconds for each face. I guess with segments 1.8mm thick, it would be difficult to get any kind of grip, even if you have fingers as small as mine.