Tare my CA apart

Signed-In Members Don't See This Ad

ctubbs

Member
Joined
Sep 12, 2010
Messages
3,588
Location
Murray, Kentucky
Here are three shots of my CA finish. The first one is CA applied with nothing done. The second is after MM to 12000. The third is after polish with Plastix. The blank is home made spalted crab apple. All comments especially critical ones greatly appreciated. Thank you for the help.
Charles
 

Attachments

  • IMGP0741a.jpg
    IMGP0741a.jpg
    23.2 KB · Views: 464
  • IMGP0743a.jpg
    IMGP0743a.jpg
    24 KB · Views: 417
  • IMGP0745a.jpg
    IMGP0745a.jpg
    24.1 KB · Views: 476
Signed-In Members Don't See This Ad
How many coats of CA did you use? It might just be the picture, but the 1st photo looks a little dull.
 
All comments especially critical ones greatly appreciated.

Ok Charles, no offense meant and I'm no master of the CA finish but it appears that you have a dull patch on the first pic. IMHO, unless you add at least another CA layer, then even if it polishes up after MM and polish, then that thin area will always eventually become dull again.
To me, the surface looks pretty smooth but needs another coat or two to make sure the wood is actually below the surface finish.:wink:
 
The 1st (CA only) does look a bit dull and I've had similar appearance when applying CA in cooler temperatures. It usually sands/polishes to a gloss but I have better results applying another coat or 2 when the "CA only" looks dull like your #1. Your final result (#3) looks good from here.

Did you use the MM dry or wet (actually just damp)? I get better results with wet sanding with MM followed by Novus #2 (probably similar to your Plastx polish).
 
OOPS, I left out all the necessary data. Two coats thin, four coats medium, three coats thin. No accelerator. Temp around 65 F. Basement garage.
Absolutely no offense taken on any comments. This is a learning experience. Thanks for the time and effort you are expending to teach me to do better.
Charles
 
Charles, The 1st photo does look like there is a dull spot, BUT since thare hasn't been anything other than CA applied, I'd say OK a lot of times I get those dull spotsit's something to do with the way it dries. Your second picture looks great to me, actually it seems to have a better shine line than the after polish 3rd shot, Which still would make most turners happy. I'd say ya done good.
 
Well, someone once said to me, "don't answer a question with another question" but, I'm intrigued about the bushes you have used what are they...???

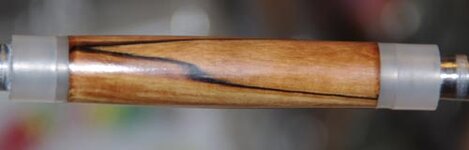
Now in relation to the CA finish, the first thing I notice is the very irregular edges between the wood and the bushings, secondly I see a very poor finish on the ends of the barrels, scratches and rings, this means that before you started using the CA, the wood was not properly sanded (finished).

With 9 coats of CA (5xthin, 4xmedium) the finish should be a lot better, with more depth..! now, are you sanding in between costs or did you sand somewhere while coating the blank with CA...??? it really looks that half of the CA you put on it has been sanded off and certainly not enough CA in some spots where it show a dull finish.

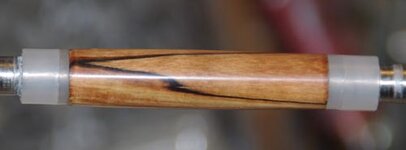
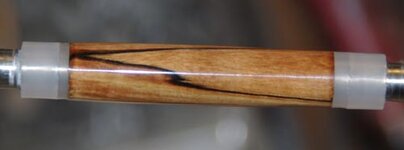
The last 2 pics are an improvement of the CA finish and those 2 steps are necessary to obtain a proper CA finish anyway but still, the amount of CA over the wood is not even, there is some of those duller spots before polishing are the indication that are possibly higher spots where the sanding remove more CA than any other places so, leaving those areas with little CA (protection) and they will never produce an even shine and depth finish.

The starting of the CA application with thin CA, in my view is an excellent "habit" to have, the first coats need to soak in a little into the timber (material) to achieve a good "bonding" strength, all other layers after that will be "protective" layers. Many CA finished pens endup having "separation" due to the thick layers that fails to bond to the material underneath, this will endup in the CA to become "milky" particularly after some time and if dropped and hit in a sharp edge, this will "brake" the CA layers, making the hole finish to fail...!

With an enormous variety of ways to apply a CA finish, no one single system is better or more effective above all the rest, there are far too many "variants" that alter the final results, this is why what works for one person can possibly not work to someone else. Each one of us have to experiment most possibilities and then start to work on the one that produces the most reliable and consistent results for your circumstances and materials used. Some of us reached that equilibrium quit fast, many other struggle with it for a while but, in the end, you always endup with what works for you, if that is consistent with what others do fine, if not, its fine also...!!!:wink:

Cheers
George
 
I think your finish looks great. It took me a long time to get the hang of it. Excellent work. I am curious about the bushings as well.
 
I can't see the finish well enough in the supplied photos to make a judgment. I find that the quality and nature of the reflected light is critical in taking a picture of the finish.

Just looking at your first photo, where you have not done any sanding, your finish looks very smooth. Certainly smoother than mine. I can usually see small ripples (actually paper towel marks) on the surface after about 8 to 10 coats of medium CA. This is easily brought smooth with the green 1800MM (I skip the coarsest brown 1500 MM completely). After that it's simply a progression through the grits to make the scratches smaller and smaller. By the time I'm done with the finest (gray 12000) grit, I have a glass-like surface. It's great because it looks the same both before and after I wipe the water off. I still polish it with a little plastic polish out of habit, but this really doesn't make it much better - how could it? The Renaissance wax is next to protect it from finger prints.

By the way, I have a 40x hand magnifier and also a magnetic base flexible arm light attached to my lathe ($12 at Harbor Freight) to let me see what I'm doing. I examine the finish after each step, particularly in the early steps. It's very easy to see if you've adequately flattened the surface or whether you've left any scratches that shouldn't be there. Sure beats finding these defects after you've run through the grits. Also works great to evaluate your sanding.

Dave
 
The bushings in question are an experiment. I cut up a plastic cutting board, drilled 1/4 inch holes in the pieces and turned then to the size of the metal bushings. The wood was turned to the metal bushings. then they were replaced with the plastic to keep the CA off the turning bushings.
Again, my thanks for all the honest responses. I hoped for and expected no less.
Charles
 
Well presented finishing case

I think most of what has been said covers your request.
I'd just like to add - really good photography - almost looks 3D and the blanks seem to be floating.
Gordon:cool:
 
Try finishing your blank between 60 degree centers. It makes for a clean fit to the pen parts. No more stuck bushings and no trimming with razor.
 
Back
Top Bottom