Tail stock align question

Signed-In Members Don't See This Ad

workinforwood

Member
Joined
Mar 1, 2007
Messages
8,173
Location
Eaton Rapids, Michigan, USA.
I spent 4 hrs fiddling with my collet chuck. After pulling it apart, facing pieces to match the head of the machine and re-assembly along with thousands of hammer tunks, I am pretty happy with the setting of the chuck. I do not know what the meter means, but the little arrow only moves 2 dashes, and that's better than I can get out of my jet mini at least. Probably not good enough for some of you, but oh well. The question now is how to align the tail stock to the chuck? I know the obvious part where I have to turn the screw :rolleyes:, but how will I know when the tailstock is in the center?
 
Signed-In Members Don't See This Ad

skiprat

Passed Away Mar 22, 2022
In Memoriam
Joined
Oct 19, 2006
Messages
7,812
Location
In a Skip in Wales
Jeff, there are some great video's on Utube on how to do this. I just googled Tailstock Alignment and got about ten video's.:biggrin:
 

workinforwood

Member
Joined
Mar 1, 2007
Messages
8,173
Location
Eaton Rapids, Michigan, USA.
A video won't work on my phone connection. I'm going to need a written explanation pretty please. I know it's close by just eyeballing a center installed in both ends and lining up the points, but I'd like to get it as dead on as I can. I don't care how many other things I have to get done, I want to make a pen on this thing! ..I've been walking past it for months now I think.
 

ed4copies

Local Chapter Manager
Joined
Mar 25, 2005
Messages
24,529
Location
Racine, WI, USA.
Skippy, being serious for just a moment: This would be a GREAT topic for a tutorial in the library.

IF you are going to make the effort to take pics, etc--think about contacting VisExp and get the presentation "canned" for future reference. EVERY lathe owner should have a method of checking the tailstock. So it is of universal interest.

Even if the pictures have a British accent, I think most of us will understand them!!!
 

skiprat

Passed Away Mar 22, 2022
In Memoriam
Joined
Oct 19, 2006
Messages
7,812
Location
In a Skip in Wales
Skippy, being serious for just a moment: This would be a GREAT topic for a tutorial in the library.

IF you are going to make the effort to take pics, etc--think about contacting VisExp and get the presentation "canned" for future reference. EVERY lathe owner should have a method of checking the tailstock. So it is of universal interest.

Even if the pictures have a British accent, I think most of us will understand them!!!

Ed, you know I don't have a problem posting pics or pictorials but these pics will be 'quickies' just to get the man going. I'll do some better ones and expand on other ways to do it as well, but not for a while ( maybe in the new year)

OK, 5 mins I'll have the pics up, but no complaints about my dirty lathe:rolleyes:
 

ed4copies

Local Chapter Manager
Joined
Mar 25, 2005
Messages
24,529
Location
Racine, WI, USA.
Not my place to try to "pressure" you. Just thought, after all you are one of the foremost metal lathe practicioners in the universe, but hey, we can wait!!
 

skiprat

Passed Away Mar 22, 2022
In Memoriam
Joined
Oct 19, 2006
Messages
7,812
Location
In a Skip in Wales
Quick huh??:biggrin:

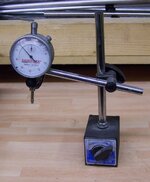
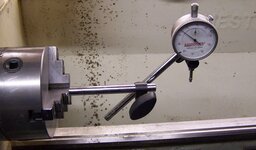
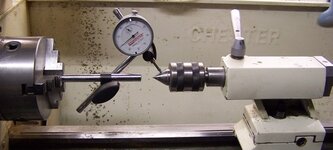
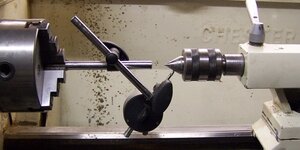
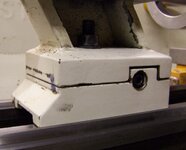
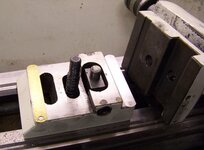
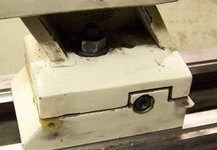
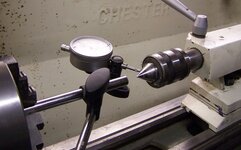
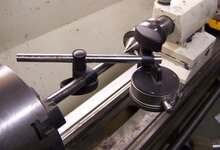
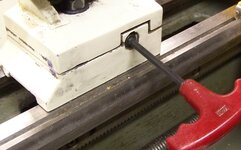
Jeff, the pics are numbered 1 to 10.


Take a dial indicator and remove the base
Unplug lathe!!!
Mount the indicator arm as in the pic, make sure the chuck can rotate 360 past the bed
You may find it easier to remove the tailstock completely and remount it on the other side of the carriage ( like I have )
Bring up the tailstock carefully till the centre ( or even a test rod in a chuck) is near the indicator. lock down TS. Wind the centre till it is below the indicator.
Adjust indicator so it rests on the 12 o'clock position of the centre
Set the indicator to Zero
Rotate the headstock chuck around till the indicator is at the 6 o'clock position.
Check the reading.
If it is zero then you are good
If not then you will need to split your TS base
Check the mating surfaces for cleanliness ( Remember that gunky grease that your lathe came covered in? ) Clean everything and put it all back and retest.
Still not perfect?
Take HALF the difference of the indicator error ( 12 to 6 ) and select shims ( feeler gauges ) and position them between the mating surfaces.
Re-assemble and retest.
Keep going till the 12 - 6 HEIGHT is good.

Now do the same from the 9 - 3 o'clock points.
Adjust the locking screws on the front and back of the tailstock till it's bang on.
If your TS doesn't already have one, then scribe a mark across these to parts for future quick set up. You will eventually use the TS off set to do long tapers and this is a quick way to get it back in line.

You can use any centre or chuck in the tailstock to do these set ups, but I prefer using the centre.

You can get a lot more 'in-depth' with setting up, but these should get you going for now.:wink:
 

Attachments

  • 1.jpg
    1.jpg
    72 KB · Views: 306
  • 2.jpg
    2.jpg
    62.5 KB · Views: 18,644
  • 3.jpg
    3.jpg
    52.5 KB · Views: 463
  • 4.jpg
    4.jpg
    55.9 KB · Views: 319
  • 5.jpg
    5.jpg
    57.1 KB · Views: 417
  • 6.jpg
    6.jpg
    72.9 KB · Views: 309
  • 7.jpg
    7.jpg
    63.8 KB · Views: 291
  • 8.jpg
    8.jpg
    66.9 KB · Views: 459
  • 9.jpg
    9.jpg
    70.4 KB · Views: 414
  • 10.jpg
    10.jpg
    68 KB · Views: 242

workinforwood

Member
Joined
Mar 1, 2007
Messages
8,173
Location
Eaton Rapids, Michigan, USA.
Damn...that looks like it could wind me into a few more hours of work that I didn't expect. Thank you Steve. I can't figure out how to get the dial indicator set to zero..I'm a doofuss? Those pictures make perfect sense. I'll take it apart and clean the inside. Seeing the pictures, now I understand, if I have to shim, I see how and why. I don't know what it means if the dial will move 2 spots..is that 2 thousands? there's a zero on the dial and then a 5 and then a 10 etc..and there are dashes inbetween the numbers, but there are more than 5 dashes between zero and 5 and my dial when put on my collet chuck moves 2 dashes. No matter what I do I can't get it to not move at all. Mind you, the Jet doesn't get results that good right out of the spindle and the collet chuck is being measured about 10 inches or more away from the end of the spindle. I'm going to make a pen off this thing if it kills me. Facing the spindle plate wasn't too difficult, although I quickly realised I better get my goggles and some gloves on..that metal turns like dust and it's a bit hot..must be cast iron.
 

skiprat

Passed Away Mar 22, 2022
In Memoriam
Joined
Oct 19, 2006
Messages
7,812
Location
In a Skip in Wales
Jeff, big golden rule about lathes, but especially metal lathes.

NO GLOVES while it's plugged in. Small cuts and scratches will heal, but you can't grow a new hand.

The outside of the dial indicator should have a bezel that can turn. It often has a little thumb nut to lock it in place.
Remember that the error is actually half of the difference.

If you have a set of feeler gauges then play a little.
Set up your indicator anywhere and adjust it so the tip is resting on something. Turn the dial bezel to zero. Now select a feeler gauge and insert it between the indicator tip and the item. Compare how much it moves to the thickness of the gauge. You will soon see the error of 2 clicks that you have is pretty good, but you will get it better with practice. Don't sweat it too much yet.

Setting up a tailstock shouldn't take more than about five minutes
You only have to set the height once ( by shimming it if needed )
The sideways adjustment can take a little longer to set as the adjustment screws are a bit course. I can never understand why they don't put a fine thread on these screws

EDIT; You probably have already realized that you will have to unlock the TS clamp screw to do the sideways adjustments, but you wouldn't be the first to try and adjust it while locked. Just remember to lock it each time you test.

Have fun:biggrin:
 
Last edited:

gawdelpus

Passed Away May 11, 2015
In Memoriam
Joined
Jan 10, 2009
Messages
183
Location
Gold coast AU
Damn...that looks like it could wind me into a few more hours of work that I didn't expect. Thank you Steve. I can't figure out how to get the dial indicator set to zero..I'm a doofuss? Those pictures make perfect sense. I'll take it apart and clean the inside. Seeing the pictures, now I understand, if I have to shim, I see how and why. I don't know what it means if the dial will move 2 spots..is that 2 thousands? there's a zero on the dial and then a 5 and then a 10 etc..and there are dashes inbetween the numbers, but there are more than 5 dashes between zero and 5 and my dial when put on my collet chuck moves 2 dashes. No matter what I do I can't get it to not move at all. Mind you, the Jet doesn't get results that good right out of the spindle and the collet chuck is being measured about 10 inches or more away from the end of the spindle. I'm going to make a pen off this thing if it kills me. Facing the spindle plate wasn't too difficult, although I quickly realised I better get my goggles and some gloves on..that metal turns like dust and it's a bit hot..must be cast iron.

Not sure what sort of "dial indicater" you have ,but normally they have a Knurled edge on the outside of the glass or plastic lens , this will actually turn with gentle pressure to allow you to "zero" .so you apply slight pressure on the pointer against you test piece ,then simply turn the outside knurled section to line up your zero pointer. If you turn your work till you get the highest reading and zero at that point you will get a minus reading as you turn the work . or in the case of a tailstock alignment as the indicater turns around the centre. If the cover will not turn check for a small locking screw that will stop it moving easily, good luck with it all :) cheers ~John
 

Texatdurango

Member
Joined
Apr 23, 2007
Messages
4,649
Location
Show Low, Arizona
Ed, you know I don't have a problem posting pics or pictorials but these pics will be 'quickies' just to get the man going. I'll do some better ones and expand on other ways to do it as well, but not for a while ( maybe in the new year)

OK, 5 mins I'll have the pics up, but no complaints about my dirty lathe :rolleyes:

Who are you kidding? Your lathe is cleaner than mine was after I spent the whole day cleaning it when I first uncrated it. And it's been downhill ever since!:biggrin:
 

skiprat

Passed Away Mar 22, 2022
In Memoriam
Joined
Oct 19, 2006
Messages
7,812
Location
In a Skip in Wales
Bruce, I'd never seen anything like those buttons before and at first glance I thought they were quite clever...but then I thought 'Where is the advantage?' as you still need to use a dial indicator to measure them? So why not measure the parts on your lathe rather than introduce another (potential) error?:confused:
 

gawdelpus

Passed Away May 11, 2015
In Memoriam
Joined
Jan 10, 2009
Messages
183
Location
Gold coast AU
Bruce, I'd never seen anything like those buttons before and at first glance I thought they were quite clever...but then I thought 'Where is the advantage?' as you still need to use a dial indicator to measure them? So why not measure the parts on your lathe rather than introduce another (potential) error?:confused:
Dial indicater not needed ,just measure in the centre of the 2 mating surfaces for the OD ,the size is a nominal .900 " if not the centres need to be adjusted till the size is correct :) cheers ~ John
 

workinforwood

Member
Joined
Mar 1, 2007
Messages
8,173
Location
Eaton Rapids, Michigan, USA.
That's all great stuff, thanks Steve and everyone. I think everything is pretty well tuned, so I have a piece of bar stock chucked and I'm ready to practice some of the threading techniques that Steve so generously taught. Uh Oh..I went to install my drill chuck, searched everywhere and I believe I forgot to buy one for this machine!!! :curse:

Off to Ebay...
 

bobindayton

Member
Joined
Apr 3, 2008
Messages
82
Location
Dayton, Ohio, USA.
Jeff
On the face of your indicator it should tell what the resolution is. Probably says .001. If it does each mark is .001" and my guess is that the total travel is 1"

Bob
 

Texatdurango

Member
Joined
Apr 23, 2007
Messages
4,649
Location
Show Low, Arizona
That's all great stuff, thanks Steve and everyone. I think everything is pretty well tuned, so I have a piece of bar stock chucked and I'm ready to practice some of the threading techniques that Steve so generously taught. Uh Oh..I went to install my drill chuck, searched everywhere and I believe I forgot to buy one for this machine!!! :curse:

Off to Ebay...

Jeff, what type of metal lathe do you have? If it has an mt2 tailstock then perhaps the chuck from your wood lathe would work.
 
Top Bottom