Still Struggling

Signed-In Members Don't See This Ad

JamesC

Member
Joined
Mar 12, 2022
Messages
94
Location
Dallas Texas
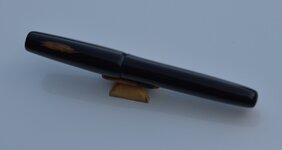
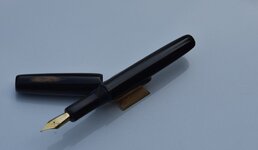
My most recent project was African Blackwood. The lumber is really pretty, very dark with a little brown. Hard to see unless you are in the sunshine. The cap has a little piece of the sapwood that I thought looked cool.
My problem is the cap when screwed on (M13 triple Start) will be a little off center unless the thread starts in the correct location. It's not much but really bothers me.
My process is to take the blank and turn them to 3/4" between centers. Live and dead centers are perfectly aligned at the headstock (wood Lathe). At this point I try and turn down close to the size I am after but the live center is now off center a little so the blank is not supported in the center. What is odd is the drill chuck mounted in the tailstock is dead on center.. I then center drill and then drill the appropriate size hole / holes for an insert.
I wonder if turning the blank between centers is creating a problem. All of my threading is done with a Niels sliding holder so I don't think its a threading issue. All of my issues seem to involve some don't think issue so I may be wrong.

Any suggestions, criticism is greatly appreciated.
Jim

DSC_0876 (2).jpg
DSC_0878 (2).jpg
DSC_0876 (2).jpgDSC_0878 (2).jpgDSC_0878 (2).jpgDSC_0876 (2).jpg
Any suggestions?
Still pretty new at this so sorry if I missed a previous discussion regarding this issue.
Jim
 
Signed-In Members Don't See This Ad

Valleyboy

Member
Joined
Jul 2, 2019
Messages
341
Location
Wales
My guess is that either the tenon on the barrel or the hole in the cap is off centre and that you are then putting the assembled pen between centres to shape it. That would at least explain why it looks ok in one of the three possible closed positions - namely the position it was in when you shaped it (you wouldn't see this issue if it was single threaded). Concentricity is really critical, especially the tenon-to-barrel-to hole inside barrel relationship. I am guessing a little here, but that would be one possible explanation.

Great effort all the same. Wooden pens are not easy!

Cheers
Ash
 
Last edited:

JamesC

Member
Joined
Mar 12, 2022
Messages
94
Location
Dallas Texas
My guess is that either the tenon on the barrel or the hole in the cap is off centre and that you are then putting the assembled pen between centres to shape it. That would at least explain why it looks ok in one of the three possible closed positions - namely the position it was in when you shaped it (you wouldn't see this issue if it was single threaded). Concentricity is really critical, especially the tenon-to-barrel-to hole inside barrel relationship. I am guessing a little here, but that would be one possible explanation.

Great effort all the same. Wooden pens are not easy!

Cheers
Ash
Thanks so much! I don't put the assembly between centers to shape, only to turn the blank round to fit the collette. I measured the body( best I can) the section fits perfectly the "lip" between the barrel is the same all the way around so either I cut the threads on the barrel tenon whacky or something got off in the cap. I suspect the cap is the problem. May scrap the cap and try again.
Just curious why wood is more difficult than resins?
Jim
 

Valleyboy

Member
Joined
Jul 2, 2019
Messages
341
Location
Wales
Ah ok, my assumption was a bit off 😊. I was trying to think why it looks ok in one position but not the other two. You could measure the wall thickness of the cap at different points to see if there is any difference (or eyeball it to see if it looks a bit off). Or if you have a pen that "works" try swapping caps to see whether the issue is with the cap or barrel before you scrap anything...

With regard to wooden pens - I tend to line mine and thread the lining (usually acrylic or cellulose). That's not to say you cant thread wood, I've seen it done very successfully, but the fact that its a natural substance can introduce small nuances that make it a little more tricky to take the very fine threads you're using compared to plastic which is fairly straightforward. I know the African Blackwood is pretty tight so one of the better candidates for threading.
Also you often need to coat the inside of the cap with lacquer or similar to prevent them from drying out.
Cheers
Ash
 

JamesC

Member
Joined
Mar 12, 2022
Messages
94
Location
Dallas Texas
Thanks Ash, I did line everything wit acrylic. Looking at it I think the acrylic may have twisted or separated just a little when threading. The insert was 14 mm and the thread of course 13mm. The triple start tap may put additional torque on the insert?
I'm shooting for a little under 16 mm diameter at the cap. Might make the insert a tad bigger?
Jim
 

Valleyboy

Member
Joined
Jul 2, 2019
Messages
341
Location
Wales
Ah right, I didn't realise you'd lined it.

Sometimes its possible to introduce a small discrepancy simply through the process of removing and re-mounting the blank on the lathe a couple of times (because you have to glue the insert in). Its easy to introduce a slight misalignment at some point and you end up turning/drilling/threading at a a different angle or slightly offset. It only has to be a tiny bit out of whack for it to be quite exaggerated in the finished pen.

Again I am guessing here but its going to be something like that I suspect.

The cap liner of 14mm sounds about right I would say. I tend to allow 1mm wall thickness for wood, so 16mm seems about right, but there is no real scientific reason for this. It just sounds right to me 😊.
 

JamesC

Member
Joined
Mar 12, 2022
Messages
94
Location
Dallas Texas
Thanks Ash, I did line everything wit acrylic. Looking at it I think the acrylic may have twisted or separated just a little when threading. The insert was 14 mm and the thread of course 13mm. The triple start tap may put additional torque on the insert?
I'm shooting for a little under 16 mm diameter at the cap. Might make the insert a tad bigger?
Jim
 

MedWoodWorx

Member
Joined
Nov 23, 2021
Messages
598
Location
Greece
My most recent project was African Blackwood. The lumber is really pretty, very dark with a little brown. Hard to see unless you are in the sunshine. The cap has a little piece of the sapwood that I thought looked cool.
My problem is the cap when screwed on (M13 triple Start) will be a little off center unless the thread starts in the correct location. It's not much but really bothers me.
My process is to take the blank and turn them to 3/4" between centers. Live and dead centers are perfectly aligned at the headstock (wood Lathe). At this point I try and turn down close to the size I am after but the live center is now off center a little so the blank is not supported in the center. What is odd is the drill chuck mounted in the tailstock is dead on center.. I then center drill and then drill the appropriate size hole / holes for an insert.
I wonder if turning the blank between centers is creating a problem. All of my threading is done with a Niels sliding holder so I don't think its a threading issue. All of my issues seem to involve some don't think issue so I may be wrong.

Any suggestions, criticism is greatly appreciated.
Jim

View attachment 336499View attachment 336500View attachment 336499View attachment 336500View attachment 336500View attachment 336499
Any suggestions?
Still pretty new at this so sorry if I missed a previous discussion regarding this issue.
Jim
This is a great looking pen, i understand your disappointment and search for perfection but nevertheless this looks amazing. Is that made entirely out of wood? Great job.
 

hamm3rhand

Member
Joined
May 15, 2021
Messages
4
Location
Mississippi
Thanks so much! I don't put the assembly between centers to shape, only to turn the blank round to fit the collette. I measured the body( best I can) the section fits perfectly the "lip" between the barrel is the same all the way around so either I cut the threads on the barrel tenon whacky or something got off in the cap. I suspect the cap is the problem. May scrap the cap and try again.
Just curious why wood is more difficult than resins?
Jim
i've had a lot of issues with this problem and for me its actually the body that is the issue not the cap! just don't want you to scrap the cap if its actually the body that is the issue.

Most people recommend turning the body cap threads and then drilling the body section threads so you have more support on the tenon for the cap threads, but I have to do it the other way around so that i can make sure they are concentric. It might not be an issue for people that use a machine lathe, but i also use a wood lathe and the little bit of flex that happens when starting the drill (even with a center drill) is usually enough to throw it off just enough to where it is noticeable at the very end. if I'm worried about the drilled out tenon cracking i'll use a threaded insert to help support, but its usually not an issue since there's usually enough wall thickness
 

PatrickR

Member
Joined
Apr 8, 2017
Messages
1,423
Location
Rural America
It is a very nice looking pen. I have ended up ruining a number of pens trying to fix these kind of issues but thats how you learn.
This is a tough one without seeing your work flow.
to ash's point, machinist wont move a piece unless absolutely necessary. To counter this I mark the blank and collet then try and put it back as close as possible.
when drilling watch for any amount of wobble in the bit. If it does your hole will be out of round. If you have a dial gauge check the runout of the dead center. Your live and dead center have been aligned using a shim between them to show that they are truly aligned?
 

JamesC

Member
Joined
Mar 12, 2022
Messages
94
Location
Dallas Texas
This is a great looking pen, i understand your disappointment and search for perfection but nevertheless this looks amazing. Is that made entirely out of wood? Great job.
It is all wood with the exception of the section which is Buffalo horn. The entire piece is sleeved with acrylic. I am very fond of the African Blackwood. You really have to look at it up close.
Thank you very much.
Jim
 

JamesC

Member
Joined
Mar 12, 2022
Messages
94
Location
Dallas Texas
i've had a lot of issues with this problem and for me its actually the body that is the issue not the cap! just don't want you to scrap the cap if its actually the body that is the issue.

Most people recommend turning the body cap threads and then drilling the body section threads so you have more support on the tenon for the cap threads, but I have to do it the other way around so that i can make sure they are concentric. It might not be an issue for people that use a machine lathe, but i also use a wood lathe and the little bit of flex that happens when starting the drill (even with a center drill) is usually enough to throw it off just enough to where it is noticeable at the very end. if I'm worried about the drilled out tenon cracking i'll use a threaded insert to help support, but its usually not an issue since there's usually enough wall thickness
I'm going to try drilling and tapping the body tenon prior to cutting the tenon threads as you suggest. Today I drilled a center in a 3/4 round piece of ebonite and tapped 13 mm triple start to see if the body was actually the problem. I can't really tell. So tomorrow I'll make an ebonite rod with a 13mm thread, screw it into the hole an then see if the cap is concentric. Not sure what I'll learn but will get more practice cutting threads, which by the way, in ebonite is amazing! 🥴
The other thing I learned today is removal and reinstall action of a blank into a collett chuck is not exactly repeatable. I'll start marking my blank, the collett and the collar so I get it a little closer. Thanks to Ash for pointing this out.
Thanks for the recommendation
Jim
 

JamesC

Member
Joined
Mar 12, 2022
Messages
94
Location
Dallas Texas
It is a very nice looking pen. I have ended up ruining a number of pens trying to fix these kind of issues but thats how you learn.
This is a tough one without seeing your work flow.
to ash's point, machinist wont move a piece unless absolutely necessary. To counter this I mark the blank and collet then try and put it back as close as possible.
when drilling watch for any amount of wobble in the bit. If it does your hole will be out of round. If you have a dial gauge check the runout of the dead center. Your live and dead center have been aligned using a shim between them to show that they are truly aligned?
Thanks Patrick, and by the way I got the ebonite you recommended yesterday. So like Ash suggested I'm marking my collett collar and blank. Live and dead center are aligned. I'm almost positive my hole is elliptical and not round. Just a tad. I think my center drill gets off just a fuzz from play in the drill chuck. I'm going to start with a tiny center drill and work up. I'm drilling at about 550 rpm in acrylic and the ebonite. Very slowly advancing the bid and cleaning swarf frequently.
Thanks so much for the help.
Also wondering if you drill and tap the body prior to cutting cap threads on the tenon?
Jim
 

PatrickR

Member
Joined
Apr 8, 2017
Messages
1,423
Location
Rural America
Thanks Patrick, and by the way I got the ebonite you recommended yesterday. So like Ash suggested I'm marking my collett collar and blank. Live and dead center are aligned. I'm almost positive my hole is elliptical and not round. Just a tad. I think my center drill gets off just a fuzz from play in the drill chuck. I'm going to start with a tiny center drill and work up. I'm drilling at about 550 rpm in acrylic and the ebonite. Very slowly advancing the bid and cleaning swarf frequently.
Thanks so much for the help.
Also wondering if you drill and tap the body prior to cutting cap threads on the tenon?
Jim
i think you will like working with the ebonite.
i tbc then mount in a collet, cut and polish the tenon, thread and then drill and tap. the remainder of the work is done on a mandrel.
if you aren't using a spotting bit first when drilling (not a counter sink bit) think about getting one. I find it the best way. Get a 1/2" - 90*, you wont need any other sizes.
 

JamesC

Member
Joined
Mar 12, 2022
Messages
94
Location
Dallas Texas
i think you will like working with the ebonite.
i tbc then mount in a collet, cut and polish the tenon, thread and then drill and tap. the remainder of the work is done on a mandrel.
if you aren't using a spotting bit first when drilling (not a counter sink bit) think about getting one. I find it the best way. Get a 1/2" - 90*, you wont need any other sizes.
Thank you
I currently cut polish and thread the tenon but it has been suggested that I try and drill and tap first. Going to give it a try. I have a 3/8 spotting bit but never tried it..not sure why.
I agree with others that threading,
#1 Ebonite
#2 Alumilite
#3 Acrylic Acetate.
Thanks for the help.
Jim
 

duncsuss

Member
Joined
Jun 29, 2012
Messages
2,151
Location
Wilmington, MA
I currently cut polish and thread the tenon but it has been suggested that I try and drill and tap first. Going to give it a try.
Jim - try making a "threaded washer" from a piece of scrap (or material bought specifically for making mandrels/holders - I use Delrin).

My steps to make any piece which is threaded on the outside and drilled on the inside (whether tapped or not) are -

* turn the tenon to 0.1mm under the major diameter of the threads
* chamfer the end of the tenon
* polish the tenon
* cut the threads on the tenon
* screw the washer onto the tenon threads
* spot the center with the tip of a skew
* drill the piece
* if the interior is to be threaded also, chamfer the inner lip, then tap the threads

The threaded washer on the outside provides strength to resist the outward forces of drilling & tapping the inside.
 

JamesC

Member
Joined
Mar 12, 2022
Messages
94
Location
Dallas Texas
Jim - try making a "threaded washer" from a piece of scrap (or material bought specifically for making mandrels/holders - I use Delrin).

My steps to make any piece which is threaded on the outside and drilled on the inside (whether tapped or not) are -

* turn the tenon to 0.1mm under the major diameter of the threads
* chamfer the end of the tenon
* polish the tenon
* cut the threads on the tenon
* screw the washer onto the tenon threads
* spot the center with the tip of a skew
* drill the piece
* if the interior is to be threaded also, chamfer the inner lip, then tap the threads

The threaded washer on the outside provides strength to resist the outward forces of drilling & tapping the inside.
Thank you Duncan.
When you spot the center with a skew are you able to hit that spot exactly with a center drill ? I'm seeing just a little runout. Or I may not be drilling exactly down the center line into the blank if that makes sense. I'm trying to say if I enter the bit at the center I may be exiting off center. (Wood lathe). I'm thinking my tailstock might need some work. But you would think the #2 taper would keep the bit in alignment.
Jim
 

duncsuss

Member
Joined
Jun 29, 2012
Messages
2,151
Location
Wilmington, MA
Thank you Duncan.
When you spot the center with a skew are you able to hit that spot exactly with a center drill ? I'm seeing just a little runout. Or I may not be drilling exactly down the center line into the blank if that makes sense. I'm trying to say if I enter the bit at the center I may be exiting off center. (Wood lathe). I'm thinking my tailstock might need some work. But you would think the #2 taper would keep the bit in alignment.
Jim
I don't use a center drill after creating the center dimple with the skew - it seems redundant to me.

Do you have a transfer punch? (Or any metal rod, doesn't have to be a punch.) Mount it in your drill chuck as if it were a drill bit, move the tailstock into position as if you were about to drill into a pen blank.

Now grab the rod and see how tight your tailstock is clamped to the lathe ways, and how tight the quill is in your tailstock, and how tight the MT2 taper is in the quill, and how tight the chuck head is on the MT2/(JT33?) mandrel.

If you can move the rod, there's some slop which could be the cause of your troubles.

Knock the drill chuck out of the tailstock and mount it in the headstock. Set the lathe turning as slow as it will go, and touch your finger to the side of the rod, as far out from the chuck as you can get.

Do you feel vibration? That would imply either there's something wrong with the chuck mandrel/tapers (the axis isn't straight) or the jaws of the chuck are not gripping the rod properly aligned on center.

If all these tests say there's nothing wrong with your set up when everything is clamped tight - it suggests that you are loosening the quill too much when you are drilling. It should not be too easy to crank the drill bit into the pen blank - a little resistance means that the quill is held firmly against the side of the bore it travels in.
 

JamesC

Member
Joined
Mar 12, 2022
Messages
94
Location
Dallas Texas
I don't use a center drill after creating the center dimple with the skew - it seems redundant to me.

Do you have a transfer punch? (Or any metal rod, doesn't have to be a punch.) Mount it in your drill chuck as if it were a drill bit, move the tailstock into position as if you were about to drill into a pen blank.

Now grab the rod and see how tight your tailstock is clamped to the lathe ways, and how tight the quill is in your tailstock, and how tight the MT2 taper is in the quill, and how tight the chuck head is on the MT2/(JT33?) mandrel.

If you can move the rod, there's some slop which could be the cause of your troubles.

Knock the drill chuck out of the tailstock and mount it in the headstock. Set the lathe turning as slow as it will go, and touch your finger to the side of the rod, as far out from the chuck as you can get.

Do you feel vibration? That would imply either there's something wrong with the chuck mandrel/tapers (the axis isn't straight) or the jaws of the chuck are not gripping the rod properly aligned on center.

If all these tests say there's nothing wrong with your set up when everything is clamped tight - it suggests that you are loosening the quill too much when you are drilling. It should not be too easy to crank the drill bit into the pen blank - a little resistance means that the quill is held firmly against the side of the bore it travels in.
Thanks for the help. Everything seems to be fine. My problem is I'm loosening the quill clamp too much I believe. There is enough play in the drill chuck assembly to get a lot of run out. Probably the issue I have been dealing with. I have a lot of play in my quill. If I get it tight enough to eliminate the play it's very hard to extend the quill. I also have a lot of play in the tailstock on the ways. Enough that I can move the tailstock to find the center of a blank with bit chucked. My other problem is probably not REALLY clamping the tailstock down tight. I good firm push is not enough. I'll take all of this apart and clean and lube.
Thanks so much.
Jim
 
Top Bottom