
firewhatfire
Member
Having done several different types of segments and getting slot of questions about glue and sizes of pieces I have used. So I decided to take a few photos so I could explain it. This is the pen of the day.


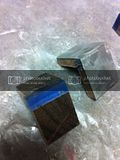
After choosing you material for your pen. I chose rosewood, blue acrylic and aluminum. As I had didn't really have any measurements to start with I chose to do what I always do.(guess at it). I knew the inside pieces and the the outside needed to be the same size. I set my bandsaw and started cutting pieces of both materials. I sized them just to see what they were afterwards. I managed 4 strips out of a single blank of the blue acrylic. After getting those and the rosewood all cut to the same width they were cut down to size for gluing.
 [URL=http://s50.photobucket.com/albums/f312/firewhatfire/pen/?action=view¤t=EBE0E5C3-48A9-4C12-A1F1-DCF22900BD34-42123-0000444566752441.jpg]
 [/URL]
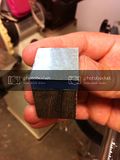
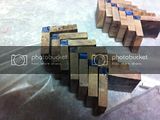
Start by sanding the pieces(i do it by hand on paper glued to a pice of glass) then gluing a piece of the rosewood and acrylic together with thick CA glue. The glue a 2nd piece of wood at a 90 degree angle. A note of caution with the glue here. Don't fill up the inside of the elbow. I use a belt sander to remove excess glue and make sure the outside is square.
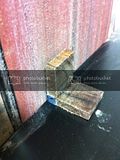
After making sure my surface is glue free and ready to proceed I take a sheet of aluminum and sand the whole sheet before cutting it. I get my aluminum from lowes in a pack of 100 sheets of 5x7 inch squares. I then cut strips and then smaller pieces to fit the piece. I glue the first piece then have to sand it to make sure it's square. Then repeat on the other side. Now that one is done repeat the process until you enough to glue up for a pen blank.

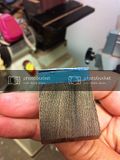
Now if I think I am going to have trouble drilling the blank I will take and sand the corners off on the belt or disk sander. I will mark my centers and use a starter bit and turn it round. After I have the blank round I take it off the lathe and wrap it in cheese cloth then drizzle with thin CA glue before drilling(don't know if it helps but it is what I do). Drill short spurts and stop often. Don't overheat drill bits.
This isn't the only way. It is how I figured out to do it. Comments and critiques are welcome and thanks for taking the time to look.


After choosing you material for your pen. I chose rosewood, blue acrylic and aluminum. As I had didn't really have any measurements to start with I chose to do what I always do.(guess at it). I knew the inside pieces and the the outside needed to be the same size. I set my bandsaw and started cutting pieces of both materials. I sized them just to see what they were afterwards. I managed 4 strips out of a single blank of the blue acrylic. After getting those and the rosewood all cut to the same width they were cut down to size for gluing.
 [URL=http://s50.photobucket.com/albums/f312/firewhatfire/pen/?action=view¤t=EBE0E5C3-48A9-4C12-A1F1-DCF22900BD34-42123-0000444566752441.jpg]
Start by sanding the pieces(i do it by hand on paper glued to a pice of glass) then gluing a piece of the rosewood and acrylic together with thick CA glue. The glue a 2nd piece of wood at a 90 degree angle. A note of caution with the glue here. Don't fill up the inside of the elbow. I use a belt sander to remove excess glue and make sure the outside is square.


After making sure my surface is glue free and ready to proceed I take a sheet of aluminum and sand the whole sheet before cutting it. I get my aluminum from lowes in a pack of 100 sheets of 5x7 inch squares. I then cut strips and then smaller pieces to fit the piece. I glue the first piece then have to sand it to make sure it's square. Then repeat on the other side. Now that one is done repeat the process until you enough to glue up for a pen blank.


Now if I think I am going to have trouble drilling the blank I will take and sand the corners off on the belt or disk sander. I will mark my centers and use a starter bit and turn it round. After I have the blank round I take it off the lathe and wrap it in cheese cloth then drizzle with thin CA glue before drilling(don't know if it helps but it is what I do). Drill short spurts and stop often. Don't overheat drill bits.
This isn't the only way. It is how I figured out to do it. Comments and critiques are welcome and thanks for taking the time to look.
