Secret compartment key ring upgrade

Signed-In Members Don't See This Ad

thewishman

Member
Joined
Mar 9, 2006
Messages
8,223
Location
Reynoldsburg, Ohio, USA.
I've been making these for a couple of months and tell people that they can roll up a $100 bill and hide it away. The trouble is, the bottom of the bill gets hung up on the pressed in cap. That makes it hard to work the bill in and it is frustrating.
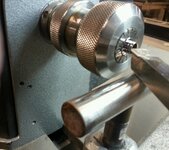
rps20150630_213710_557.jpg

I put the bottom cap into a 13-14mm collet and turn the lathe on reverse. I taper the inside of the cap to get rid of the hard, straight edge. The cutting is done to the far side, inside. (I could do it with the lathe in forward cutting the near inside, but then I couldn't see what I'm doing.)

The process takes just a few seconds and you can do a bunch in a few minutes.
 
Signed-In Members Don't See This Ad
Thanks for passing on this "trick". Which vendor's key ring are you working with ? Do you actually make a false bottom for the compartment ?
 
Thats cool... Hmmm.. I'm not sure I have the right sized collet.. and I have no reverse so I'll have to do this from the back side of the lathe, but its a GREAT idea!!!

Thanks!!! I've sold more of these key rings a money holders than any other use.
 
Good tip.

I tell people they can put a $100 bill inside, but it doesn't come with one. However, for a little more I will supply the $100 bill.
Usually they ask how much more and I say $105, then explain that I need to have a little mark-up to make any profit. Nobody has bought one with the $100 bill included yet.
 
I sell a few of these for keep money in as well but it was always a struggle to get it back out. I'll give your tip a try.

The strangest use for one of these came from a woman who was going to use it to carry some of her deceased husband's ashes with her.
 
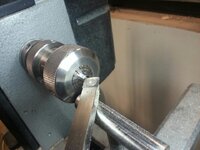
Okay, an upgrade to the upgrade. I decided that since beveling the bottom insert was a good idea, why not do the top, too. Because the threaded insert is more problematic to grip, I left it screwed into the cap. Of course when I started working on the cap with the lathe in reverse the insert unscrewed itself and bounced onto the floor.

rps20150718_154805_281.jpg

Easy fix. Move the tool rest and put the lathe back in forward and turn from the inside out towards me. Worked like a charm, 15 kits modified in about 10 minutes (there are size variations in the hardware, so I did the smaller ones first and then the bigger pieces.

One word of caution, after beveling the tubes, do not try to brush off any chips with your thumb as the piece is still rotating on the lathe. I now have a nice semi-circular cut that is altering my thumbprint.:eek:
 
Wow! Thanks for sharing this wonderful trick! Never would have thought that this will make the job a lot easier! Please share more if you have more :)
 
Might also be a great idea to pass this on to PSI and see if they will alter the specs for their secret compartment keychains?
 
Back
Top Bottom