creativewriting
Member
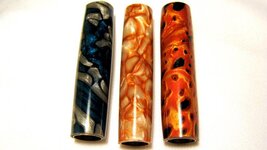
The second seamless tube option is a basic mokume technique. If you are not familiar with mokume there are numerous websites that explain the process in great detail. In the spirit simplicity I will be brief in my description.
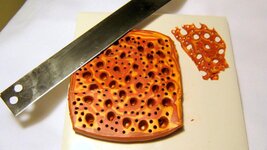
Using whatever color combination you choose roll the clay into thin sheets (a pasta machine makes this simple). Alternating the colors stack the clay layers. Using a small rolling pin, water glass, or acrylic rod compress the stack. Cut the clay into quarters and restack. Repeat as necessary.
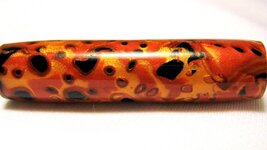
Next I used different sized tools to make holes in the clay stack. You can fill the holes with another color or leave them open. Once I got the design I wanted I wrapped a tube with a thin layer of black clay. Next using a tissue blade I cut thin slices of the layered stack and wrapped them around the covered tube. Roll the tube on a flat surface to smooth the layers together, bake, and turn to size. I finished with CA and buffed.
I am not a big fan of the colors I used, but the technique works to eliminate seams. The color and design choices are unlimited once you get a better feel for building the stacks.
Good Luck!
For those that missed the first and wondering why this is number 2 here is the link http://www.penturners.org/forum/showthread.php?t=56195
Using whatever color combination you choose roll the clay into thin sheets (a pasta machine makes this simple). Alternating the colors stack the clay layers. Using a small rolling pin, water glass, or acrylic rod compress the stack. Cut the clay into quarters and restack. Repeat as necessary.
Next I used different sized tools to make holes in the clay stack. You can fill the holes with another color or leave them open. Once I got the design I wanted I wrapped a tube with a thin layer of black clay. Next using a tissue blade I cut thin slices of the layered stack and wrapped them around the covered tube. Roll the tube on a flat surface to smooth the layers together, bake, and turn to size. I finished with CA and buffed.
I am not a big fan of the colors I used, but the technique works to eliminate seams. The color and design choices are unlimited once you get a better feel for building the stacks.
Good Luck!
For those that missed the first and wondering why this is number 2 here is the link http://www.penturners.org/forum/showthread.php?t=56195