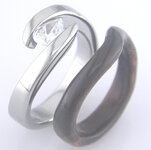
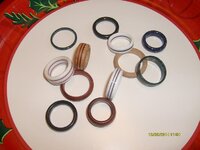
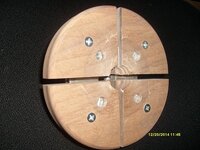
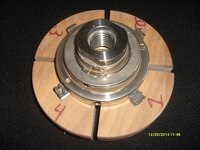
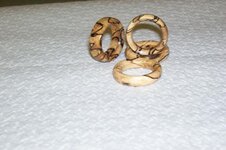
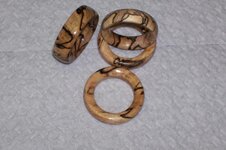
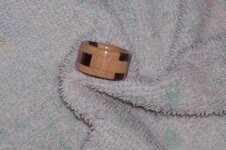
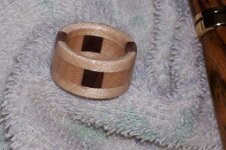
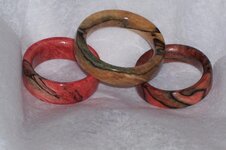
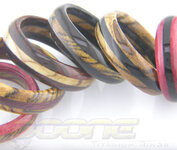
RING MAKING

Signed-In Members Don't See This Ad
I don't know if you picked up on it or not but the guy finished the inside, parted it off, then slid it on a tenon on the waste block. It's just pressure fit into place. I've done one before just playing around and there's an art to it for sure.
 
I haven't done rings, but I have done a few centerbands by making some bushings with very narrow tenons and just mounting on a pen mandrel. Works for me.
 
That link is a wealth of knowledge for making rings . He uses a jam chuck to hold the parted ring for finishing , pictures 9 and 10 on the second page . This is the only way I know of to this . I guess you could use the step jaws on your chuck .
That is a great idea Bruce , I never would have thought of that .
 
Last edited:
I do mine from a solid block glued up from 3 pieces, and turn the outside first, followed by the inside and part it off. I use an expanding aluminum mandrel to grip on the ring to finish the inner corner for side 2. A tapered scrap of wood can work well there too.
 

Attachments

  • woodrings.jpg
    woodrings.jpg
    71 KB · Views: 455
I do mine from a solid block glued up from 3 pieces, and turn the outside first, followed by the inside and part it off. I use an expanding aluminum mandrel to grip on the ring to finish the inner corner for side 2. A tapered scrap of wood can work well there too.

I've always been curious how you make the ones with the inlaid wood:confused: Don't answer if you don't want to give out any trade secrets:tongue::wink:
 
I do mine from a solid block glued up from 3 pieces, and turn the outside first, followed by the inside and part it off. I use an expanding aluminum mandrel to grip on the ring to finish the inner corner for side 2. A tapered scrap of wood can work well there too.

Bruce, those are amazing rings. When I get time after Christmas I'll have to give that a try. I doubt if they'll be as nice as yours. At least not at first ; )
 
I do mine from a solid block glued up from 3 pieces, and turn the outside first, followed by the inside and part it off. I use an expanding aluminum mandrel to grip on the ring to finish the inner corner for side 2. A tapered scrap of wood can work well there too.

Dang man, what do you finish those with?
 
I do a CA finish. I sand them with a drywall sponge, maybe 220 grit then a fine yellow sanding sponge, probably around 320 grit and polish from there. When I sand, I don't spin them on the lathe. I sand at a 45 degree angle, and that does a better job of smoothing the surface. The metal rings with the inlay are done by a proprietary method that I came up with. I'll keep those a secret.
 
Bruce,

I am certainly NOT trying to tell you how to do YOUR business.

Have you TRIED buffing? Seems like it would be faster and the results on a Beall type system ARE amazing.

Just a thought.
 
Hi Ed,
I've tried different ways. I do buff at the end with my 3/4hp 3500 rpm buffer. It goes pretty quick and I need to be careful not to burn through. I don't sell that all many of them, which is a good thing because they take a lot longer than the titanium ones with all the setup and gluing and finishing, and they sell for less money than the other things I do in the same amount of time. I need to compensate the ring size numbers for the finish and need to be sure they are dead on size when I'm done. There's a very specific way I need to do them in order to ensure the laminations are dead center. The hand sanding part only takes about a minute or so, and I find that does a better job than sanding on the lathe, which leaves lines, so I would need to use finer grits. It only takes a few swipes with the right grit sanding sponge to be sure ther are no bumps or imperfections in the finish.

Every once in a while I'll have a whole wedding party get them, like in this case, where the groom's last name was Wood.
 
"Every once in a while I'll have a whole wedding party get them, like in this case, where the groom's last name was Wood."

Sure, Bruce.

I suppose his first name was "big" or "hard" and the bride to be was "Strokin"???

(I kinda figured you HAD thought of that, but ya never know!!)
 
Here's one I did today. The wood ring is a companion ring to my Sculpted Pear ring and is made in Koa. It is a bit lighter in person. The two rings nest nicely on a finger.
 

Attachments

  • pearandwood.jpg
    pearandwood.jpg
    33.5 KB · Views: 250
It's beautiful work, Bruce.

Why would they want wood for a wedding band and metal for the engagement ring?

Does wood not like holding stones?? (Just a guess)
 
The Sculpted Pear is the main show on her finger. The wood is just along for the ride. I wouldn't trust wood to hold a diamond. It's not stable enough for that.
 
Just don't let your wife look at his web site----Bruce makes some of the most awesome rings on the market.
Oh ----Bruce what to I use to polish the wifes ring--after two years it needs polished???
 
Gary, the best thing for polishing a ring is a polishing compound made for stainless. I use a white waxy compound on my buffing wheel, but lots of other fine abrasives or polishes could work, like car wax, simichrome polish, Zam, Blue Away, and others. Some toothpasts might even do OK. The trick is to get out any fine scratches with 400 grit or so paper before polishing. I wet sand with WD-40 and that works pretty good. I also have a lifetime refinishing policy, so if you want me to do it, just send it to me.
 
Well before the ice storm hit and torn down all the lines I was busy learning ring making. Now that I froze my tail off helping get the lights back on I have some time to post my pics. Thankfully we were released from work CHRISTmas eve morning after working 16 days straight 8 of which were 16 hour days with 8 hours off from the time you check out til the time you check back in. When I would come home everyone was sleeping and when I woke up they were still asleep. That is hard on the body and spirit.

It took me quite a while to build the jaws for the chuck and mounting them to the woodcraft pinnacle chuck was fun. I think when I find some money I will invest in a better quality chuck, one with zero slop. The cuttin board is for my mother in law. It fits in a space right under her counter which when needed is pulled out.

MERRY CHRISTmas.
 

Attachments

  • S7300619.JPG
    S7300619.JPG
    80.6 KB · Views: 207
  • S7300620.JPG
    S7300620.JPG
    78.4 KB · Views: 319
  • S7300621.JPG
    S7300621.JPG
    82 KB · Views: 288
  • S7300622.JPG
    S7300622.JPG
    73.2 KB · Views: 269
Back
Top Bottom