Poor result from first stabilized blank

Signed-In Members Don't See This Ad

frankonthetis

Member
Joined
Feb 13, 2018
Messages
27
Location
Thetis Island, B.C., Canada
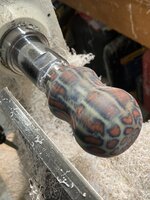
Made my first batch of 8 stabilized blanks from spalted Cascara, Dogwood & Big Leaf Maple Sept 5. These blanks were cut to size in 2017 and stored indoors. Baked for approx. 5 hours at 220F then into Cactus Juice vacuum setup for 10 hours, some tiny bubbles still evident, vacuum released then soaked for another 36 hours. Baked finished blanks in toaster oven for 4 hours at 220F and there was crystallized juice on blanks and drip pan where they sat on the oven rack, no wet spots. Overall weight of individual blanks had increased anywhere from 40 to 60% after process.

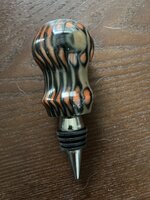
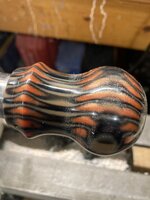
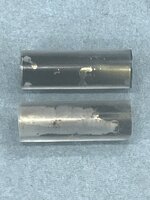
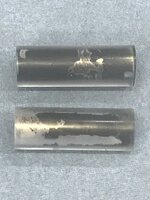
Yesterday, sized one Cascara blank for a Groove Click pen, drilled 7mm holes then glued tubes in with thick CA glue. Noticed when drilling that it was a very fine dust/sawdust that was produced by the bit. Non-stabilized blanks produce either chips or curls when being drilled out.

Today turned the blank to size with a roughing gouge then skew. Both tools also produced this dust like output that clung to them similar to how the acrylic blank shavings stick. A small chunk of wood broke off at the nib end but it was just proud of the bushings. When doing the final sizing for middle section of the clip end at the middle bushings that area just disintegrated to expose the barrel. That was very disappointing as same thing happens to me with spalted wood that has no stabilizing.

Questions are;
1. is this fine dust output when drilling or shaping normal? 2. any obvious errors in my preparations/procedures? 3. should the stabilized blanks be left for x time before use?

Thanks in advance for any suggestions, critiques or hints. Invested heavily in the stabilizing system so would really like to make it work.

Frank
 
Signed-In Members Don't See This Ad

1080Wayne

Member
Joined
Feb 5, 2006
Messages
3,344
Location
Brownfield, Alberta, Canada.
The dust is what you should get with stabilized wood . Don`t see any major problems with your technique . Was the blank still fully covered by the juice after the 36 hours ? If not , it probably didn`t have enough juice in it at the top end , which may have ended up as the nib end .

Did you weigh the blanks several times during the drying process to confirm that they were indeed dry and not continuing to lose weight with time ?
 

KateHarrow

Member
Joined
Jul 2, 2021
Messages
280
Location
Los Angeles, CA
Just real quick on your technique: Don's correct above, you need to be drying the wood longer. 24 hours is the minimum at 220 degrees. In addition to that, your curing temperature is too hot, as Cactus Juice's curing temp is 190-200 degrees which is why you had so much CJ on the surface of the blanks and in the drip pan.

What speed are you drilling/turning at? I do not experience what you're dealing with when drilling or turning stabilized blanks of any species
 

Gary Beasley

Member
Joined
Sep 18, 2009
Messages
1,326
Location
Marietta, Ga. USA
I suspect that glue gapping played a role in the disintegration of your blank. I check the tube contact at the ends of the blank and If I see any sign of gap I do my best to wick some thin CA into the gap. Ive never had one fail after this.
 

frankonthetis

Member
Joined
Feb 13, 2018
Messages
27
Location
Thetis Island, B.C., Canada
Thanks for all your responses.
1080Wayne yes the blanks were covered with cactus juice when the vacuum was released and topped up another inch. No, never weighed those blanks was just too anxious to get started. New procedure now is to weigh blanks together when starting, during and after stabilizing.
Don, doing the initial drying over 2 days, 12 hrs per, weight taken when stopping first day then before starting 2nd. Double bagging with ziplock and sealing them. Should I go another hour or so and weigh them again after 2nd 12 hr stint?
Kate, thanks for that reminder, will drop the baking temp to 190-200, it was around 220+ on those blanks. Have an old Delta Triple Duty 14" DP speed set at lowest available 680rpm. Have a GI 17" that can go lower. What speed do you recommend?
Another drilling failure just now, blew out 1 section of 2 1/16" spalted dogwood blank, bit got too hot, little smoke then bang, split into 3 pieces!!
Gary, did have a gap around the blank from initial bit entrance into blank. Made centre hole with punch before starting and still some deflection, twist bit. Filled it with coloured medium CA but have thin and extra thin on hand.
 

MRDucks2

Member
Joined
Jul 17, 2017
Messages
3,227
Location
Bristow, IN
If I recall correctly curing to hot will cause the exterior to cure before the interior gets to the proper temperature. The important part is getting the entire blank up to temperature evenly. It would seem this could cause some issues.
 

1080Wayne

Member
Joined
Feb 5, 2006
Messages
3,344
Location
Brownfield, Alberta, Canada.
Drying time is not important , having the piece dry , is . From reading this forum , I`ve gathered that toaster ovens have poor temperature regulation . I use my regular kitchen stove oven for both drying and curing , so it is easy to control temperature within 5 degrees of target . When the blank hasn`t changed weight in an hour , it is dry .

Some negotiations with your spouse might be required if you use it for curing , as the odour is distinctive and unpleasant to some .

Gary`s point about not having a gap around the top of the tube is very important .

Re drilling : Are you drilling all of the way through the blank ? It is generally good practice on sensitive blanks to cut it long enough that you can stop drilling short of the end , and then saw or grind off the undrilled part . Sharp drill bits are also important .
 

frankonthetis

Member
Joined
Feb 13, 2018
Messages
27
Location
Thetis Island, B.C., Canada
MRDucks2 Hopefully the next bunch to be baked at the 190-200F will get even heat distribution throughout after 4 hours.

1080Wayne Negotiating use of the kitchen stove is a no go, been there tried that, unsuccessful!!. The little temp gauge placed in the toaster oven seems to give decent heat readings. Will do more weight checking during baking process. Am drilling right through the blanks so will try leaving blanks longer and saw/disc sand off the excess. Have ordered some Norseman twist bits so hoping they are better than current twist & brad points being used.
 

1080Wayne

Member
Joined
Feb 5, 2006
Messages
3,344
Location
Brownfield, Alberta, Canada.
Neglected to mention that it is also important to raise the drill bit every 1/4 inch or so , to clear most of the cuttings out of the hole . They will rapidly cause overheating of the bit and the blank if you don`t . Take your time with drilling . Don`t force it . There are various ways of cooling the drill bit . I just drill with water in the hole - a bit messy , but it works .
 

jrista

Member
Joined
Aug 12, 2021
Messages
2,241
Location
Colorado
The boiling point of water is 212º F (100º C)...hence the reason you want to cook at ~200º F, its just about the boiling point and will actually cook off the water and dry the blank at a reasonable rate without damaging the wood.
 

BULLWINKLE

Member
Joined
Nov 8, 2010
Messages
652
Location
Georgia
MRDucks2 Hopefully the next bunch to be baked at the 190-200F will get even heat distribution throughout after 4 hours.

1080Wayne Negotiating use of the kitchen stove is a no go, been there tried that, unsuccessful!!. The little temp gauge placed in the toaster oven seems to give decent heat readings. Will do more weight checking during baking process. Am drilling right through the blanks so will try leaving blanks longer and saw/disc sand off the excess. Have ordered some Norseman twist bits so hoping they are better than current twist & brad points being used.
Frank, I have turned many stabilized blanks although I've never stabilized any myself.
A few things that I've learned. While stabilizing wood impregnates the wood with resin, it doesn't fill any voids the blank may have within it. I've had better results with carbide chisels than traditional ones. I'd still occasionally get a few blowouts.
Recently, at a friend's suggestion, I purchased a negative rake carbide. Works great with almost no blowouts, but takes longer to turn due to the slightly downward curve of the cutting edge. If you have the extra time to turn the blank, I'd highly recommend you try one. Works great on stabilized wood, hard woods and acrylic blanks. Here's a bottle stopper I've turned in acrylic.
 

Attachments

  • 340FB307-4070-442F-A1BF-0E46085062F8.jpeg
    340FB307-4070-442F-A1BF-0E46085062F8.jpeg
    298.1 KB · Views: 71
  • BE02197F-64B8-4249-8588-11BA2CD86909.jpeg
    BE02197F-64B8-4249-8588-11BA2CD86909.jpeg
    341.4 KB · Views: 63
  • 77B61D08-B482-4E3B-8EDE-F4941BF6171A.jpeg
    77B61D08-B482-4E3B-8EDE-F4941BF6171A.jpeg
    288.5 KB · Views: 61

frankonthetis

Member
Joined
Feb 13, 2018
Messages
27
Location
Thetis Island, B.C., Canada
1080Wayne, am drilling slowly and withdrawing to remove chips etc. Many times when completely withdrawing the bit and re-entering, the bit seems to deflect at the point of entry and hole becomes wider than it started out. Think it was this forum that mentioned the Norseman twist bits were high quality and less likely to heat up.

Thanks jrista, gleaning information here about this stabilizing process and tricks has been a sharp learning curve. Lots of notes made.

Bullwinkle great looking bottle stoppers. Had noticed no cracks in the first Cascara blank and was surprised when that piece broke off. Have read and watched numerous videos and have 2 part epoxy on hand to start casting the many lovely arbutus/madrona burl blanks with voids in them. Those blanks still have high MC but going to try drying in toaster oven then stabilizing and casting in a 4 slot mould. Glad my collection of power tools were on hand as this pen turning hobby has now gotten expensive!!

Thanks again all for your help.
 

BULLWINKLE

Member
Joined
Nov 8, 2010
Messages
652
Location
Georgia
As far as drill bits widening and I've had issues with drill starting in center of blank and exiting off center, I found a solution. I was drilling on drill press. I was advised by a employee at Woodcraft to drill them on the lathe. You need a chuck for the headstock ($95) and a drill chuck for the tailstock. Tailstock chuck can't be live center. Chuck blank in headstock, drill bit in tailstock. Slide tailstock towards headstock with lathe on. Not only is drill hole perfectly sized, but it exits blank in the center. Don't ask me why it works way better because I have no idea. But it does a much better job than the drill press.
Penn State makes the blank chuck, but it was a few dollars cheaper at Woodcraft. Hope this helps.
 

RNelson

Member
Joined
Jan 26, 2011
Messages
12
Location
Wisconsin
I agree with many of you that questioned the adhesion of the tube to the blank. If your blank blows up while turning & you see the brass tube, there is a good chance there was no glue in that area. Here are 2 photo of the same blanks just rotated 180 degrees. The top blank in each photo is the same blank. The bottom blank in each photo is the same blank. The bottom blank was glued by putting glue on the brass tube & working it back & forth as the tube is slid in the blank from right to left. The upper blank was done by putting glue both inside the blank & on the tube, working from right to left. Black glue was used for a visual reference. The blanks are clear resin. Although I thought there was going to be a difference, I didn't think it was going to be this much. This surprised me.
 

Attachments

  • Glue distribution.jpg
    Glue distribution.jpg
    194.2 KB · Views: 60
  • Glue distribution #2.jpg
    Glue distribution #2.jpg
    190.4 KB · Views: 59

KenB259

Member
Joined
Dec 24, 2017
Messages
3,576
Location
Michigan
I agree with many of you that questioned the adhesion of the tube to the blank. If your blank blows up while turning & you see the brass tube, there is a good chance there was no glue in that area. Here are 2 photo of the same blanks just rotated 180 degrees. The top blank in each photo is the same blank. The bottom blank in each photo is the same blank. The bottom blank was glued by putting glue on the brass tube & working it back & forth as the tube is slid in the blank from right to left. The upper blank was done by putting glue both inside the blank & on the tube, working from right to left. Black glue was used for a visual reference. The blanks are clear resin. Although I thought there was going to be a difference, I didn't think it was going to be this much. This surprised me.
That is an awesome visual reference, very informative. Thanks for posting.
 
Top Bottom