Pine cone pens

Signed-In Members Don't See This Ad
See more from meacht

meacht

Member
Joined
Apr 28, 2005
Messages
3
Location
Regina, Saskatchewan, Canada.
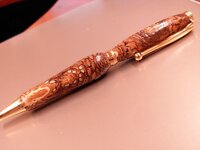
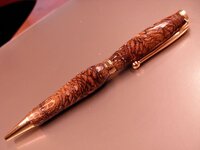
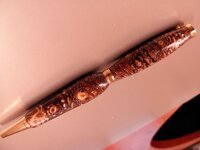
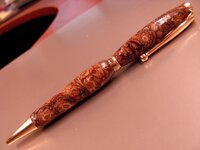
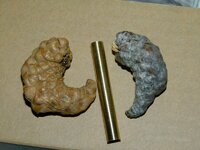
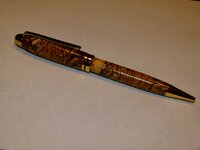
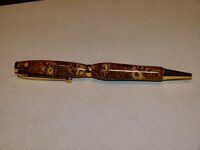
This is my first time posting. Here are some pens made from pine cones I picked up in northern Saskatchewan. Any criticism is welcomed and will be taken as constructive.

Thanks,
Terry
 

Attachments

  • Pinecone (1).JPG
    Pinecone (1).JPG
    73 KB · Views: 376
  • Pinecone (2).JPG
    Pinecone (2).JPG
    77.3 KB · Views: 315
  • Pinecone (3).JPG
    Pinecone (3).JPG
    77.1 KB · Views: 248
  • Pinecone (4).JPG
    Pinecone (4).JPG
    63.1 KB · Views: 240
  • Pinecone (5).JPG
    Pinecone (5).JPG
    74.8 KB · Views: 291
Signed-In Members Don't See This Ad
I really like the natural designs in those pens, very pretty. I think the pine cone pens are the ones that receive the most attention, whenever I have them in my assortment.

Nicely done!!
 
Those are very nice, I tried to do one and it blew up, what is the best way to prepare and do them?

Thanks,

David :confused:
 
Blank preparation

I use a bandsaw to cut relatively straight sections of the cone. I find that, typically, it takes 3 cones for each half of the pen. The I take each piece, seal one end it with CA and a shot of accelerator, turn it over and fill it with thin CA. Let it sit overnight, sand each end flat with a belt sander and, with thick CA, glue enough together for one tube and clamp.

Hope that helps.

Terry
 
I like the way you segmented them instead of just drilling down the center and turning. I don't believe I have seen any done like that before...
 
Those segmented cones are very neat. I believe that is the first time I've seen them done like that. It gives a very interesting look to an otherwise beautiful pen. Congratulations.
Charles
 
I use a bandsaw to cut relatively straight sections of the cone. I find that, typically, it takes 3 cones for each half of the pen. The I take each piece, seal one end it with CA and a shot of accelerator, turn it over and fill it with thin CA. Let it sit overnight, sand each end flat with a belt sander and, with thick CA, glue enough together for one tube and clamp.

Hope that helps.

Terry

That's pretty awesome. I just turn the cores on the huge long needle pine cones. Looks great, you have something pretty special there.
 
Cones

There is no acrylic used, just CA. I have to segment them because the cones are small and curled. The curls are what give them character. The "bug" and "sun" shapes come when the stem of the cone comes out the side of the barrel.

Here is a picture of a couple of the cones with a Slimline tube to show relative size. Some of the cones are actually large enough that I can get a nice Euro style from it.
 

Attachments

  • P1000033-pst.jpg
    P1000033-pst.jpg
    194.3 KB · Views: 155
  • P1000012-pst.jpg
    P1000012-pst.jpg
    199.3 KB · Views: 154
  • P1000010-pst.jpg
    P1000010-pst.jpg
    194 KB · Views: 143
WOW! That is some funky looking pine cone! I would never have even tried something that looked like that. Wonderful idea there. I'll have to try some of mine here. They are giants compared to yours.
Charles
 
Those look great!
Add to list of things to collect:
1) Pine cones of all shapes and sizes.

My wife will (not) appreciate this!
(Thanks!:wink:)


Chris
 
Back
Top Bottom