monophoto
Member
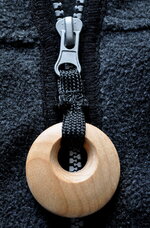
Pendants are a popular item for turners because they can be used in several ways. I use them as zipper pulls on jackets, sweaters or vests. My wife has several on cords that she wears as jewelry. They can also e used a lamp pulls, or as the weighted 'thingie' at the end of window shade or venetian blind cords. They are simple to make, and can be made from scraps of wood that otherwise would be thrown away - for example, the tenon at the end of a spindle turning is often considered scrap, but is ideal for making a pendant.
You can purchase special-purpose mandrels for making pendants, but they are rather pricey. I've chosen instead to make mandrels from scraps of wood that serve just as well. Here's how I do it.
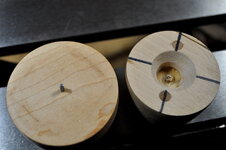
1. The first step is to make the mandrels. I chose to make mine from scraps of hard maple that I drilled and tapped to thread onto the spindle of my lathe. One is used for turning the pendant and is a solid block with a small pin exactly centered in the face - after truing the face, I drilled a hole on axis, and glued in a finishing nail. After the glue cured, I snipped off the nail, leaving about 3/16" proud of the mandrel face, and then smoothed the end with a file. The second mandrel is used for drilling the off-center hole in the pendant, and is a solid block but with a larger hole drilled on axis. I also drew some 'crosshairs' on the face to help center the pendant.
2. I start by applying a small piece of double-stick tape to the turning mandrel, centering it on the face such that the pin pierces the tape. I use 'Shurtape' brand double-stick duct tape purchased at Lowes (although I understand they no longer carry that product). I drill a hole all the way through the blank that is just large enough to fit over the pin, and then press the blank onto the taped face of the mandrel, using the pin to center it. Turn, sand and finish what will become the back of the pendant. I use a lacquer-based friction polish.
3. Gently pry the blank off of the mandrel, fiip it over, and remount it with the finished side against the taped face. Turn, sand and finish what will be the front face of the pendant. The double stick tape holds the blank in place, but the pin serves two functions - it assures that the two faces are exactly concentric after the blank is remounted, and it also resists lateral motion as the blank is being turned.
4. Use a sharp tool (I use an old bench chisel) to lift the tape away from the face of the mandrel. That is, insert the tip of the chisel between the tape and the face of the mandrel and pry up, with the tape preventing the chisel from marring the pendant.
5. Put a fresh piece of tape on the drilling mandrel, and using the 'crosshairs' as a guide, place the pendant on the mandrel. This isn't rocket science, and the diameter and centering of the mounting hole are design decisions. The key thing is that cutting the mounting hole should remove all traces of the pin hole used to mount the pendant blank on the first mandrel. The amount of offset between the true center of the mandrel (where the pin hole is) and the center of the mounting hole must be slightly LESS than one half the diameter of the offset mounting hole. Press the pendant onto the tape, and let it sit for a few minutes until the tape bond strengthens.
6. VERY CAREFULLY cut the mounting hole. One way to do this is to use a drill bit in a Jacobs chuck in the tailstock. I prefer to use a skew to nibble away the hole very slowly while tapering the edge of the hole as illustrated in the picture. The key thing is to NOT be aggressive - the only thing holding the pendant on the mandrel is the tape.
7. Sand and finish the edges of the hole.
8. Now, carefully pop the pendant off of the tape and inspect the back. You will probably find that the edge of the mounting hole is ragged. There are two ways to deal with that. One is to use some soft, fabric-backed sandpaper to sand the inside edge of the hole, and then apply more finish to the hole and the back of the pendant. The other is to remount the pendant FACE DOWN on the drilling mandrel, visually aligning the edges of the mounting hole with the dust and debris that will have collected on the tape, and then use a skew to VERY CAREFULLY smooth the edge where the hole intersects the back of the pendant.
You can purchase special-purpose mandrels for making pendants, but they are rather pricey. I've chosen instead to make mandrels from scraps of wood that serve just as well. Here's how I do it.
1. The first step is to make the mandrels. I chose to make mine from scraps of hard maple that I drilled and tapped to thread onto the spindle of my lathe. One is used for turning the pendant and is a solid block with a small pin exactly centered in the face - after truing the face, I drilled a hole on axis, and glued in a finishing nail. After the glue cured, I snipped off the nail, leaving about 3/16" proud of the mandrel face, and then smoothed the end with a file. The second mandrel is used for drilling the off-center hole in the pendant, and is a solid block but with a larger hole drilled on axis. I also drew some 'crosshairs' on the face to help center the pendant.
2. I start by applying a small piece of double-stick tape to the turning mandrel, centering it on the face such that the pin pierces the tape. I use 'Shurtape' brand double-stick duct tape purchased at Lowes (although I understand they no longer carry that product). I drill a hole all the way through the blank that is just large enough to fit over the pin, and then press the blank onto the taped face of the mandrel, using the pin to center it. Turn, sand and finish what will become the back of the pendant. I use a lacquer-based friction polish.
3. Gently pry the blank off of the mandrel, fiip it over, and remount it with the finished side against the taped face. Turn, sand and finish what will be the front face of the pendant. The double stick tape holds the blank in place, but the pin serves two functions - it assures that the two faces are exactly concentric after the blank is remounted, and it also resists lateral motion as the blank is being turned.
4. Use a sharp tool (I use an old bench chisel) to lift the tape away from the face of the mandrel. That is, insert the tip of the chisel between the tape and the face of the mandrel and pry up, with the tape preventing the chisel from marring the pendant.
5. Put a fresh piece of tape on the drilling mandrel, and using the 'crosshairs' as a guide, place the pendant on the mandrel. This isn't rocket science, and the diameter and centering of the mounting hole are design decisions. The key thing is that cutting the mounting hole should remove all traces of the pin hole used to mount the pendant blank on the first mandrel. The amount of offset between the true center of the mandrel (where the pin hole is) and the center of the mounting hole must be slightly LESS than one half the diameter of the offset mounting hole. Press the pendant onto the tape, and let it sit for a few minutes until the tape bond strengthens.
6. VERY CAREFULLY cut the mounting hole. One way to do this is to use a drill bit in a Jacobs chuck in the tailstock. I prefer to use a skew to nibble away the hole very slowly while tapering the edge of the hole as illustrated in the picture. The key thing is to NOT be aggressive - the only thing holding the pendant on the mandrel is the tape.
7. Sand and finish the edges of the hole.
8. Now, carefully pop the pendant off of the tape and inspect the back. You will probably find that the edge of the mounting hole is ragged. There are two ways to deal with that. One is to use some soft, fabric-backed sandpaper to sand the inside edge of the hole, and then apply more finish to the hole and the back of the pendant. The other is to remount the pendant FACE DOWN on the drilling mandrel, visually aligning the edges of the mounting hole with the dust and debris that will have collected on the tape, and then use a skew to VERY CAREFULLY smooth the edge where the hole intersects the back of the pendant.