
robutacion
Member
I everyone,
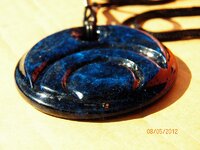
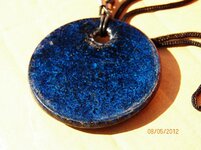
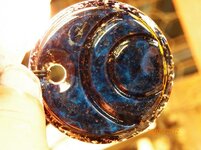
I've just finished another pendant but this time, I gave the enfaces to the material I used mixed with the resin and the "hammered" finish on the main surface.
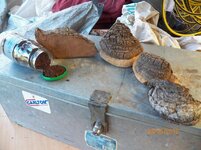
The 'True" Pearlex blue mixed with resin I used was a left over from a small pour done a couple of days ago and this time I decided to use the coarse saw dust I salvaged from the turning of a piece out of a tree fungus a few years ago, called the "horse shoe fungi", for its resemblance to horse shoes...!
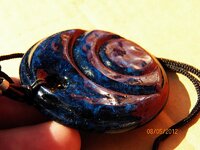
This material has a interesting structure and features, extremely light weight, and a dark brown as its natural colour, it transforms itself into almost black when coated or wet with any liquid, including water...!
I simply used a empty cap of a spray can to mix it and let it set, not putting it in the pressure pot, the fungi bits didn't soak into the resin, which will make turning it a lot more difficult in relation to the finish quality and holes that are left from the very soft material not being impregnated and pressurized on the pot.
However, and being aware of this, I decide to simply let it dry/set by itself so I put it outside the shed to dry faster. This was late afternoon and while the weather seemed OK, that did change some time later with some nasty heavy showers. I was already in bed and while I heard the rain, I didn't thing of anything that could be outside that shouldn't get wet so, I curled up to the wife and went to sleep...!
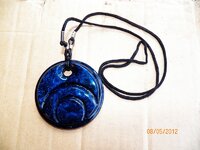
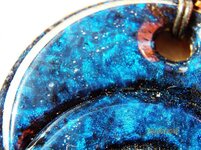
Next morning, I got out, the shy's were blue again but the ground was wet still so, and I was walking down to the shed, I spotted that lid with my resin mix and though that it was ruined from the water but at a closer look, after I emptied the water inside, I saw that the rain has done a job that I have done before artificially, there is, create the "hammered" finish on the face that was exposed. This obviously happened, because the resin was "jelled" but not set/hard.
Was in fact the heavy rain/shower that created the indentations on the resin surface, something that a light shower would be able to do. I was quite please with it and straight away I though is finishing it leaving that finish as a feature, while the fungus bits, did their job also nicely...!
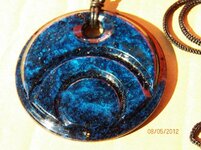
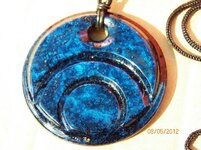
The Blue resin mix was quite translucent, is the fungus particles that give it that dark blue appearance but, when put under a strong light, the transparency is quite visible as the pics show...!
After turned, the pendant needed coating with something, CA has come to mind, particularly to seal and fill all those little holes and soft bits where the fungus come to the surface but, I opted to the easier and faster Acrylic lacquer, 3 coats of it and I was done...!
I was not very lucky with my pics today, no position seemed to work and or give the real appearance of this finished material but, that will do and the wife claimed it 5 minutes after I took the pics, there is, when she saw it for the first time. It was for her anyway so, brownie points for "moi":wink::wink::biggrin::biggrin:
Hope you like it...!
Cheers
George
I've just finished another pendant but this time, I gave the enfaces to the material I used mixed with the resin and the "hammered" finish on the main surface.
The 'True" Pearlex blue mixed with resin I used was a left over from a small pour done a couple of days ago and this time I decided to use the coarse saw dust I salvaged from the turning of a piece out of a tree fungus a few years ago, called the "horse shoe fungi", for its resemblance to horse shoes...!
This material has a interesting structure and features, extremely light weight, and a dark brown as its natural colour, it transforms itself into almost black when coated or wet with any liquid, including water...!
I simply used a empty cap of a spray can to mix it and let it set, not putting it in the pressure pot, the fungi bits didn't soak into the resin, which will make turning it a lot more difficult in relation to the finish quality and holes that are left from the very soft material not being impregnated and pressurized on the pot.
However, and being aware of this, I decide to simply let it dry/set by itself so I put it outside the shed to dry faster. This was late afternoon and while the weather seemed OK, that did change some time later with some nasty heavy showers. I was already in bed and while I heard the rain, I didn't thing of anything that could be outside that shouldn't get wet so, I curled up to the wife and went to sleep...!
Next morning, I got out, the shy's were blue again but the ground was wet still so, and I was walking down to the shed, I spotted that lid with my resin mix and though that it was ruined from the water but at a closer look, after I emptied the water inside, I saw that the rain has done a job that I have done before artificially, there is, create the "hammered" finish on the face that was exposed. This obviously happened, because the resin was "jelled" but not set/hard.
Was in fact the heavy rain/shower that created the indentations on the resin surface, something that a light shower would be able to do. I was quite please with it and straight away I though is finishing it leaving that finish as a feature, while the fungus bits, did their job also nicely...!
The Blue resin mix was quite translucent, is the fungus particles that give it that dark blue appearance but, when put under a strong light, the transparency is quite visible as the pics show...!
After turned, the pendant needed coating with something, CA has come to mind, particularly to seal and fill all those little holes and soft bits where the fungus come to the surface but, I opted to the easier and faster Acrylic lacquer, 3 coats of it and I was done...!
I was not very lucky with my pics today, no position seemed to work and or give the real appearance of this finished material but, that will do and the wife claimed it 5 minutes after I took the pics, there is, when she saw it for the first time. It was for her anyway so, brownie points for "moi":wink::wink::biggrin::biggrin:
Hope you like it...!
Cheers
George
Attachments
-
 005a.jpg88.2 KB · Views: 291
 -
 007a.jpg243.8 KB · Views: 241
 -
 010a.jpg86.8 KB · Views: 239
 -
 011a.jpg82.2 KB · Views: 219
 -
 013a.jpg105.8 KB · Views: 232
 -
 014a.jpg224.5 KB · Views: 222
 -
 015a.jpg70 KB · Views: 204
 -
 017a.jpg237.5 KB · Views: 245
 -
 019a.jpg74.9 KB · Views: 250
 -
 Timbers preparartion 008_(1).jpg49.3 KB · Views: 216
Last edited:


