Pen Stand Contest Voting Poll

Signed-In Members Don't See This Ad

Pen Stand Contest Voting

  • Pen Stand 1

    Votes: 35 30.2%
  • Pen Stand 2

    Votes: 14 12.1%
  • Pen Stand 3

    Votes: 2 1.7%
  • Pen Stand 4

    Votes: 68 58.6%
  • Pen Stand 5

    Votes: 19 16.4%
  • Pen Stand 6

    Votes: 70 60.3%

  • Total voters
    116
  • Poll closed .

firewhatfire

Member
Joined
Mar 7, 2011
Messages
3,813
Location
Columbiana, Alabama
Voting for this contest will last for 3 days. Pick you top 3. If a run off is needed that will happen in a 1 day voting poll.

Please wait until all entries are posted before voting
 
Signed-In Members Don't See This Ad

firewhatfire

Member
Joined
Mar 7, 2011
Messages
3,813
Location
Columbiana, Alabama
Pen Stand Entry 1

Material Used - Acrylic Rod and Acrylic Tube

Method Used - Design an eye pleasing pen stand that might attract people to a sales booth while at the same time, take up very little sales space. Several prototypes were made in wood to come up with a basic design that would work. Those concepts were transferred to the acrylic material where several more versions were made before coming up with the final stand.


firewhatfire

Member
Joined
Mar 7, 2011
Messages
3,813
Location
Columbiana, Alabama
Pen Stand 2

Materials used are: Superglue, Oak, Deer Antler.

Tools used: 1/8th inch drill bit, 3/8ths inch drill bit, cordless drill, vise, hacksaw, 120-grit 1 inch x 30 inch sanding belt on HFT Central Machinery Belt/Disc combo sander, 2 inch buffing wheels mounted to the same sander (in place of the disc), white buffing rouge, and the good old fashioned eyeball.

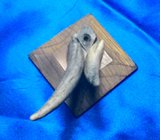
I took a small piece of leftover oak stock from the side of a dresser drawer that got scrapped and cut a rough square off of it. Used the sander with 120 grit belt to grind the bevels by eye. I made sure to sand with the grain to minimize sanding marks. Afterwards, I added a little white rouge to my buffing wheels that are mounted on the side of the sander in place of the 5 inch disc sander, and I buffed the wood directly from 120 grit. This left a lot of black particulate all over the wood from previous metalworking buffing jobs, but aging the appearance of the wood was part of the intent, so this was acceptable. The wooden base of the stand is now complete.

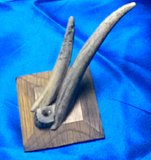
I took some antler tines left over from doing some Deer Hunter pens and selected 2 tines that bent in opposite directions. Used the vice and hacksaw to get appropriate sized sections. I also selected from my scrap box a small scrap of antler that was cut in the shape of a wedge. This was the cutout section between two actual pen blanks in order to give me a dead on spot to place my drill for drilling the blank. I sanded the surface and ground off two flats on either side to give room for the tines to mount close in. I drilled through the top to the bottom of the wedge a 1/8th inch hole to give myself a "glue application hole" and I countersunk that hole with the 3/8ths bit to give the nib of the pen a place to "seat" on the surface of the wedge. The entire wedge was then buffed the same as the oak base.

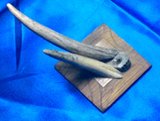
The antler tines were then ground so as to somewhat mate up with the section of antler wedge and roughly run parallel to each other at about the same angle. I ground a bit, then checked angle and eyeballed it. I then buffed the antler tines the same as the oak and the antler wedge. The metal particulates from the buffing wheel help to age the appearance of the antler tines as well.

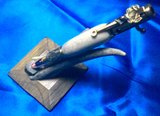
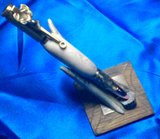
Superglue was applied into the hole in the wedge to seat it in a corner of the oak board, and then superglue was dabbed on the locations I determined that the antler tines would sit. 20 minutes was allowed for the drying/curing process before photographs were taken. Entire project took approx 1 hour from start to photographs.


The pen included in the pictures is a PSI Deer Hunter Bolt Action pen in Deer Antler (Antique Brass)


firewhatfire

Member
Joined
Mar 7, 2011
Messages
3,813
Location
Columbiana, Alabama
Pen Stand 4

Materials used:

Oak Base with bentwood Zebrawood veneer accent. Finish is a coat of BLO and then spray poly. The Zebrawood is surprisingly stable. The pen I had originally intended to picture with this stand was also done in Zebrawood, but the pen sold before I realized I needed two pictures from different angles. I believe it would be possible to make a stand like this to match the wood of almost any pen, as long as veneer of that type of wood is available.


firewhatfire

Member
Joined
Mar 7, 2011
Messages
3,813
Location
Columbiana, Alabama
Pen Stand 5

OK, here's my entry :)

It's called "Excalibur" - King Arthur's sword that was pulled out of the rock.

My rock is Rock Maple Burl, cut from a burl I had like a slice of pie. The one side is the natural burl.

Sanded, except for the natural burl end, then sprayed with Minwax polyurethane. The pen is a Knight's Armor kit from PSI.


firewhatfire

Member
Joined
Mar 7, 2011
Messages
3,813
Location
Columbiana, Alabama
Pen Stand 6

Maglev Floating Pen display stand
The stand itself is made from aluminium, with acrylic enamel filling the detailing.
I used a PIC microprocessor, with a hall sensor to measure the EMF produced by the electromagnet. The microprocessor adjusts the current to the coil as the pen moves up and down, regulating it's position causing it to levitate. The design of this has been amped up to lift up to 70 grams.

The top body which encloses the electromagnet, acts as a heatsink, drawing the 40'C heat generated by the coil away from the system.

Because there is no friction, you can spin the pen and it will go on and on and on, with only air to resist it. A video would show that better, it's a great way to display a rotating pen.

I designed this in such a way that either Neodymium magnets can be built into the end of the pen as pictured, or a stack of magnets can be placed inside the cap of a standard pen with the nib removed, and placed on display


D.Oliver

Member
Joined
May 10, 2011
Messages
3,531
Location
Faith SD
Some great stands here. I built pen stand for this contest that would hold the kitless pen I made last year. Unfortunately I didn't have time to get it photographed and submitted. Oh well.
 

firewhatfire

Member
Joined
Mar 7, 2011
Messages
3,813
Location
Columbiana, Alabama
Now Igotta go back and look for your pen from last year.


found it. that was the most kitless pen I think I have ever seen. Some people are just to good at this.


Some great stands here. I built pen stand for this contest that would hold the kitless pen I made last year. Unfortunately I didn't have time to get it photographed and submitted. Oh well.
 
Last edited:
Top Bottom