Let me preface this by saying I'm not a traditional woodworker. I more or less stumbled into woodturning about five years ago, and that's where most of my experience lives.
My fiancée is a pen turner and has developed a strong preference for segmented blanks. Naturally, as a supportive partner, I set up our bandsaw for ripping pen blanks and added a jointer and a benchtop drum sander to the shop.
Our current goal is to produce 100 segmented pen blanks, all with the same pattern.
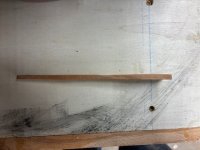
Starting with stock pen blanks arranged as (111) and (222), the plan is to rip them into strips and reassemble them into (121) and (212), with veneer or aluminum accents in between.
I'm comfortable ripping the strips—we're getting them reasonably straight off the bandsaw using a thin-rip jig. What I'm not comfortable with is hand-sanding dozens (hundreds…) of tiny strips, which is why the drum sander entered the picture.
The issue is that the pen-blank strips are simply too short. They tend to shift, get pulled, or dig in under the drum. I've tried very light pressure, heavier pressure, and different feed speeds with little success.
Please tell me that adhering the strips to a piece of MDF with double-sided tape will give me the flat, consistent results I'm after.
If not, I'm looking for ideas or examples of a drum-sander jig for sanding small parts efficiently—ideally without relying on a consumable for every batch. I'm envisioning something like "micro clamps" mounted to an MDF carrier that could hold multiple strips securely at once.
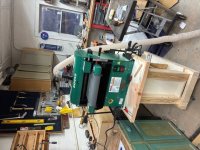
I'm stubborn and have committed to solving this with the drum sander rather than switching methods. For anyone curious, the machine is a Grizzly G0459, which I picked up for just under $1,200 delivered.
Thanks in advance for any guidance—photos of jigs or real-world solutions would be especially appreciated.
My fiancée is a pen turner and has developed a strong preference for segmented blanks. Naturally, as a supportive partner, I set up our bandsaw for ripping pen blanks and added a jointer and a benchtop drum sander to the shop.
Our current goal is to produce 100 segmented pen blanks, all with the same pattern.
Starting with stock pen blanks arranged as (111) and (222), the plan is to rip them into strips and reassemble them into (121) and (212), with veneer or aluminum accents in between.
I'm comfortable ripping the strips—we're getting them reasonably straight off the bandsaw using a thin-rip jig. What I'm not comfortable with is hand-sanding dozens (hundreds…) of tiny strips, which is why the drum sander entered the picture.
The issue is that the pen-blank strips are simply too short. They tend to shift, get pulled, or dig in under the drum. I've tried very light pressure, heavier pressure, and different feed speeds with little success.
Please tell me that adhering the strips to a piece of MDF with double-sided tape will give me the flat, consistent results I'm after.
If not, I'm looking for ideas or examples of a drum-sander jig for sanding small parts efficiently—ideally without relying on a consumable for every batch. I'm envisioning something like "micro clamps" mounted to an MDF carrier that could hold multiple strips securely at once.
I'm stubborn and have committed to solving this with the drum sander rather than switching methods. For anyone curious, the machine is a Grizzly G0459, which I picked up for just under $1,200 delivered.
Thanks in advance for any guidance—photos of jigs or real-world solutions would be especially appreciated.