robutacion
Member
Hi peoples,
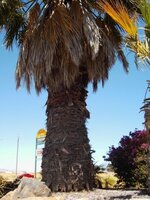
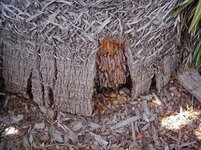
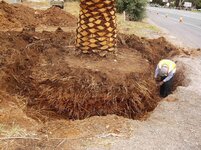
In continuation on my attempts to utilise materials that aren't that common among wood-turners, the Palm root material has fascinated me from the start and one product has already been born out of it, the Resifills pen blanks but, I wonder how big of a blank I can go using this material as the base.
The thought has been there since day one but, the need to utilize what I've got wisely is also of crucial importance, as I don't know when I'm going to have an opportunity to get some more so, wastage is not welcome...!
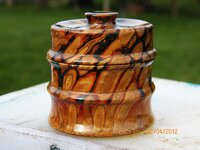
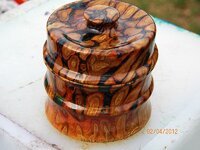
While wastage is not on, using all I've got in a half a dozen "big" blanks is certainly not what I want either so, and with that in mind, I had a good friend here, teasing me with some talk we had about mini jewellery boxes of about 2.5" square x 3" tall...!
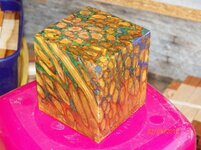
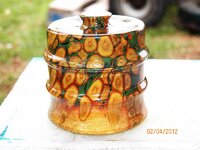
It got me curious so, I decided to make 2 of these blanks in the same mold so that means, same colour for both blanks. I wanted to created the blank using the palm material from where the roots grow from as the base of the box and them the root strains shooting up like "flames" but, due to the orientation the root material grows in relation to the tree centre material meant that, to have this base with a uniform(ish) thickness, I had to follow the natural orientation growth and that meant that, the root strains would come out not straight but, in a angle but that was OK...!
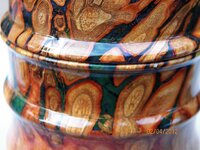
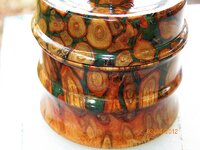
The funny thing was that I missed deep violet Pearlex with dark blue and then I decided to put just a few drops of the liquid translucent fluorescent yellow...!
The mix looked a bit strange but when I was pouring, a bluish/viloletish come up to the surface and after the mold has been through the pressure pot and put in the sun to dry, the same colours were showing.
I got a big surprised when I went to trim and separated the 2 blanks, this greenish was everywhere and the more it dried, the darker it got...!
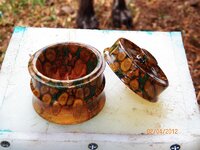
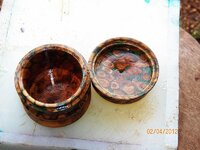
Anyway, I decided to see how strong and solid these blanks were and after cutting the lid part off, I hollowed the base with a 13mm square carbide tipped tool, the same tool used to turn it from square to round. Straight walls, about 5mm thick right to the bottom, no problem at all, with the lathe speed at just under 2.000RPM
Surprisingly, due to the fact that the blank wasn't yet cured or hard enough on the inside, that would require about a week to achieve with this combination materials, the carbide tool cut solidly all the way and no loose bits or tares did occur. The hight speed could have made the blank disintegrate if the 5mm material left in the walls, wasn't solid and combined with the soft nature of the root strains.
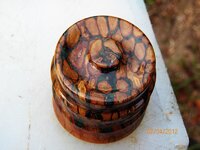
Turning the outside and lid, I use the 18mm round carbide tipped tool, and a Bedan HSS tool, the final thickness on the concave part of the lid and the recesses on the bottom's body, are no more than 2mm still, everything kept together beautifuly...!
The inside was finished with CA but the outside, I decided to use Floorseal, one of my preferred finishing products.
An overnight drying and a few hours in the sun the next morning, got it done for good.
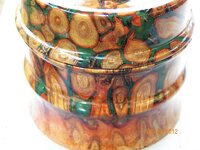
I was quite pleased with it also and, the "clarity" of the root grain formation, within. The close up detail is just amazing, in my eyes, off-course...!:wink:
The wife was always going to be the recipient but some how, I manage to have it made without her notice what it was so, she got a nice surprise yesterday when I gave it to her, one more jewellery box for her collection but, this one is very different than any other...!:wink:
That gave me a few rewarding "points"...!:biggrin:
So, what do you thing...???
Cheers
George
In continuation on my attempts to utilise materials that aren't that common among wood-turners, the Palm root material has fascinated me from the start and one product has already been born out of it, the Resifills pen blanks but, I wonder how big of a blank I can go using this material as the base.
The thought has been there since day one but, the need to utilize what I've got wisely is also of crucial importance, as I don't know when I'm going to have an opportunity to get some more so, wastage is not welcome...!
While wastage is not on, using all I've got in a half a dozen "big" blanks is certainly not what I want either so, and with that in mind, I had a good friend here, teasing me with some talk we had about mini jewellery boxes of about 2.5" square x 3" tall...!
It got me curious so, I decided to make 2 of these blanks in the same mold so that means, same colour for both blanks. I wanted to created the blank using the palm material from where the roots grow from as the base of the box and them the root strains shooting up like "flames" but, due to the orientation the root material grows in relation to the tree centre material meant that, to have this base with a uniform(ish) thickness, I had to follow the natural orientation growth and that meant that, the root strains would come out not straight but, in a angle but that was OK...!
The funny thing was that I missed deep violet Pearlex with dark blue and then I decided to put just a few drops of the liquid translucent fluorescent yellow...!
The mix looked a bit strange but when I was pouring, a bluish/viloletish come up to the surface and after the mold has been through the pressure pot and put in the sun to dry, the same colours were showing.
I got a big surprised when I went to trim and separated the 2 blanks, this greenish was everywhere and the more it dried, the darker it got...!
Anyway, I decided to see how strong and solid these blanks were and after cutting the lid part off, I hollowed the base with a 13mm square carbide tipped tool, the same tool used to turn it from square to round. Straight walls, about 5mm thick right to the bottom, no problem at all, with the lathe speed at just under 2.000RPM
Surprisingly, due to the fact that the blank wasn't yet cured or hard enough on the inside, that would require about a week to achieve with this combination materials, the carbide tool cut solidly all the way and no loose bits or tares did occur. The hight speed could have made the blank disintegrate if the 5mm material left in the walls, wasn't solid and combined with the soft nature of the root strains.
Turning the outside and lid, I use the 18mm round carbide tipped tool, and a Bedan HSS tool, the final thickness on the concave part of the lid and the recesses on the bottom's body, are no more than 2mm still, everything kept together beautifuly...!
The inside was finished with CA but the outside, I decided to use Floorseal, one of my preferred finishing products.
An overnight drying and a few hours in the sun the next morning, got it done for good.
I was quite pleased with it also and, the "clarity" of the root grain formation, within. The close up detail is just amazing, in my eyes, off-course...!:wink:
The wife was always going to be the recipient but some how, I manage to have it made without her notice what it was so, she got a nice surprise yesterday when I gave it to her, one more jewellery box for her collection but, this one is very different than any other...!:wink:
That gave me a few rewarding "points"...!:biggrin:
So, what do you thing...???
Cheers
George
Attachments
-
 101_2093a.jpg78.9 KB · Views: 583
 -
 101_2072a.jpg174.2 KB · Views: 493
 -
 101_2075a.jpg241.5 KB · Views: 380
 -
 101_2078a.jpg213.3 KB · Views: 341
 -
 101_2079a.jpg237.7 KB · Views: 369
 -
 101_2083a.jpg237.4 KB · Views: 397
 -
 101_2086a.jpg246.6 KB · Views: 395
 -
 101_2087a.jpg243.1 KB · Views: 399
 -
 101_2088a.jpg225.9 KB · Views: 357
 -
 101_2089a.jpg232 KB · Views: 395
Last edited: