Painting tubes?

Signed-In Members Don't See This Ad

DFR

Member
Joined
Oct 6, 2019
Messages
18
Location
Upper Michigan
Question is, if the tubes are scuffed up or etched to get the epoxy to adhere, wouldn't painting them then take away the ability for the glue to adhere?
 
Signed-In Members Don't See This Ad

bsshog40

Member
Joined
Oct 2, 2018
Messages
2,375
Location
Omaha, Tx
I would think that the glue still has the paint coat to adhere to. The scuffing will still give the paint something to adhere to.
 

John Eldeen

Member
Joined
Apr 3, 2019
Messages
419
Location
Sacramento, CA
I would say the epoxy will adhere just fine to the paint. If you are concerned about it once the paint is dry you could scuff it as well. On a different note but the same topic you might be better served to paint the inside of the blank rather than the tube. I have had much better results by painting the inside of the blank.
 

magpens

Member
Joined
Feb 2, 2011
Messages
15,911
Location
Canada
@DFR

I have often wondered about the answer to the question you have posed.

My preference, as others suggest, is to paint the inside of the drilled blank. . Doing that at least allows the paint to mask imperfections in the application of the glue, as well as masking imperfections left on the hole "surface" from the drilling process.

Actually, I strongly question whether "adherence" is a major issue once the pen is properly assembled, but I stand to be corrected on that.

I am inclined to think of the glue as primarily a void filler with adhesion as a secondary benefit until the pen parts are pressed together in such a way as to lock the brass tube in position. . I am pretty sure that the application of paint to either (or both) surfaces must necessarily weaken any adhesive role that the glue would otherwise have.

Pressing the nib and finial parts of the pen kit into the brass tube causes some compression of the metal which aids in "locking" pieces in place.

Of course, painting is a useful step only if the transparency of the blank material is a matter of concern.
 
Last edited:

howsitwork

Member
Joined
Jul 9, 2016
Messages
2,320
Location
Thirsk
How do you paint the inside of the blank and get an even coating?

I too wonder about adhesion of adhesive to paint but if paint has cured it can be really difficult to remove from metal surfaces . I'd never considered the masking effect on the adhesive joint integrity Magpens but actually on some semi transparent pens you can see air pockets in the adhesive layer even though I have used slow set epoxy, retooled the tube on insertion and pump auctioned it in and out to get an even layer ( so I thought before turning it ).
 

More4dan

Member
Joined
Mar 17, 2016
Messages
2,102
Location
Katy, TX
How do you paint the inside of the blank and get an even coating?

I too wonder about adhesion of adhesive to paint but if paint has cured it can be really difficult to remove from metal surfaces . I'd never considered the masking effect on the adhesive joint integrity Magpens but actually on some semi transparent pens you can see air pockets in the adhesive layer even though I have used slow set epoxy, retooled the tube on insertion and pump auctioned it in and out to get an even layer ( so I thought before turning it ).

I get an even coat of paint by using spray point from each end for a second or two. I then mount the blank in my chuck and spin at max rpm. Nice smooth coat.

Danny


Sent from my iPad using Penturners.org mobile app
 

magpens

Member
Joined
Feb 2, 2011
Messages
15,911
Location
Canada
@howsitwork

How do you paint the inside of the blank and get an even coating?

Ans: .... with considerable difficulty, uncertainty, more than one coat, and a little intervention from "Oh High".
It helps if you hold your tongue just right, also.

I use a Q-Tip (you can get single-ended ones with long sticks).

As "paint" I use the colored fluid out of glass markers. . I find that easier to apply, and it dries fairly quickly (20 mins or so).
One problem is the limited color availability so you may have to do some color mixing.

The brand name is Rust-Oleum ... you know, the paint company. . It was purely by chance that I discovered this stuff at a disposal store.
It works quite well on "acrylic"-type blanks, believe it or not.
 

howsitwork

Member
Joined
Jul 9, 2016
Messages
2,320
Location
Thirsk
Not sure I can get rust oelum this side of the pond but I can find equivalents .

Cotton throat swabs should give me the reach to get down a tube I figure. Spinning at speed t9 get an even coating seems a good idea too. Thanks folks

Now just got to wait for the moon to be in the right phase and the four leaved clovers to come up and I'm sorted 🤞
 

leehljp

Member Liaison
Joined
Feb 6, 2005
Messages
9,330
Location
Tunica, Mississippi,
One problem with adherence and painting in particular: lack of patience! Let the paint Dry, and Cure, not just set up. some paints that have not cured will interact with some glues and curing times become glacial.

Concerning adherence: if you ever have a blowout, look at the glue in the blown out piece. It is amazing on how much glue can be used and then see all of the space in which there was not any adherence. That is why I used polyurethane most of the time; it expands and MAKES contact everywhere. I don't remember of reading of any blowouts from polyurethane glue. I could have missed it.

This wasn't asked but I will through this information out anyway, as it is related.:
http://www.penturners.org/forum/f19/seeing-believing-reverse-painting-151785/

Seeing is believing.
http://www.penturners.org/forum/f14/painting-tubes-vs-blanks-152461/#post1959325
http://www.penturners.org/forum/f13/reverse-painting-different-effects-132612/
 
Last edited:

DrD

Member
Joined
Jun 26, 2019
Messages
1,104
Location
Columbus, Mississippi
I learned the hard way that with many acrylics, if the inside of the blank is not painted, you may be able to discern the swirl pattern on the tubes as a result of gluing the tubes into the blank. As far as how to paint the inside of the blank I have found the easiest, most foolproof way is to apply plastic safe model paint with a que-tip.
 

magpens

Member
Joined
Feb 2, 2011
Messages
15,911
Location
Canada
Could you color your 5 min. epoxy that you use for gluing in the tube?

Yes, you could, but it's not as good !!! . (And that's a rhyme !!)
Can you guess why ?

The reason is that you have very little control over how the glue distributes itself, whereas you do control the painting of the inside of the hole.
 

PBorowick

Member
Joined
Sep 23, 2019
Messages
264
Location
Portland, Oregon
Well fine, be that that magpens....your logic shall not defeat me!!!!!!!!!!!

Actually that is a very good point, if you don't get good coverage with the epoxy it would probably look even worse.
 

randyrls

Member
Joined
Feb 2, 2006
Messages
4,829
Location
Harrisburg, PA 17112
Dan; I've never had a problem with adherence. I just use a spray rattle can. Give each end of the blank a 2 second PSSSFFTT. Wear gloves. Let the blank dry overnight. Different colors will change the color of the blank. White will make the blank "brighter" Black or gray will make the blank color duller, The same color as the blank will make the color more vivid. With white pearlescent blanks you can make the blanks any color you want.
 

Bob F

Member
Joined
Feb 26, 2018
Messages
26
Location
Thornton ,Colorado
we ( Franklin Blanks and crafts )make and sell thousands of hybrid blanks each year and while our blanks are made with extra mica or pigments to help with this - we still recommend you paint the HOLE , reason being is that we do use a lot of chamelion pigments or interference pigments in our blanks and they can show some translucent areas at times but they give the blank extra depth-- the recommendation by us from years of testing is to paint the hole with a spray paint made for plastics ( after all thats the area of the blank we want the best adhesion to ) -or use an all surface (including plastics) spray paint - I scuff the tube , use nitrile gloves , shake the can well -spray over a trash can- spray the hole from each end -look inside and make sure all surfaces are coated well and not thin , then -place on a paper towel with the hole down so any run off is absorbed by the towel and not puddled in the hole - then you must either let dry for the time recommended per instructions on can -or once the paint has skinned over put the blanks on a warm surface or in an oven and help bake the paint on (even 150 degrees really helps set the paint and speed things a bit ). Typically i use and prefer black about 75% of the time as it helps make the color and sparkle from the mica really pop --white will lighten the over color of the blank or silver goes with almost any color ---I personally recommend then that you either use an epoxy or gorilla glue for the tube adhesion -- with gorilla glue being my glue of choice because it is a gap filling glue and will adhere better to loose fits
 

penicillin

Member
Joined
Feb 27, 2019
Messages
1,036
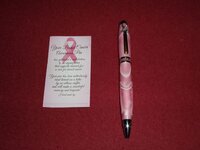
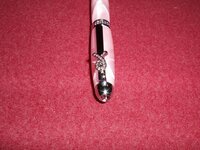
I am working on a breast cancer pen with a pink acrylic blank.

I made one once before - I painted the tube pink but did not paint the blank. I used pink rattle can acrylic spray, Rustoleum. I used epoxy to glue the tubes inside. The pen turned out pretty well, one of my better efforts.

This time, I tried spraying the tubes AND the blanks. It has been painful from the start. After allowing them to cure for many days, I discovered that the tubes would not go in the blanks. I finally reamed out the blanks and sanded the tubes, then painted the tubes again. The tubes went in with difficulty, not happily. I used Clear Gorilla Glue (silane, not polyurethane) to glue in the tubes. The glue provided some lubrication, which helped me get the tubes in. They are milled and mounted on the lathe, ready to turn. The bushings were very tight, due to a small amount of paint on the inside of the tubes that the pen mill did not remove. I hope it looks okay when assembled. It may have to wait a week for me to get to it.

Photos:
First breast cancer pen, January 2019. Pink paint on tubes only. Five minute epoxy in the two-part syringe for glue.

Breast Cancer Pen.JPG Breast Cancer Pen Closeup.JPG
 

mark james

IAP Collection, Curator
Joined
Sep 6, 2012
Messages
12,752
Location
Medina, Ohio
Question is, if the tubes are scuffed up or etched to get the epoxy to adhere, wouldn't painting them then take away the ability for the glue to adhere?

Since the initial post you have gotten amply excellent suggestions. This is what I have had good success with:

- Scuff the tubes.
- Paint the tubes/wait 24 hrs to cure. (Paint - see previous posts for good suggestions)
- Paint the inside of the blanks/wait 24 hrs to cure (done at the same time as the above).
- Put a drop of paint into my 2 part epoxy. Glue in the tubes. (I have never had any issues with the epoxy losing adherence). Wait 24 hrs. This gives a very slight tint, but works to color the epoxy without degrading the adherence).

This has worked for me.
 
Top Bottom