Optimal Overturning Depth (thickness) for CA finish?

Signed-In Members Don't See This Ad

jrista

Member
Joined
Aug 12, 2021
Messages
2,241
Location
Colorado
Well, my journey into switching to GluBoost for my pen finish is ongoing. I did manage to find a solution that works for me, to ensure I get the finish on the blank, without any real issues. This involved using a foam applicator (which I glue wax paper onto, although if I can find the right foam I am hoping I may not have to do that), and trimmed whiptail applicators on the GluBoost bottles to control the rate of flow. This allows me to put very thin coats of the glue directly onto the blank, and the applicator ensures the vast majority of the glue stays on the blank, and spreads out smoothly. Getting good finishes now, however...I'm ending up with pretty thick CA glue (way thicker than I ever wanted), and the finishes look slightly plastic-like.

When I was doing my preliminary testing, I was able to get moderately thin final finish thickness, which I think looked a lot better. My problem seems to be that I'm over-turning the blank too much. I'm in the couple hundredths range, sometimes a little more. Some of this is probably techinique, and I just haven't honed in my ability to turn my blanks below the bushing size only slightly...I always seem to get more overturning than I want. So hopefully practice will help with that.

I feel like a couple hundredths or so, is just WAY too much... Aside from the plasticy look, it just requires a lot more CA to build back up to the specified diameter of the fittings. I'm curious what most CA finishers aim for when overturning. Does everyone overturn by hundredths? Or is it possible to overturn by say a few tens of thousandths? Is there a well known minimum floor that should always be reached when overturning, to avoid say sanding through the finish back into the wood (did that a couple of times early on when testing)? Should I say always aim to overturn by say 50 thousandths? Or should I be aiming for more, such as say just one hundredth?
 
Signed-In Members Don't See This Ad

derekdd

Member
Joined
Jan 29, 2023
Messages
1,101
Location
Wisconsin
I strive to not over turn at all then use the sanding process to get me right on the bushings.

Occasionally, I have overturned accidentally and just used more CA (Starbond medium) to build up that end. The finished product looks about the same to my eye.

I've not journeyed into Gluboost yet, though everyone here seems to really like it.
 

RunnerVince

Member
Joined
Dec 18, 2019
Messages
293
Location
Ogden, UT
I overturn by the minimum perceptable amount. To put that in context, I turn until my calipers (set to the diameter of the actual mating part) just fit over the blank without forcing them. Then I take the smallest cuts I can until I can perceive "slop" between the blank and the calipers. I know this isn't super scientific, but it's worked well for me.
 

JohnU

Member
Joined
Jan 31, 2008
Messages
4,974
Location
Ottawa, Illinois
I do Like others stated, turn down to bushings, then just over sand slightly and apply my finish. If it's a smooth wood, I don't over sand much and apply the Gluboost thin. Now that they have Ultra thin I probably won't over sand at all, especially over acrylics.
 

egnald

Member
Joined
Jun 9, 2017
Messages
3,152
Location
Columbus, Nebraska, USA
Depending on the type of blank and how the pen hardware interfaces with the blank, I target underturn / under-sanding about 0.003 inches. Although I haven't been using GluBoost very long yet, I pretty consistently only get a 0.004 to 0.005" increase in diameter with the regimen I am using (so far anyway). This is also comparable to the thickness increase from my standard CA regimen. - Dave

Dave
 

jrista

Member
Joined
Aug 12, 2021
Messages
2,241
Location
Colorado
I do Like others stated, turn down to bushings, then just over sand slightly and apply my finish. If it's a smooth wood, I don't over sand much and apply the Gluboost thin. Now that they have Ultra thin I probably won't over sand at all, especially over acrylics.
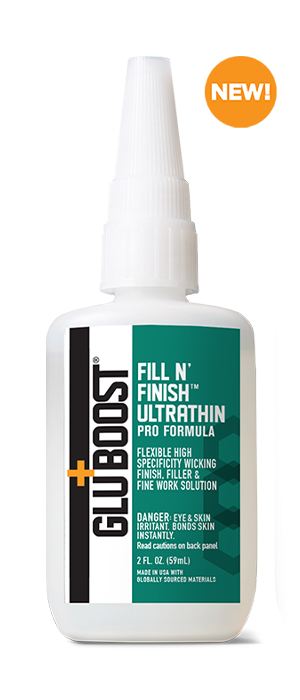
Are you saying that GluBoost now has an ultra thin glue? Something other than the orange bottle, or are you talking about the orange bottle?
 

jrista

Member
Joined
Aug 12, 2021
Messages
2,241
Location
Colorado
Ok. Sounds like you guys are just sanding, rather than actually using a tool, to overturn just a bit. And maybe just overturning by a few thousandths, rather than tens of thousandths. I will give that a try...have five more pens to make here.
 

jrista

Member
Joined
Aug 12, 2021
Messages
2,241
Location
Colorado
Ah! Had to go to their web site to find it:


I'd seen the red bottle, which I thought was a different kind of glue for repairs to things like guitars. Supposedly that is ultra thin. This stuff looks like the ultra thin version of the flexible finish though.
 

JohnU

Member
Joined
Jan 31, 2008
Messages
4,974
Location
Ottawa, Illinois
Are you saying that GluBoost now has an ultra thin glue? Something other than the orange bottle, or are you talking about the orange bottle?
Yep, it's just out, Ultra Thin Flexible Finish. I had the privilege of trying a sample of it to see how it would work for Penmaking. It's great stuff. Wicks in, goes on thin and shines up great. I've been using it on urethane resin to get a better shine and finish. It's also works for a great base coat and sealer as well as a final coat after sanding your finish level. It fills the scratches from sanding to make it easier to get a nice finish. I apply it just before I micromesh. It's a teal green label.
 

bugradx2

Member
Joined
Jan 31, 2023
Messages
382
Location
Chicago
Yep, it's just out, Ultra Thin Flexible Finish. I had the privilege of trying a sample of it to see how it would work for Penmaking. It's great stuff. Wicks in, goes on thin and shines up great. I've been using it on urethane resin to get a better shine and finish. It's also works for a great base coat and sealer as well as a final coat after sanding your finish level. It fills the scratches from sanding to make it easier to get a nice finish. I apply it just before I micromesh. It's a teal green label.
I have a bottle of the red gluboost. I use so little sealing blanks it may be a lifetime supply. Is the flexible finish ultra thin a noticeable difference?
 

jrista

Member
Joined
Aug 12, 2021
Messages
2,241
Location
Colorado
Well, sanding has been better. I'm not overturning as much, but still around a hundredth, maybe a bit more. I may have to pick up a bottle of this ultra thin for my penetrating coat, and then try a few coats of just thin, and see if I can get a finish that is just a few thousandths thick.

I may need to find some proper closed-cell foam to use as an applicator as well. The wax paper bonded to a foam base (open cell, though, so it absorbs the CA very quickly, wasting it) has been the best applicator I've used so far, but occasionally it will leave these tiny fibers of the wax paper in the finish, and I have to turn it down and re-finish, which is annoying. It also doesn't leave an optimally flat surface to each coat after application, so I am not sure if it would even be possible for me to get final finish just a few thousandths thick.

If I can find a foam that doesn't react with the CA and cause problems, and doesn't soak up the CA, then I might finally be able to get some ultra-thin, but viable coats, then I might finally be able to achieve my goals. The first few tests I did with GluBoost when I first got it were phenomenal...crystal clear, razor sharp shine line, and couldn't have been more than a few thousandths thick. You couldn't really tell that it was a CA finish, which was awesome. I guess I have to admit, at the time I was doing those experiments, achieving an EXACT diameter was not an issue, as I was just experimenting. So had no need to overturn and then build back up to an exact diameter at all, whereas with these actual pens that will be for sale I do...and that's a good deal harder than I expected.
 

JohnU

Member
Joined
Jan 31, 2008
Messages
4,974
Location
Ottawa, Illinois
I have a bottle of the red gluboost. I use so little sealing blanks it may be a lifetime supply. Is the flexible finish ultra thin a noticeable difference?
They are both the same consistency and wick in but the red isn't made to be a finish. I used it for sealing and gluing fabric and such, and even a base coat for the blue and orange label, but it's not a finish like the new stuff. It won't hold up as well on the final surface as a finish, like the new Ultra thin finish does.

The new ultra thin works great as a stand alone finish. I made Rick at Gluboost a video for their Youtube channel on how I use it. I really like it for a stand alone finish over acrylics. It will hold up and shine much longer than a baked resin surface will. It's easier and quicker to finish also. You definitely feel the difference in durability, between the red label and the new ultra thin finish, when wet sanding during the finishing.

If you do a lot of laser cut blanks where you have to assemble, hold with rubber bands and glue in place, the red label ultra thin works great. It wicks in all of the cracks and seams and hold it all together very well. A little goes a long way, which is why you want to use the wisp tips, so you don't glue yourself to the blank. I won't tell you how I learned that.
 

bugradx2

Member
Joined
Jan 31, 2023
Messages
382
Location
Chicago
They are both the same consistency and wick in but the red isn't made to be a finish. I used it for sealing and gluing fabric and such, and even a base coat for the blue and orange label, but it's not a finish like the new stuff. It won't hold up as well on the final surface as a finish, like the new Ultra thin finish does.

The new ultra thin works great as a stand alone finish. I made Rick at Gluboost a video for their Youtube channel on how I use it. I really like it for a stand alone finish over acrylics. It will hold up and shine much longer than a baked resin surface will. It's easier and quicker to finish also. You definitely feel the difference in durability, between the red label and the new ultra thin finish, when wet sanding during the finishing.

If you do a lot of laser cut blanks where you have to assemble, hold with rubber bands and glue in place, the red label ultra thin works great. It wicks in all of the cracks and seams and hold it all together very well. A little goes a long way, which is why you want to use the wisp tips, so you don't glue yourself to the blank. I won't tell you how I learned that.
Thanks very much John! I think I may have learned how to glue myself to blanks in a similar manner to you....
 
Top Bottom