New to turning....CA issues

Signed-In Members Don't See This Ad

jrich7970

Member
Joined
Jun 13, 2020
Messages
124
Location
South Jersey, USA
Hi guys. New to all this, only on my third pen, so I realize I have no experience, but perhaps you could give me a few tips. I've started with the slimline, which I have read is where a lot of people start.

My issues so far have been with finishing. But the issues don't seem to be what most of the posts I see are about, but I bet a lot of you have had similar problems. I'm posting some pictures and will describe what went on.

Diagnoal Ridges.jpg


So this was my first effort. The wood was perfectly smooth, but, after I finished and put the pen together, I noticed these marks running diagonally. I now know to inspect the blanks before I assemble the pen, but how did these get on an angle? I know it's too late for this pen now, and fortunately it only cost me less than $5 for this mistake, but if I can avoid it in the future, that would be particularly awesome. I can detail what I did with regard to application, sanding, etc.

CA Build Up.jpg


My second one was perhaps even worse. I noticed the diagonal ridges again, and sanded down almost to bare wood and started over on the CA again. But it looks like I put soooo much on that it built up increased the size of the pen. I swear that the wood was perfectly sized to the bushings before I started the CA.

There are other problems I had, but I can go into them later.

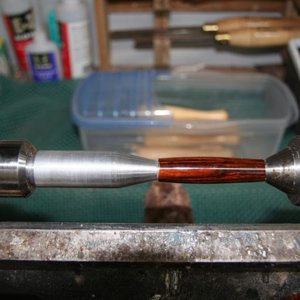
I have a third pen I've turned, but I'm almost afraid to finish it because it so darn beautiful and smooth as glass. I'm afraid to mess it up. But, in reality, I also need to get a grip...it's only a $3 blank.

My intention is to grab a hunk of spare wood I have laying around, turn it smooth, then start with the CA. Sand it off (or turn it off), try again. Sand it off, try again. Over and over until I figure it out.

Any help would be appreciated!

Thanks,

Jeff
 
Signed-In Members Don't See This Ad

dgsearle

Member
Joined
Apr 12, 2020
Messages
17
Location
Michigan
Hello, I am also brand new to turning and pen making and am struggling with CA issues as well.
The only thing I can offer is that based on my experience thus far (all six months of it), the second picture looks like you have not actually trimmed the wood far enough.
I may be wrong, but I doubt you could build up THAT much thickness just by adding CA layers and in the picture it looks to me like it is wood.
I have found that I have had to trim the ends down a little further than the bushings to get the blank to match up with the components to my liking.
Measuring the diameter of the blank with a pair of calipers is going to be a more accurate method of matching the size of the components to the wood.
I have been measuring the component and then checking the blank and turn it to just under the diameter of the mating component.
The diameter does increase with the layers of CA so everything comes out good dimensionally (or at least close enough).
As I mentioned above, I can offer NO advice on the quality of the finish and will have to learn from the others along with you.
 

ed4copies

Local Chapter Manager
Joined
Mar 25, 2005
Messages
24,523
Location
Racine, WI, USA.
In your second picture, if you turned your blank even with the bushings, you had the wrong size bushings.

Regarding the CA question, you could still sand the blank to even out the CA, (about 600 grit) once you have an even coat, THEN finish sanding with micromesh and/or plastic polishes

Watch this video

From 3:07 forward you will see the sanding I do the following day. Although this shows gluBoost, it could be used as a procedure for any CA finish, just that some will have problems months later--so far GluBoost has not.

Hope that helps,

Ed
 

jttheclockman

Member
Joined
Feb 22, 2005
Messages
19,082
Location
NJ, USA.
All correctable. As Ed said I believe you have the wrong bushings for that kit. Yes most people start with Slimline pens because they are cheap kits but I believe the best kit for beginners to learn on is the Sierra line. Now there are many kits based on the Sierra kit and maybe called something different but they are all a one piece barrel and you can concentrate on the finishing and other things more so than getting things lined up on such thin blanks. The first one just requires more sanding or smoothing of the CA as applied.
 

jrich7970

Member
Joined
Jun 13, 2020
Messages
124
Location
South Jersey, USA
Thanks for the responses! Forgetting about the bushings and the entire second pen for the moment....how might the diagonal ridges get on the first pen to begin with? How long would I have to wipe the CA glue on the blank before it gets too sticky? Maybe I can smooth those out before I even put on accelerator? Or should I consider lightly sanding between each coat? I also do have MM from 1500 up to 12000, and I did use that on both pens.
 

jttheclockman

Member
Joined
Feb 22, 2005
Messages
19,082
Location
NJ, USA.
Thanks for the responses! Forgetting about the bushings and the entire second pen for the moment....how might the diagonal ridges get on the first pen to begin with? How long would I have to wipe the CA glue on the blank before it gets too sticky? Maybe I can smooth those out before I even put on accelerator? Or should I consider lightly sanding between each coat? I also do have MM from 1500 up to 12000, and I did use that on both pens.
I always make 2 swipes with CA on a blue shop paper towel and walk away. Once down and once back in one motion. Low speed on lathe. The more you play with it the worse it gets. It is like doing spackling on sheetrock, learned quickly put it on and take it off and walk away. I use 3 to 4 coats of thin CA to seal the wood and then 3 to 4 coats of med CA to add depth and finish from there. I wet sand starting with 800 grit and go to 2000 and then MM. Sometimes I can start with 1200. I use black auto wet dry sandpaper.
 

jrich7970

Member
Joined
Jun 13, 2020
Messages
124
Location
South Jersey, USA
Hmmm. I like the drywall analogy. I too have/use blue shop towels. Do you put the glue on the towel and wipe, or put it on the blank then wipe with the towel? I've seen people do it both ways in videos.
 

Dehn0045

Member
Joined
Mar 19, 2017
Messages
1,533
Location
US
IMHO the diagonal ridges are from CA application, nothing to do with turning or sanding prior. After applying CA you need to sand down completely smooth before micromesh/buffing. I usually start with 800 git and wet sand, I keep sanding until there are no shiny spots left. Then move up through the grits and micromesh. The problem that then crops up is sanding through the CA, which shows up as dull spots on the finish. The smoother your CA coats prior to sanding the better off you'll be. Sometimes it is best to apply CA, sand, and then apply more CA.

As for the oversized barrel - might be due to CA buildup in the bushing. But I tend to agree with others that if it was flush with the bushing then probably the wrong bushing - unlikely you applied that much CA.
 

randyrls

Member
Joined
Feb 2, 2006
Messages
4,821
Location
Harrisburg, PA 17112
Jeff; Do not trust bushings or sizes printed on instructions. Go to Harbor Freight and get a cheap set of digital calipers (two if possible). Well worth $10. Put the calipers on the fitting and press the "Zero" button. Now your calipers will read the "target" size. Set the second caliper for the other end fitting. You can check the bushings to see if they are accurate. Turn a few thou under-size and CA finish.

Oh, Added later. While you are Harbor Freight, Pick up a set of "Transfer Punches" You can use them to disassemble a pen.

As far as CA finishing goes. Turn a blank until it is just round (not to size) and sand and apply CA finish. Turn off half the blank and vary one aspect of your application. Better or worse? turn away the worse portion and repeat the finish on that portion. Repeat removing the worse until you are satisfied with the results. It is more about getting a good finish than following a set process that works for someone else.

Hope this helps... Randy
 

leehljp

Member Liaison
Joined
Feb 6, 2005
Messages
9,314
Location
Tunica, Mississippi,
Randy has a very good suggestion on the calipers. Look for sales at HF. Most of the time calipers are $20+ but on sale they can be purchased for $10. DON'T get the "composite" calipers, get metal ones.

Measure the fittings and mark them down on a piece of paper. Measure the nose cone, the center band and the clip end. Turn the blanks; stop and measure, turn more, stop and measure. There are many thoughts on this and most all work - but it is along these lines: turn the blank down to the precise size or perhaps a bit more. I turn the blank down until it is .005 smaller than the nose cone (sometimes referred to as nib end) and center band and clip end. Apply CA as JohnT mentioned above and build up enough CA until it is about .005 or .01 larger than the target measurements. Sand back down to the perfect fittings.

It has been noticed above and I did also: you are afraid of turning too close or you are using the wrong bushings. Don't let this next suggestion scare you: Look up TBC, turning between centers. There are a lot of complications in learning to make a pen, and most people just do not want to learn something new once they have created what they think of as a somewhat decent pen. TBC is one of those things that many people wish that they had known earlier as it is more simple than using mandrels and puts the onus on using calipers, which makes a MUCH better fitting.
http://www.penturners.org/forum/f14/if-i-had-known-earlier-46654/
(In this link, I referred to Turning Between Centers as "Mandrel-less" - or without a mandrel. That was before it became widely known )


CA application: Everyone wants to make a pen and another and another when they just start out. a Good CA finish is one of the frustrations of just starting. One turns out perfect and the next 3 or 4 don't; then another good one followed by several that are just so-so. Honestly this goes on into the 20th, 25th and even 50th pen for some. The latter difficulties is not in the application of CA itself but in a combination of 1. oily woods don't like CA, 2. Temperature and Humidity changes with seasonal changes affect CA application, 3. CA Brands and older CA affect the application of CA as a finish - all minor points but enough to through the routine off!

How to overcome much of this: After you make 3 or 4 pens, get a cutoff of some pine or thrown away wood. Buy a dozen or 2 dozen extra tubes; cut the wood into blank sizes. Practice drilling 10 to 12. Then glue them up. Next, spend a morning or afternoon doing three things with the dozen blanks: 1. turning and measuring; 2. sanding to size and measuring; 3. Applying CA and finishing with sanding.
The Point is NOT a pen, but learning the step through practice. On my 3rd or 4th pen, I stopped and did this very thing. There was a HUGE difference in the pens from that point on. I learned the characteristics of CA; I learned not to be afraid to turn the blank down to size; I learned the pressures of sanding and grits. Learn to sand all sanding scratches out before applying CA. I do not start less than 320. 120, 180, all leave deep sanding scratches that are difficult to sand out for beginners. Sand to 400 at the least before applying CA.

Also At this point I learned something that ran against all wise woodworkers suggestions that I had been around since I was a kid: CA will stick to any wood (except oily wood) no matter how smooth. Wise woodworkers will say don't sand beyond 120 grit or 220 grit - so that the CA will adhere. That is in reality, nonsense. CA will stick to windshields for 50 years and it is smoother than most woods. I have paint on windows that have been on for more than 30 years. The grit does not determine how well CA will stick. Or paint will stick.
SO, sand it smooth. CA will stick to all except on oily woods and green wood (full of sap). On Oily woods, wipe Acetone over it and then apply CA. On wet/green woods dry them first.

It looks like on your first pict, it could be course sanding that is showing through. Don't use course sandpaper as those leave scratches that are hard to get out.
 
Last edited:

jrich7970

Member
Joined
Jun 13, 2020
Messages
124
Location
South Jersey, USA
IMHO the diagonal ridges are from CA application, nothing to do with turning or sanding prior. After applying CA you need to sand down completely smooth before micromesh/buffing. I usually start with 800 git and wet sand, I keep sanding until there are no shiny spots left. Then move up through the grits and micromesh. The problem that then crops up is sanding through the CA, which shows up as dull spots on the finish. The smoother your CA coats prior to sanding the better off you'll be. Sometimes it is best to apply CA, sand, and then apply more CA.

As for the oversized barrel - might be due to CA buildup in the bushing. But I tend to agree with others that if it was flush with the bushing then probably the wrong bushing - unlikely you applied that much CA.

Sanding between each coating of CA, or when I'm done all my coatings?
 

jrich7970

Member
Joined
Jun 13, 2020
Messages
124
Location
South Jersey, USA
I suspect that I really didn't turn the second pen to the bushing size. Here's another pic and you can see that one end of the blank IS correct, or, much closer to the correct size. And I checked, all the bushings I am using are the same size. My bad.

blank-bushing.jpg


There's another issue there...the bushings were black...and when I got close to that size, some of the black migrated to the blank. I fixed that (I think), by sanding all the black (is it paint? Why would they do that) off the bushings, so now they are just bare metal. I do have another set of bushings, which are the same size that appear to be stainless steel, or something similar. I might try them.
 

Dehn0045

Member
Joined
Mar 19, 2017
Messages
1,533
Location
US
Sanding between each coating of CA, or when I'm done all my coatings?

I usually apply several coats of CA. I use only BSI thin, and apply using open cell foam. I usually get about 0.001 thickness per coat. I first apply 4-6 coats. If you are using different application technique, then the number of coats you should do will vary -- this is where a digital calipers is extremely helpful. I then turn using a sharp skew to make sure the finished barrel is perfectly cylindrical. I then might repeat if I had to turn a lot of CA away to get rid of all the low points. This can happen if my CA application isn't smooth or if the turned blank has a lot of pits and valleys. Whether you turn or sand the approach should be the same. I take a lot of measurements to make sure I don't sand thru, it might be considered overkill to some. Since I am only a hobbyist the more pens I make the more expensive it gets, so I take my time - if you are trying to make a living at it then I'd probably recommend a different approach.

One approach I have taken in the past is to apply several coats of CA, then sand with 400 grit until only some low shiny spots are visible. Reapply several coats and then sand until all the low points are gone completely. Then proceed through the grits and MM.

There are 1000 ways to skin the cat. The main point is you need to get to a point where the surface is perfectly smooth (no low points) prior to moving on to final sanding/polishing. But you also need to make sure there is enough CA on the blank prior to final sanding/polishing where you don't leave bare wood in spots.
 

leehljp

Member Liaison
Joined
Feb 6, 2005
Messages
9,314
Location
Tunica, Mississippi,
. . . There's another issue there...the bushings were black...and when I got close to that size, some of the black migrated to the blank. I fixed that (I think), by sanding all the black (is it paint? Why would they do that) off the bushings, so now they are just bare metal. I do have another set of bushings, which are the same size that appear to be stainless steel, or something similar. I might try them.

Several problems are created with bushings on mandrels. Most can be overcome with practice and or experience. Bushings on Mandrels should be considered as CONSUMABLES. They will wear out - quicker than one would guess.

If you had measured the bushings with a good set of calipers before you sanded and then measured after you sanded the black off, you would notice a minuscule decrease in size. But even more so - once your chisel (or sandpaper) touches the bushings accidentally a couple of times per pen, the bushings will decrease in size to the point that after 10 to 20 pens, it will not be reliable for use for measuring/comparing to make a finished pen. At this point, you will need new bushings or move over to using calipers for measuring to size.

Turning between centers or using PSI's Mandrel saver allows the use of smaller or cone shaped bushings so that the chisel or sand paper does not touch the bushings and contaminate it with sanding dust.

BTW, the Mandrel saver or TBC will eliminate a number of problems that are associated with mandrels that you have yet to experience.
 

jrich7970

Member
Joined
Jun 13, 2020
Messages
124
Location
South Jersey, USA
Several problems are created with bushings on mandrels. Most can be overcome with practice and or experience. Bushings on Mandrels should be considered as CONSUMABLES. They will wear out - quicker than one would guess.

If you had measured the bushings with a good set of calipers before you sanded and then measured after you sanded the black off, you would notice a minuscule decrease in size. But even more so - once your chisel (or sandpaper) touches the bushings accidentally a couple of times per pen, the bushings will decrease in size to the point that after 10 to 20 pens, it will not be reliable for use for measuring/comparing to make a finished pen. At this point, you will need new bushings or move over to using calipers for measuring to size.

Turning between centers or using PSI's Mandrel saver allows the use of smaller or cone shaped bushings so that the chisel or sand paper does not touch the bushings and contaminate it with sanding dust.

BTW, the Mandrel saver or TBC will eliminate a number of problems that are associated with mandrels that you have yet to experience.

I HAVE hit the bushings with my chisel several times. Not a lot, but I'll get some calipers and check how much different they are from the other set. I do have a PSI mandrel saver and I'm using that. It just seems to make so much sense. I've read too many stories of people not being able to get things tight enough, or bending their mandrel, etc.

Here's a question....when using the CA finish, even with those plastic bushings, the CA does stick even though it's not supposed to. And it is very difficult to break away from the blank. And that second pic, I even chipped the finish on the blank. Is there a trick, other than just being careful, to avoid getting too much CA on the plastic bushings?
 

jttheclockman

Member
Joined
Feb 22, 2005
Messages
19,082
Location
NJ, USA.
Jeff to back to your question to me It varies. No rhyme or reason. Some times I will put on paper towel and sometimes I will drizzle on blank. But as I said 2 passes and I am done. Let the lathe spin and it will self level. Do not apply so much CA it starts slinging all over. Cover the lathe when doing a finish. When CA is applied and all layers are done sand down to dull finish being sure not to sand through or you have to start all over. The more pens you do the better the feel for amount of CA needed and sanding needed. It really does become a feel thing. The calipers is the way to zero in on a great pen fit. I will disagree with one thing. Bushings to me will last forever. Yes they will wear because you hit them with sandpaper and tools but to me that is exactly what I want. I use the standard bushings to get me in the ballpark and that is all. I take them off and now finish turning between centers using a live and dead center. I apply my Ca with them also. After a few coats I will take the blank off and clean CA from centers and ends and then finish up with final coats. No breaking off CA on ends or anything like that.
 

jrich7970

Member
Joined
Jun 13, 2020
Messages
124
Location
South Jersey, USA
Jeff to back to your question to me It varies. No rhyme or reason. Some times I will put on paper towel and sometimes I will drizzle on blank. But as I said 2 passes and I am done. Let the lathe spin and it will self level. Do not apply so much CA it starts slinging all over. Cover the lathe when doing a finish. When CA is applied and all layers are done sand down to dull finish being sure not to sand through or you have to start all over. The more pens you do the better the feel for amount of CA needed and sanding needed. It really does become a feel thing. The calipers is the way to zero in on a great pen fit. I will disagree with one thing. Bushings to me will last forever. Yes they will wear because you hit them with sandpaper and tools but to me that is exactly what I want. I use the standard bushings to get me in the ballpark and that is all. I take them off and now finish turning between centers using a live and dead center. I apply my Ca with them also. After a few coats I will take the blank off and clean CA from centers and ends and then finish up with final coats. No breaking off CA on ends or anything like that.

So, you use no activatore/accelerator to dry the CA? How long (on average) does it take to dry, say, with the lathe running?
 

jttheclockman

Member
Joined
Feb 22, 2005
Messages
19,082
Location
NJ, USA.
So, you use no activatore/accelerator to dry the CA? How long (on average) does it take to dry, say, with the lathe running?
Thin dries in about 5 min. Med about twice as long but I am never in a hurry. Many times I will be putting a coat of CA on a blank and walk away to do other things in the shop so many times never really time it. No I never use accelerator. I feel it makes the CA too brittle because it is forcing the drying action. But if you are going to use it make sure it is compatible to your CA because they are all not the same and that goes for CA too.

I never ever sand or MM a pen blank till at least 24 hrs cure time of CA and at times 48 hrs. CA needs to cure and not just dry. That is true with all finishes of any kind.
 

jrich7970

Member
Joined
Jun 13, 2020
Messages
124
Location
South Jersey, USA
I usually apply several coats of CA. I use only BSI thin, and apply using open cell foam. I usually get about 0.001 thickness per coat. I first apply 4-6 coats. If you are using different application technique, then the number of coats you should do will vary -- this is where a digital calipers is extremely helpful. I then turn using a sharp skew to make sure the finished barrel is perfectly cylindrical. I then might repeat if I had to turn a lot of CA away to get rid of all the low points. This can happen if my CA application isn't smooth or if the turned blank has a lot of pits and valleys. Whether you turn or sand the approach should be the same. I take a lot of measurements to make sure I don't sand thru, it might be considered overkill to some. Since I am only a hobbyist the more pens I make the more expensive it gets, so I take my time - if you are trying to make a living at it then I'd probably recommend a different approach.

One approach I have taken in the past is to apply several coats of CA, then sand with 400 grit until only some low shiny spots are visible. Reapply several coats and then sand until all the low points are gone completely. Then proceed through the grits and MM.

There are 1000 ways to skin the cat. The main point is you need to get to a point where the surface is perfectly smooth (no low points) prior to moving on to final sanding/polishing. But you also need to make sure there is enough CA on the blank prior to final sanding/polishing where you don't leave bare wood in spots.

So, you mention 400 grit (if needed) between coats of CA. If I'm mildly aggressive with 400 grit paper (yeah, I know mildly is subjective), how many layers of the CA do you think I might be taking off?
 

leehljp

Member Liaison
Joined
Feb 6, 2005
Messages
9,314
Location
Tunica, Mississippi,
The calipers is the way to zero in on a great pen fit. I will disagree with one thing. Bushings to me will last forever.

John, My bushings last forever too, but there is a caveat to it. You KNOW HOW to use them and I do too. Most people don't. I should have made that statement as a shock value and followed it up with an explanation. If calipers are not used to size blanks, then they (bushings) ARE consumables and lose their purpose. I learned that phrase from some of the good guys here back in 2005-2006 or 7. That was somewhat of a mantra back then. It still is today if caliper sizing is not used.

Jeff Richards:
Here's a question....when using the CA finish, even with those plastic bushings, the CA does stick even though it's not supposed to. And it is very difficult to break away from the blank. And that second pic, I even chipped the finish on the blank. Is there a trick, other than just being careful, to avoid getting too much CA on the plastic bushings?

Not all plastic bushings are the same. Part of it is your experience. With experience you will keep far more on the blank than on the bushings. Where bushings butt up against the blank, it is almost a solid horizontal line and they will be glued together. IF you have a cone shaped bushing going into the blank, it will look vaguely like this (cone shaped bushing>[blank]<cone shaped busing) That will make breaking off much easier and less problematic.

Here are some cone shaped bushings: https://www.pennstateind.com/store/PKDRYBU.html

TBC does similar but without a mandrel.
Here is a pict of the first TBC on this forum and I called it Mandrel-less back then - as there was no name for it.
Notice the tail stock and the drive cone made out of aluminum. They go into the tubes. I used normal bushings to turn it to near size; took the blank off the lathe and removed the bushings; then put it (blank) back on and turned to size (without the use of bushings) and CA'ed it. It takes all of 8 to 10 seconds to remove the bushings and get it back to turning without the bushings.

What drove me to try that was that on oily (ebony) blanks, when separating, the CA would separate from the ebony. A couple of guys mentioned to me about a method they had heard about that did not use mandrels. The sharp angle between the drive cone and tail stock is enough to allow the CA to break off away from the edge on the blank.
 
Last edited:

Dehn0045

Member
Joined
Mar 19, 2017
Messages
1,533
Location
US
So, you mention 400 grit (if needed) between coats of CA. If I'm mildly aggressive with 400 grit paper (yeah, I know mildly is subjective), how many layers of the CA do you think I might be taking off?

a "layer" or "coat" of CA is not really a good unit of measurement. When I use a paper towel with thin CA I figure the thickness of a coat of CA is about 0.0003", but when I use open cell foam it is about 3X as thick (or more). There is also the question of type of CA, medium/thick will give different results (though I don't often see penturners using thick). Also, different types of CA respond different to sanding -- medium tends to be "softer" than thin, and flex is even softer yet. Speed of the lathe. Whether you wet or dry sand. So many variables. Usually I shoot for about 0.002" or more excess CA with a final CA thickness around 0.003".

Based on my experience, I could probably do about 4-6 coats of thin using a paper towel and then sand with 400 pretty aggressive and not break through. I would then follow with 4-6 more coats and sand with 800 and MM. But due to the number of variables, you really just need to try and see what works for you.
 

egnald

Member
Joined
Jun 9, 2017
Messages
3,061
Location
Columbus, Nebraska, USA
Greetings from Nebraska, and welcome to the joys of pen turning. As many have already indicated, we all have different regimens that we use for finishing using CA. In case it helps, you figure something out, here is mine (my current one anyway).

1. Sand the wood down after turning. I use 400, 600, and 800 grit dry paper at about 800 RPM and follow up with lateral sanding with the lathe off to get rid of concentric sanding marks - not excessive sanding, just a little for each grit.

2. I replace the bushings with HDPE bushings (i.e. non-stick bushings). I make my own, but you can buy them from many of the pen supply houses.

3. I use VIVA Vantage paper towels cut into strips (until I am out and have to switch to something else - they are discontinued by the supplier). I cut them into strips using scissors to avoid any fraying or lint from tearing and then fold them a couple of times to make a small pad - maybe about 1 x 1 inch or so. I will likely try out the blue shop towels after my VIVA runs out - I hate it when things I use get discontinued.

4. I clean the blank using compressed air followed by wiping it down with paper towel soaked in Denatured Alcohol. Then I let it spin dry for a few minutes. (Oily woods like Cocobolo and Olive get a more aggressive cleaning with the DNA to take out some of the surface oil to assist with adhesion. You can tell when to stop based on the residue left behind on the paper towel).

5. I use StickFast Thin and Medium CA Finishes (maybe they are the same as glue, but they are labeled Finish and not Glue - and StickFast does sell both Finish and Glue). I also use it like somebody else is paying for it -- in other words, I wind up with more CA discarded on the paper towel pad than winds up on the pen. I'm a believer of lots of thin coats rather than a few thick applications - I had the ridges like in your photo when I used to use closed cell foam and other applicators that are less porous than the paper towels - i.e resulting in thicker and less uniform coats.

6. I apply 4 coats of thin, wiping across with the lathe turning at about 500-800 RPM - I put 2-3 drops on the paper towel pad then run it back and forth across the blank no more than 2 times using a fair amount of pressure (thin coats) and then right into my trash can. I have a 90 second hourglass timer that I use for the dry time between coats of thin.

7. I apply 8 to 12 coats of medium, again wiping across with the lathe turning at about 500-800 RPM - I put 2-3 drops on the paper towel pad then run it back and forth across the blank no more than 2 times using a fair amount of pressure (thin coats) and then right into my trash can. I follow each coat with two quick bursts of Stickfast CA Accelerator aerosol holding the can back about 12 inches. I only wait for as long as it takes to get my next paper towel pad folded before applying the next coat.

8. I remove the blanks and carefully sand off any CA fingernails (buildups) on the ends where the blank meets the non-stick bushings. A few quick figure 8's on a piece of fine sandpaper on a hard surface does the trick. Then I put a couple of drops of thin CA on a paper towel pad and twist the end of the blank down on it - just to make sure that any exposed end grain gets sealed back up following the fingernail trimming.

9. The blank then goes back on the lathe, but using the standard pen bushings instead of the non-Sticks for wet sanding with the 9 micromesh grits. Lathe speed about 800 RPM and 10 to 15 seconds of sanding followed by a quick lateral sanding with the lathe off for each micromesh pad.

The blanks are pretty shiny and nice after the final micromesh and could perhaps be considered done, but I still use a polishing rouge on a cotton buffer followed by buffing on a loose flannel wheel. (I used to use liquid plastic polish before I had buffing wheels, first satin then gloss, but occasionally some polish would wind up in a pinhole on the blank causing a white spot - a problem that I have never had using the buffing wheels).

I clean my HDPE (Non-Stick) bushings up with a short soak (5 minutes or so) in Acetone which dissolves all of the CA left behind on the bushings leaving them with no buildup (like new) and ready for the next pen.

I use a Nitrile finger cot on my finger when applying the CA Finish just in case some soaks through the paper towel. Better to glue paper towels to a finger cot than to a finger. Some people put a wrap of blue masking tape on their finger to serve this purpose.

Sorry for having such a verbose response. It must be the engineer in me coming out - details, details, details.

Regards,
Dave (egnald)
 

Jans husband

Member
Joined
May 4, 2020
Messages
273
Location
Doncaster England
Just a query-

Is there any other method than using what is (after all) a strong glue to finish pens.

I have not used CA to date-only fine sanding and a wood/pen polish from my local woodturners shop. Is there anything wrong with that?

I use CA glue for sticking tubes in blanks, although I am willing to give it a try as a finisher if there are good reasons to do that.

Mike
 

jttheclockman

Member
Joined
Feb 22, 2005
Messages
19,082
Location
NJ, USA.
You are correct Hank and sometimes I forget being I probably said these things so many times before here. We do have to be aware who is reading. Thanks.
 

jttheclockman

Member
Joined
Feb 22, 2005
Messages
19,082
Location
NJ, USA.
Just a query-

Is there any other method than using what is (after all) a strong glue to finish pens.

I have not used CA to date-only fine sanding and a wood/pen polish from my local woodturners shop. Is there anything wrong with that?

I use CA glue for sticking tubes in blanks, although I am willing to give it a try as a finisher if there are good reasons to do that.

Mike
Look at Exotics Blanks site and Ed has videos of Gluboost or whatever it is called. Some people use poly and use """their""" dipping method" and some people spray lacquer. All work well.
 
Joined
Dec 22, 2017
Messages
3,036
Location
Wolf Creek Montana
Just a query-

Is there any other method than using what is (after all) a strong glue to finish pens.

I have not used CA to date-only fine sanding and a wood/pen polish from my local woodturners shop. Is there anything wrong with that?

I use CA glue for sticking tubes in blanks, although I am willing to give it a try as a finisher if there are good reasons to do that.

Mike


After thoroughly sanding my blank I use compressed air to get any dust off of the blank prior to finishing. My finish consists of several coats of Wipe On Poly used as a friction polish applied using a blue shop towel and the lathe set at around 2,000rpm. Let the blank sit for 24 hours then use 00 steel wool to smooth it out, use a light touch. Sometimes I put another light coat of the Poly on after I've used the steel wool. I finish up by putting a quality paste wax on it and then buff on a buffing wheel. This finish holds up very well for me.
 

jrich7970

Member
Joined
Jun 13, 2020
Messages
124
Location
South Jersey, USA
OK. So I just finished the 3rd pen, and I'm much happier with it. It took much longer, but I'm OK with that. And, after I start just turning random hunks of wood, which I'll do, especially since I don't have anymore kits left at the moment, I may find something that works better for me.

20200615_163456.jpg


Here's a problem spot...and I'm not talking about the "raggedness" of it...actually you can't see it well in this picture, but it's a little "foggy".

20200615_163436.jpg


So, what I did here was specifically looked for those diagonal marks after every coat of CA, through a magnifying glass. And if I saw them, I went after the blank with 400 grit sandpaper until they were gone, with the lathe running, then stopped the lathe and sanded with the grain. Then went to a wet 600. More CA, same thing.

When I was up to maybe six coats, I sanded again, but then went to the MM, from 1500 up to 12000.

Then I polished with Meguires Ultimate Compound (really for cars), because that's all I had at the moment, and this is a "learning pen".

I put it on, with the lathe running, then left it sit for about 10 minutes, then wiped it off, lathe running, blue cloth.

One thing I did notice, though, when I originally wiped it on, you could see that it went on in a big gloppy diagonal pattern. So, that's what's happening with the CA. So, I have to figure that out.

But overall, I'm MUCH happier with this pen.

Now, if I can just get to Staples and get some decent ink cartridges....because the ones that come with the kits kind of suck.

Thanks for the help and advice!

And I'll be trying new strategies too. I'm intrigued by the GluBoost video...
 

leehljp

Member Liaison
Joined
Feb 6, 2005
Messages
9,314
Location
Tunica, Mississippi,
Just a query-
Is there any other method than using what is (after all) a strong glue to finish pens.

I have not used CA to date-only fine sanding and a wood/pen polish from my local woodturners shop. Is there anything wrong with that?
I use CA glue for sticking tubes in blanks, although I am willing to give it a try as a finisher if there are good reasons to do that.
Mike

Mike, there are several other finishes but each has its own characteristics, strengths an weaknesses. Lately three or four guys are using urushi, a Japanese finish that takes days and days (and weeks) just for the finish, but if the quality is there, sales will be equivalent to (in American dollars): $1000 - $10,000 in the right markets.

Different kinds of Lacquer related finishes are good. But while lacquer dries to touch and cures to handling in a few hours for pens, - 24 to 48 hours of curing is recommended depending on the specific brand and kind.

Polyurethane of different kinds, particularly kinds that are made for hard finishes such as gym floors or bowling lanes. Again, this type of finish requires 24 to 48 hours of curing in general to handle a pen. Some get away with less, but they have learned how to do it.

There there are waxes that evaporate over a week or two; The best longest lasting "oil" finish is (real) tung oil and it is the most water resistant. But the finishing time will be about a week - from my experience.

Why so long for supposedly quick curing finish on pens? WOOD PENS are not used like Wood Furniture. We don't handle wood furniture dozens of times every day, or put them into warm humid pockets, or hold them with sweaty hands or fingers. The acidic humidity of the body or hands do damage to finishes. The heat of being out in direct sunlight or going from freezing temperatures in winter to 80 degrees inside in a matter of minutes - that is disruptive to finishes. They need to be cured well before being handled.

Back to CA - CA is Quick, it is Hard, It is Protective. I developed a severe allergy to CA about 15 years ago and tried several finishes for several months (I was in Japan at the time but did not attempt the Urushi). After several trials with different finishes, I decided to build a dust collector system and buy a couple of good respirators and masks to halt the allergens. I still use CA.
 

egnald

Member
Joined
Jun 9, 2017
Messages
3,061
Location
Columbus, Nebraska, USA
Greetings - nice to see you progressing. It always takes a few pens to work out a regimen that we are satisfied with. I'm sure someone has also mentioned that you can buy replacement brass tubes and disassemble pens to re-use the mechanism if you are not satisfied with how the final pen turned out.

As for fogginess, CA glue is sensitive to moisture, so if you are applying it after wet sanding you should make sure that the blank has thoroughly dried before putting the next coat. I've never experienced it myself, but I've heard that CA finishes are so sensitive to water that they can get foggy even if the blank is dry but the humidity is extremely high.

I'm anxious to see your next few pens.

Regards,
Dave (egnald)
 

jrich7970

Member
Joined
Jun 13, 2020
Messages
124
Location
South Jersey, USA
Greetings - nice to see you progressing. It always takes a few pens to work out a regimen that we are satisfied with. I'm sure someone has also mentioned that you can buy replacement brass tubes and disassemble pens to re-use the mechanism if you are not satisfied with how the final pen turned out.

As for fogginess, CA glue is sensitive to moisture, so if you are applying it after wet sanding you should make sure that the blank has thoroughly dried before putting the next coat. I've never experienced it myself, but I've heard that CA finishes are so sensitive to water that they can get foggy even if the blank is dry but the humidity is extremely high.

I'm anxious to see your next few pens.

Regards,
Dave (egnald)

The foggieness may indeed be because of moisture. Like I mentioned, I was dry and wet sanding between each coat of CA...maybe I was impatient and didn't let it dry.
 

jrich7970

Member
Joined
Jun 13, 2020
Messages
124
Location
South Jersey, USA
So I saw a vid by someone else who had what I thought was an interesting method and theory.

I'm paraphrasing what he did, but first, he turned the pen and sanded it smooth, but not super smooth.

Then he put on a coat of CA, but did NOT use activator. He put it on thick, then rubbed it in, hard, until it actually got sticky. At that point, there were actually pieces of paper towel breaking off and sticking to the pen.

He did eventually let it dry, but not with activator.

Then he sanded all of the CA off, and sanded the pen to totally smooth. Then applied other finishes like Triple E and Shellawax.

He ended up with an almost matte finish, which he claimed in his experience people preferred because of the "feel" of the matte finish as opposed to the almost glass-like slipperiness of a high gloss.

His theory regarding the CA was this: His one coat of CA and the way he applied it let the CA penetrate into the fibers of the wood just enough to glue them together, as it were, and that was all that was needed for protection from nicks, etc. Almost like stabilization, I guess. And since he wanted a matte finish anyway, he didn't need any CA.

Do you guys think there is any merit to this?
 

jttheclockman

Member
Joined
Feb 22, 2005
Messages
19,082
Location
NJ, USA.
So I saw a vid by someone else who had what I thought was an interesting method and theory.

I'm paraphrasing what he did, but first, he turned the pen and sanded it smooth, but not super smooth.

Then he put on a coat of CA, but did NOT use activator. He put it on thick, then rubbed it in, hard, until it actually got sticky. At that point, there were actually pieces of paper towel breaking off and sticking to the pen.

He did eventually let it dry, but not with activator.

Then he sanded all of the CA off, and sanded the pen to totally smooth. Then applied other finishes like Triple E and Shellawax.

He ended up with an almost matte finish, which he claimed in his experience people preferred because of the "feel" of the matte finish as opposed to the almost glass-like slipperiness of a high gloss.

His theory regarding the CA was this: His one coat of CA and the way he applied it let the CA penetrate into the fibers of the wood just enough to glue them together, as it were, and that was all that was needed for protection from nicks, etc. Almost like stabilization, I guess. And since he wanted a matte finish anyway, he didn't need any CA.

Do you guys think there is any merit to this?
Just a method he developed. Add it to the list of over 1000 ways to do a pen finish. If he really wanted to do that he could have used a couple coats of thin CA and he did not have to get aggressive with it and have paper towels stuck to it. It did not make the CA go any deeper into the grain. You can do a total CA finish and knock it back with a lower grit of MM and it will give a satin look and feel. Yes some people think they like the feel of real wood as opposed to plastic. But as I said you can do that with CA as well. Just different strokes for different folks.
 

leehljp

Member Liaison
Joined
Feb 6, 2005
Messages
9,314
Location
Tunica, Mississippi,
As to Fogging: Several causes: Wet sanding, some green wood, wide humidity changes, and then there is the chemical process. Ever get a glass of cold water, lemonade or cola with the glass full of ice and put it on a picnic table (and it even happens inside) THEN notice how much moisture suddenly develops on the outside? Temperature differences - when CA heats up, it draws moisture from up under the CA and fog happens.


JRich - Yes that is a good method and theory. The one coat of CA and sanding down is the same principal that woodworkers have used for centuries who wet the wood or use sanding sealer to get the fibers up and then sand it. Makes it smoother. As John T, there are a 1000 ways to do things here. This is a very interesting place!

Wax is a protectorate and it is also very time defined. Wood needs to be waxed regularly to maintain its beauty - especially with pens. Warm moist shirt pockets and clammy hands deposit caustic sweat just from holding it several times a day. People who pay hundreds of dollars for a pen are likely to keep it clean and waxed - and that is usually fountain pens. Rarely will one find a person who uses ball point/roller ball pens do this kind of cleaning on a consistent basis.

To the uninitiated, a well waxed triple E and shellwaq "finishes" are deceptive. I learned that truth the hard way. One of my early pens was a Purple Heart and the fit and finish was great. I made it for a co-worker and it was my first pen with waxes. Very shiny. The coworker really liked it. Then four days later she brought it to me and asked what happened to the finish?. . . It wore off. A clear non-shine is better in my opinion. I personally like (real) tung oil finishes but that takes a week or more. It protects against moisture and the real wood can be felt.

There are fellows here that make primarily wood pens with wood feel finishes and they do well. But in all probability there is a 50 to 1 ration of those who like shiny over matt finish. Shiny is not necessarily bad. Martin (Manupropia) uses urushi (a Japanese lacquer) and while I do not know specifically what he gets for his pens, I know where he sells some and they will be in the $5000 range. You would not get that with a wax finished pen.

"Wood Feel" is more tactile feeling, it is more about perception than real feel. Wood can have a flat/matt finish (CA, Lacquer, Poly) 1/100 inch thick and the feel can be made to be almost identical to the wood with a matt wax. There are those that like that, but shine sells in much greater numbers, both on high end and low end pens. If you do (as a few have) assemble a group of clientele for a particular type such as all wood feel, then you will draw those, and those clientele will probably be the only ones you will see. Don't let that fool you into thinking that is what most people like.

I have been doing wood working projects as a hobby since I was a kid back in the '50s. I love the wood feel versus painted furniture. So I am not against "wood" feel. In pens, pens are not furniture and are not treated in the same way. They are far more likely to get dirty and grimy from constant use unless cleaned regularly. A hard protective (and shiny) finish will keep it clean for a long time. Ever noticed the kitchen cabinet doors where the handles are? After daily openings over a years time, they can get grimy - from hands. Pens will do the same unless cleaned or protected regularly. Waxes don't keep them clean.
 

jrich7970

Member
Joined
Jun 13, 2020
Messages
124
Location
South Jersey, USA
JRich - Yes that is a good method and theory. The one coat of CA and sanding down is the same principal that woodworkers have used for centuries who wet the wood or use sanding sealer to get the fibers up and then sand it. Makes it smoother. As John T, there are a 1000 ways to do things here. This is a very interesting place!

Wax is a protectorate and it is also very time defined. Wood needs to be waxed regularly to maintain its beauty - especially with pens. Warm moist shirt pockets and clammy hands deposit caustic sweat just from holding it several times a day. People who pay hundreds of dollars for a pen are likely to keep it clean and waxed - and that is usually fountain pens. Rarely will one find a person who uses ball point/roller ball pens do this kind of cleaning on a consistent basis.

To the uninitiated, a well waxed triple E and shellwaq "finishes" are deceptive. I learned that truth the hard way. One of my early pens was a Purple Heart and the fit and finish was great. I made it for a co-worker and it was my first pen with waxes. Very shiny. The coworker really liked it. Then four days later she brought it to me and asked what happened to the finish?. . . It wore off. A clear non-shine is better in my opinion. I personally like (real) tung oil finishes but that takes a week or more. It protects against moisture and the real wood can be felt.

Re: Wetting wood to bring the grain up....yes, I use that for my cutting boards, and also for a live edge table I made for my daughter about a month back. Really, makes a difference.

Re: Purple Heart...OK...I have enough Purple Heart left over from my latest cutting board to make about 15 3/4 x 3/4 x 5 inch blanks. But I have heard that it discolors. I have not seen this evidence of this on that piece of wood, nor the piece of my cutting board that I trimmed off. Now...I did not TURN that piece of wood, and it has not been sitting in the sun, it's been in my basement. So, what is the deal there? Also I saw a vid...after turning the purple heart blank looked sort of dark and maybe red. But it was not bright at all. So he actually heated it with a small torch and sanded it again after that. That made it more purple again.

I'd like to make a pen or two out of that purple heart, especially since a friend remarked how he liked that wood when he saw my cutting board...but I don't want to give him something that's boring.

I also have a bunch of padauk, cherry, walnut, and maple. All waiting for me to make pens out of them. Any problems there?
 

leehljp

Member Liaison
Joined
Feb 6, 2005
Messages
9,314
Location
Tunica, Mississippi,
Actually there is no long term stabilizer for beautiful woods to make them stay the original color. Fresh cherry is beautiful but the aged cherry is even better in my opinion. There is a form of scrollsawing that uses different colored woods to make beautiful pictures called intarsia. Intarsia purists will not use dyed or stained wood but different colored woods for their pictures. Everyone that I have talked to say that all wood will change with time. Some 10 years, some maybe 20 years, but they change color with age.

I have had some beautiful white holly and sealed it real well. Still it looked like ivory after 15 years or so. Some woods colors can be revived as you mentioned with the Purple Heart, but it takes some effort.

That said, an interesting thing happened to me when I lived in Japan in the Toyota City area. There was one hardware/wood shop that I would frequent. They had many slabs of wood approximately 3 inches thick by about 2 ft wide and 3 to 4 ft tall. One beautiful brown one, very much the color of kiln dried walnut stood out to me. At the equivalent of about a hundred dollars, I passed on it for two or three years. Then I decided I wanted it. I asked what kind of wood it was and a guy said Kuwa. Kuwa? I had no idea. I saw the letters ku & wa or くわ on a small piece of paper so I thought a minute, and asked the guy "silk worms?" he said yes. It was mulberry! I bought the piece and took it home.

Then the SHOCK came, when I cut a piece off, the inside was almost the color of teak! With long aging it turns walnut brown! Strong UV protectors do slow the color changes.

As to making pens from such woods, don't hold back or you will never do it. Go for it.
 
Top Bottom