Need help getting aluminum veneer to adhere to wood

Signed-In Members Don't See This Ad

ramaroodle

Member
Joined
Feb 15, 2018
Messages
686
Location
Seattle
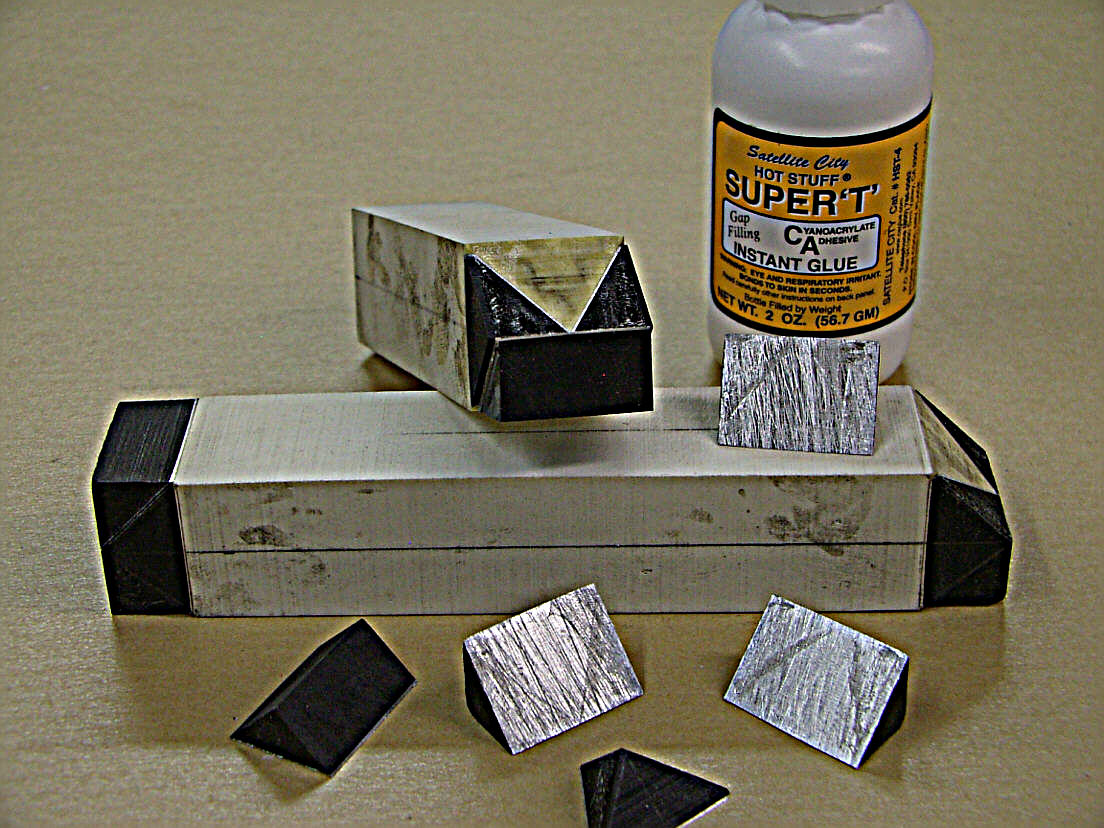
I really like the look of using aluminum as the outer layer of a veneer sandwich in Celtic knots and segments but am having trouble getting it to reliably adhere to the wood in the blank like in the pic below. I have tried both med and thin CA and sand it before glue up to roughen it up. I've tried Alum. cans, baking trays and even thicker .75mm sheets from Amazon. It always seems to be the weak point in the blank which is expected but sometimes it just doesn't seem to hold, even curing overnight.

I'll post some pics later.

Any suggestions would be greatly appreciated.

Thanks in advance.

sf2YYXIl.jpg
 
Signed-In Members Don't See This Ad

Sly Dog

Member
Joined
Nov 16, 2018
Messages
417
Location
Boise, Idaho
Think they use epoxy to bond them.

That is my experience too. I think you can find old threads here discussing CA's tendency to break down with heat - and aluminum will get hot when drilling and turning. Still, I had to learn that lesson for myself and, afterward, have not used anything but epoxy. I've had a failure or two with epoxy, but failures were greatly reduced.

There are a lot of choices of epoxies; I've generally used 5 minute types like Gorilla and let them cure for 24 hours before drilling. Still, drill very slowly backing out frequently to clear chips and let the bit cool down. Some use a lubricant on the bit.

Good luck!

Russ
 

TG Design

Member
Joined
Jan 22, 2018
Messages
267
Location
Dayton, Oh
I sand the aluminum with 100 grit, apply epoxy, and then clamp them. I usually let them sit over night and drill them the next day.

Good luck, can't wait to see the finished pen, I like your color combinations.


Sent from my iPhone using Penturners.org mobile app
 

ramaroodle

Member
Joined
Feb 15, 2018
Messages
686
Location
Seattle
When is it coming apart? Is it during the drilling that is making it do that?
Sometimes in the drilling but usually in the turning. My experience with turning is that in general most fails are the result of the tube not adhering to the blank. I think my ADHD wants me to use CA for quicker results. I found that Gorilla glue does a better job on the tube but as long as I'm gonna use epoxy and need to let it cure overnight I might as well use epoxy on the tube also. Maybe using a little sandpaper in the slot or segments will help too. Also making sure the entire blank is held between the jaws of the pen blank chuck helps too. Just trying to come up with a technique that works consistently. Seems like it needs to be an overnight curing thing also.

Thanks
 
Last edited:

ramaroodle

Member
Joined
Feb 15, 2018
Messages
686
Location
Seattle
Once I heard that polyurethane glue would bond wood veneer to aluminum dashboards, but I have no experience with it.
Yeah, that's why I was thinking of switching to Gorilla glue but epoxy seems like an even better idea.

Gonna make up some veneer sheets, try both and let them cure overnight and see which gives me the best results before putting them in a blank.
 

KenB259

Member
Joined
Dec 24, 2017
Messages
3,537
Location
Michigan
Heat is your big enemy using aluminum. A couple of things you should do.. First avoid the 5 minute epoxy when you're using aluminum. You really need the longer curing variety, the bond is much stronger. Second, after scuffing up the aluminum, make sure you clean it with denatured alcohol, then never touch it again with bare hands. You don't want any oil from your hands getting on the aluminum. Don't hurry the process, if you do, your probably going to experience a failure. Good luck and don't give up, you'll get there.


Sent from my iPhone using Penturners.org mobile app
 

ramaroodle

Member
Joined
Feb 15, 2018
Messages
686
Location
Seattle
Heat is your big enemy using aluminum. A couple of things you should do.. First avoid the 5 minute epoxy when you're using aluminum. You really need the longer curing variety, the bond is much stronger. Second, after scuffing up the aluminum, make sure you clean it with denatured alcohol, then never touch it again with bare hands. You don't want any oil from your hands getting on the aluminum. Don't hurry the process, if you do, your probably going to experience a failure. Good luck and don't give up, you'll get there.


Sent from my iPhone using Penturners.org mobile app

Yeah, was just on my way to get something other than the 5 min epoxy I have. DNA makes sense. (better than acetone?) I'm thinking I will round off the hard edges of the blank before turning too.

As always, the little things in each step add up to success in the end. Stand by for another post in a few days, but I think you guys have me on the right track now.

You guys are awesome! Should have posted this a few days ago before I grew these extra gray hairs.
 
Last edited:

KenB259

Member
Joined
Dec 24, 2017
Messages
3,537
Location
Michigan
Heat is your big enemy using aluminum. A couple of things you should do.. First avoid the 5 minute epoxy when you're using aluminum. You really need the longer curing variety, the bond is much stronger. Second, after scuffing up the aluminum, make sure you clean it with denatured alcohol, then never touch it again with bare hands. You don't want any oil from your hands getting on the aluminum. Don't hurry the process, if you do, your probably going to experience a failure. Good luck and don't give up, you'll get there.


Sent from my iPhone using Penturners.org mobile app

Yeah, was just on my way to get something other than the 5 min epoxy I have. DNA makes sense. (better than acetone?) I'm thinking I will round off the hard edges of the blank before turning too.

As always, the little things in each step add up to success in the end. Stand by for another post in a few days, but I think you guys have me on the right track now.

You guys are awesome! Should have posted this a few days ago before I grew these extra gray hairs.


I don't know if DNA is better than alcohol or not, either one will clean the oils and sanding up. I would imagine either one is fine.


Sent from my iPad using Penturners.org mobile app
 

Brian G

Member
Joined
Jul 2, 2013
Messages
1,567
Location
Bloomington, MN
I use aluminum flashing purchased from a home center. I clean it with denatured alcohol. I also scuff with 150 sand paper and clean it again. Don't waste time with aluminum cans.

I use fresh, thick CA to make the veneers and to glue ithem in the kerf, but use epoxy to glue tubes.

Make sure your drills are sharp. Out of the box, they are not sharp enough. Buy a Drill Doctor and sharpen your drills. I regrind to a 135° and split the point. Let the drill do the work and don't force it. Fast or slow doesn't matter if you avoid heat. I go a little fast, maybe around 920 rpm on the lathe. Small depths at a time. For a Celtic knot, the point where all of the segments crisscross is the critical point.

I don't always succeed, and experience a drilling failure now and then. That's the way it goes; accept it, try to figure out what went wrong, and try again.
 

jttheclockman

Member
Joined
Feb 22, 2005
Messages
19,084
Location
NJ, USA.
I have done my share with aluminum and knots and here is an example so that you know that I am speaking from experience. I have given this advice many times here so here it is again. Forget CA when segmenting and I mean it. Others may have had success but they were lucky. CA is not meant to adhere wood. It is a brittle adhesive. Yes it is a quick fix but when doing segmenting work you can not be in a hurry. Too much work goes into it.

If you are using epoxy and waiting 24 hours for it to cure than why in the world are you using 5 min. epoxy?? Never could understand this logic. Any of the epoxies that are less than 24 hour cure are not as strong and that is fact. I am a nd always will be a huge user of System III T88 epoxy for doing segment work and also gluing in tubes. I never use CA. Now if doing an all wood segment blank then I use Titebond II wood glue made to glue wood again not CA. I say this stuff because wood moves and flexibility in the adhesive has an affect of staying together when dropped or even worked. Yes heat is always bad in pen making so avoid it weather drilling or turning.

Stay away from cans for aluminum. If you use them you need to sand off the paint and decontaminate it from the liquids. Aluminum sheets can be purchased or even the use of aluminum flashing is a good choice. Sanding to add tooth is needed as well as cleaning with DNA or acetone. I prefer acetone. Gluing with epoxy is my choice as mentioned. Do not over clamp to starve the joint. Let set for at least 24 hours in a dry warm area before drilling. Drill with sharp bits and keep cool. I choose to cool my bits with DNA as I drill. Has worked for me for over 15 years now. Good luck.


View in Gallery
 

robutacion

Member
Joined
Aug 6, 2009
Messages
6,514
Location
Australia - SA Adelaide Hills
Is my understanding that taking the time and use glues that have the most adhesive strength for these of segmentation are crucial to keeping all pieces together but I also believe that most of the fails happen when the blank has been turned, any small catch and most times it's the end of the blank and that is very upsetting after spending all that time putting all pieces together, drilling, etc., so, I remind and suggest you have a look at what the "Flap disc system" is capable to do particularly or fragile and difficult to turn blanks.

You have nothing to lose and you may decide that it's easier, faster and safer than using gauges, not everybody likes it but some do.

Cheers
George
 

ramaroodle

Member
Joined
Feb 15, 2018
Messages
686
Location
Seattle
BrianG, flashing and sharp drills John, No CA, ever and titebond for wood. (since it dries stronger than the wood) and don't over clamp. & George.... Yes, there is nothing like spending all that time only to have it explode on the lathe. I have those discs. Never occured to me to use them on pens. Thanks. I even have a right angle drill around here somewhere You should be linking that vid you made. That was brilliant and worth the price of admission.!

The other thing I'm gonna try (because I like the look and it seems to be less labor intensive and risky) is this Gisi style blank technique. Seems similar enough to scallops. I can also make (or buy) Gisi molds for hybrid casting.

VwUbwLbm.jpg


My knots are getting better but I still want to get the aluminum in there. I got a copper sheet too.
UoFlFqOm.jpg


This is the jig I made for cutting scallops, segments and knots based on a design by John. On the upper left is a spacer made of aluminum track that allows me to cut repeatable thin strips down to 1/64" depending on the wood being used. This comes in handy when cutting veneer to insert into the groove made by the saw blade when making knots. I also added a clear blade guard as small chips are sometimes directed at my face. I also replaced the hinged clamp with my DIY aluminum clamps. Biggest drawback of this jig is that the table saw blade eats up a lot more stock vs using the bandsaw but that is a trade off I'm willing to make for accuracy and repeatability. As you can probably see the setup on the lower left allows me to easily switch between the 65 and 45 degree angles.

GUoj00Om.jpg

nwruSbwm.jpg


Thanks guys. The internet is a wonderful thing. :biggrin:
 
Last edited:

jttheclockman

Member
Joined
Feb 22, 2005
Messages
19,084
Location
NJ, USA.
Not to contradict anyone or belabor this point but heat is just a small factor and it can have a negative effect on the outcome for sure. But here is a photo of a blank I did a few years ago and used thick CA and let this sit for more than 2 days before I wanted to work it. I made sure I did things slowly and did not rush it. Everything looked good all glued up but when I went to work it the segments just fell off. CA is too brittle believe me. Never used that rubbery flex CA for anything so I can not speak to that. Unfortunately I never revisited this project but I will because it is a blank I do want to make. Now wood used can play a part too. If you use a more open grain wood you possibly can get more CA to get absorbed in it than a closed grain such as this Holly.


View in Gallery
 

ramaroodle

Member
Joined
Feb 15, 2018
Messages
686
Location
Seattle
OK. Making progress. If you want to sub to this thread I'll keep you up to date with the journey and I'll let you know what works.

I bought 5min clear JB Weld, sanded a piece of .7mm (.03") aluminum, wiped it with acetone and stuck it together with a spring clamp. An hour later I could not peel them apart. I bought JB because it has shown to be stronger than most and because I didn't want to wait an hour between celtic knot cuts figuring the inserts would stay put in the slots after 10 mins while I proceeded thus avoiding a sticky mess.

Next step will be to make up a blank, let it cure overnight, drill it then use the JB to glue in the tube, taking my time to ensure it doesn't heat up too much. I plan on trying George's flapper method to turn it round after practicing on another blank.
 

ramaroodle

Member
Joined
Feb 15, 2018
Messages
686
Location
Seattle
OK More progress. I had this blank glued up before starting this thread using CA but I used epoxy on the tube and used George's disc/flapper technique to round off the blank. Started with a 36 grit disc then switched to an 80 then 120 grit flapper (although it does create A LOT of dust). So using epoxy throughout the process should sure things up. Slow speed and a little DNA in the drill hole to avoid too much heat. You can see a few spots where the thin aluminum has come outside of the lines a bit but switching to flashing like John suggested should take care of that and even allow the use of the aluminum and copper sheets which even are thicker.

iKAvNalm.jpg


vQx3Bbw.jpg


iKAvNal.jpg
 
Last edited:

jttheclockman

Member
Joined
Feb 22, 2005
Messages
19,084
Location
NJ, USA.
Wow that is some magnification and rather large photos. :):) You do see all the defects when looking at it that way. What I do not get is the colored edges when using CA. CA is clear and you should not get discoloration like that. I am not a fan of the sanding method but that is just me. A good carbide cutter should eat that with no problem and leave you with clean cut lines and not folded over edges. Are you cutting all the way through the blank and gluing back together?? I ask because you spacing is off. If you are dead on those small triangles are exact the same top and bottom of the knot and the ones on the sides also match each other. I suggest you not cut all the way through and leave about 1/16" in a 1" square blank. Now match that kerf with fill in material where the inlay slides in snug but not tight. Too loose and you pull together when clamping and the spacing is off. If I am doing an elaborate segmented blank I will knock the corners off on bandsaw. Other wise turn as is with a round carbide cutter till I get close to finish size and then skew rest of the way.

Keep at it you are getting there.:)
 

tomas

Member
Joined
Jul 12, 2010
Messages
482
Location
Rio Rancho, NM
Epoxy and clamping get my vote of confidence. Also, I was thinking of using roof flashing. You can get a lifetime supply with a roll from HD or Lowe's. One after thought, check a local aluminum supply house regarding different gauges, hardness, and bonding methods. I had a client once named Explosive Engineering. Their specialty was bonding normally non-compatible materials with explosives. Just a thought.

Tomas
 

ramaroodle

Member
Joined
Feb 15, 2018
Messages
686
Location
Seattle
Don't cut all the way through. I slice the veneers so they fit the blade kerf. I just can't seem to get the blank to stay together using CA even with my carbides. I use a stop block when cutting the slots so not sure why they are uneven. Why would that be? I use a 1" blank. I have a jig for knocking off the corners.

What type of CA do you use? Thick, med, thin, brand? Technique? Any advice is appreciated.
 

tomas

Member
Joined
Jul 12, 2010
Messages
482
Location
Rio Rancho, NM
OK More progress. I had this blank glued up before starting this thread using CA but I used epoxy on the tube and used George's disc/flapper technique to round off the blank. Started with a 36 grit disc then switched to an 80 then 120 grit flapper (although it does create A LOT of dust). So using epoxy throughout the process should sure things up. Slow speed and a little DNA in the drill hole to avoid too much heat. You can see a few spots where the thin aluminum has come outside of the lines a bit but switching to flashing like John suggested should take care of that and even allow the use of the aluminum and copper sheets which even are thicker.

Ramadoodle, I'm a little troubled by the aluminum "smearing". To me it looks like the aluminum is too soft. In my previous post, I mentioned checking with a supply house. They should be able to furnish you with some aluminum with a higher hardness level that may sand cleaner. Showing them the pictures should get them interested.

Do you finish up with wet MM?

Tomas
 
Last edited:

jttheclockman

Member
Joined
Feb 22, 2005
Messages
19,084
Location
NJ, USA.
Don't cut all the way through. I slice the veneers so they fit the blade kerf. I just can't seem to get the blank to stay together using CA even with my carbides. I use a stop block when cutting the slots so not sure why they are uneven. Why would that be? I use a 1" blank. I have a jig for knocking off the corners.

What type of CA do you use? Thick, med, thin, brand? Technique? Any advice is appreciated.

A couple things can happen when making this design and other segmented designs too. First If you are not cutting all the way through that will help with alignment only if you use an infill that matches the kerf exactly. If you squeeze the blank together when gluing or spread it some when gluing in the infill then those triangles will be off. The other thing is when blank is glued, you need to drill dead center of the pattern or that too can throw the pieces off. No matter if you square the blank up again after all said and done. The drilling depends on center line not center of blank.

I told you I do not use CA. I always use epoxy.
 

ramaroodle

Member
Joined
Feb 15, 2018
Messages
686
Location
Seattle
John - Got it. I misunderstood you thinking you were saying to use CA to not get discolored edges.

Tomas - Thanks. Yes the aluminum is too thin or soft. It's just cheap dollar store baking pan. Only a little thicker than a soda can. That's why I mentioned trying aluminum flashing.


It seems like if I use epoxy on the blank and tube that it should hold together and allow me to use my carbides and a skew. In fact I may go over it with a skew to see if I can get rid of the smeared aluminum. This isn't supposed to be a finished blank. Just a coat of thin CA to see how it looks. I am trying to use thin aluminum just as an accent to sandwich the veneer. I would use thicker aluminum if I just wanted to make aluminum knots.
 

ramaroodle

Member
Joined
Feb 15, 2018
Messages
686
Location
Seattle
Ramadoodle, I'm a little troubled by the aluminum "smearing". To me it looks like the aluminum is too soft.

Do you finish up with wet MM?

Tomas

Just to be clear, I used the flapper method just to see how it worked and because this blank was made with CA so I was worried about it holding together. I got some aluminum flashing that seems to be perfect for the job and with epoxy I'm hoping that the blank will be able to stand up to traditional carbide tools and a skew. Like I said earlier, I would need to wheel the lathe outside to use the flapper. Way too much dust in my garage shop, even with the DC running.

John, other than a stop block what else could I do to make sure the knot is even all the way around?
 
Last edited:

ramaroodle

Member
Joined
Feb 15, 2018
Messages
686
Location
Seattle
Sorry for the multiple posts but I am multitasking so keep missing the editing deadline.

I'm thinking that the little bit of thin CA that runs down the blank to the end then gets sanded off is causing slight differences in the length of the blank thus the cuts are not in the exact same place. Using epoxy should take care of that. As far as centering the blank I seem to get the best results with the pen blank jaws on my lathe and a Jacobs drill chuck vs using the drill press. I'm gonna make up another blank or two tonight with epoxy and let it cure overnight and see what happens.

Thanks again for baring with me.
 

Brian G

Member
Joined
Jul 2, 2013
Messages
1,567
Location
Bloomington, MN
Every little error aggregates. If you're off a little on the cut, off a little on centering before drilling, have a little play when drilling. . .you have three little offs that probably won't offset each other.

Whatever aluminum you use, keep in mind that when you cut it the cut edge might have a burr that affects how tight the veneers adhere. I run a screwdriver shank over the edges of the cut aluminum right before I sand them before gluing.

Chase perfection and you'll catch excellence.

I got lucky using thick CA, flashing, a carbide cutter, sanding to final, and a CA finish.

attachment.php
 

Attachments

  • 8loops.jpg
    8loops.jpg
    67.6 KB · Views: 581

ramaroodle

Member
Joined
Feb 15, 2018
Messages
686
Location
Seattle
I run a screwdriver shank over the edges of the cut aluminum right before I sand them before gluing.

I got lucky using thick CA, flashing, a carbide cutter, sanding to final, and a CA finish.

Yeah. I think that's a lot more than just luck! If it is then it's the most consistent, repeatable luck I've ever seen. :biggrin:

Every little error aggregates.
Reminds me of that Police song...."Every little thing she she does is magic..."

I'm gonna try & see how thick CA adheres to a piece of sanded & wiped down flashing. If I can get consistent results with CA on the inserts I'm still gonna epoxy the tube, saw off the edges and hopefully stick with sharp carbide tools and finish with my skew. Do you use the round, radius or square tool or a combination?

Just experimenting with the most efficient combination of steps that yields the best results.
 
Last edited:

jttheclockman

Member
Joined
Feb 22, 2005
Messages
19,084
Location
NJ, USA.
Andy, as was mentioned any little deviation from step to step will affect the outcome. The big key is to not alter the Size of the blank and also the end that you place against the stop block. Those are critical. What I like to do is make my infill pieces just shy of the edge of the blank and this is why I believe a 1" blank is perfect for working these patterns. Any glue that oozes out of the glue up I lightly touch it up against my belt sander to once again flatten the surface. I make sure I do not sand too much off to change the size. I do this on all 4 sides or however man y sides you use to make the knot.

After all said and done and things are once again flat and square. I draw a line through the center of the design and transfer that ceter line to the ends I do this on 2 sides 90 degree to each other so now I have a cross section and dimple that center mark on both ends. I now place that blank between a spur drive in the headstock and a pointed live center in the tailstock. I proceed to turn the blank round. As soon as I have it turned perfectly round I stop and now insert the blank in my collet chuck and procede to drill because I know I am drilling dead center. Glue in tube and continue as normal to make a pen.

Not sure what else I can tell you. Good luck.
 

Chasper

Member
Joined
Mar 22, 2007
Messages
1,987
Location
Indiana
Apparently most disagree, but I use thick CA for segmenting: wood to wood, wood to aluminum or brass, wood to resin, resin to resin, and anything else I segment. After turning a few thousand segmented blanks I've had occasional failures but not many. Perhaps if I had used epoxy I would never have had a failure.

I also use thick CA for gluing tubes. I contend that failures that involve blanks blowing out are ALWAYS because either the blank was cracked when it went on the lathe, or turning mistakes; dull tools, wrong tools, too aggressive, etc.
 

ramaroodle

Member
Joined
Feb 15, 2018
Messages
686
Location
Seattle
I also use thick CA for gluing tubes. I contend that failures that involve blanks blowing out are ALWAYS because either the blank was cracked when it went on the lathe, or turning mistakes; dull tools, wrong tools, too aggressive, etc.

Yeah. 90% of the time I get a blow out the autopsy shows the tube and blank just didn't have enough adhesive holding them together. CA seems to have very little sheer strength and dries very hard.
 

Chasstevens

Member
Joined
May 22, 2014
Messages
12
Location
Georgia
I glue 1/4 " plywood all the way around my square blank- find centers on blank- turn between centers until round- place in chuck and drill. Have never blown one up while drilling. Time consuming but fool proof.
 
Top Bottom