gordonfraser
Member
Hello all,
I wrote a post a few weeks ago before my wedding about how I fancied kitless but wanted to remain married for at least a few weeks before the divorce papers were filed due to bankruptcy...
So I made it a week. What can I say.
This is my story of kitless.
I've spent a good while browsing the advanced pen turning forums to see the best way to go about producing not just a working pen, but a successful and usable pen, from a lump of material. Taps n Dies, that was my area of stumble - especially what drill bits to use with the dies, how thick a spigot to make etc etc...
So I threw caution in to the wind and got myself a 10x0.75 2nd tap and 10x0.75x1" die, a die holder and a 23/64th drill bit (actually 10 but that's eBay for you), going by the diameter minus the pitch equation.
Now after perusing all the posts I could until sleep got in the way, I noticed that many, if not all, of the kitless pens follow roughly the same pattern - larger thread for cap/body junction and smaller thread for nib section to body junction. Some even go for the nib-holder thread but I don't think I'll be changing many nib-holders so decided on the glue approach. The big thing I wanted from kitless was ease of manufacture and a different spin on things. I loved the idea of the eye-dropper due to big ink capacity and no-brainer manufacture. I also loved the idea of piston filler but my 1 size tap/die wouldn't work and I'd already spent quite a lot to get to this point. So I decided that eye-dropper was the way to go and started some lateral thinking.
I spoke with JoWo to get some of his nibs, which I did and he's just a fantastic person to speak to. Nibs are brilliant too.
So I had the nibs, I had the threading capabilities and I had my lathe (Jet 1014), time to go head-first.
I spent a wee while chatting to my aunty regarding the kit pens I'd made and how I was going to try making one from scratch, and in particular the eye-dropper method. Knowing pretty much nothing about fountain pen construction or indeed how an eye-dropper functioned, it was only a matter of time before stumbling blocks were found. The big question on my aunties mind was "If it's that easy, why aren't all fountain pens eye-droppers?" to which I answered convenience. I was about to find out whether there was actually a reason why eye-droppers aren't favoured. Is it actually convenience or is there a fundamental reason why an eye-dropper pen is not so popular?
Fraser Prototype A

Off to the lathe then, and a bit of imitation ivory from Timberbits.com - I've got 3 of these so I chose it over not losing a nice blank than anything else. I sketched up my ideas using the principle that the pen would be a back-filler, that is instead of screwing the section off to fill the pen, you'd just screw the back off. The thinking was that I'd not need silicone grease and instead use a syringe rubber piston to create the seal, along with the 0.75 threads. Belt and braces.

I'll just run through some images here as they are self explanatory, and I'll come back in when it gets more interesting.
This is me creating the parts for the body and cap.


So I had managed to create a proper thread! I was delighted at this, mostly because the 23/64 drill bit did such a great job and created a lovely hole within which to tap. Luckily I've got another 9 drills so I doubt I'll ever need to worry about it again!
On to the section now, and what I wanted to be a both a viewing window for ink levels and the join between cap and body, thus creating one flowing pen rather than steps and visible joins.


Unfortunately this section was both too short and too fragile and split, partly due to my idiocy. Anyway, it was a blessing in disguise as the window was too small to be of any use.
After a bit of adjustment and some head-scratching I eventually ended up with this:


Now you'll notice I've scuffed the ink window - annoying. But seeing as this is a proof of concept I left it. However a more dangerous problem was encountered - the join between clear nib section and body wasn't strong enough. I'd just inset a wee spigot and matching recess in body and thought araldite would be enough to keep these two sections together, but a drop on my garage floor cracked the two apart. A lot more glue and a bit more care would allow me to see if this concept would work.

This is the end-cap with rubber gasket. Sealed lovely and with the additional thread was safe as houses. But it got stuck in the chamber, whether it's suction or back vacuum or whatever, but the rubber gasket, after a bit of pulling and twisting, came off the clear end cap.
So the big one - ink time. I was petrified because the ink I've got is stain happy once on fingers. Anyway, glove on, ink in and....flush right out the other side. For some reason I thought that the ink, once the nib and feed were in, would remain in the barrel - the nib creating a seal of sorts to stop any ink flowing out. But the nib is obviously nothing close to a seal and as a result I had a bit of a hard time getting the ink in quick enough. I was also using a converter I got with some kit pens so filling was a bit slow, and my eye-dropper bottles for filling up my pens hadn't arrived from eBum yet.

But after quickly getting the end cap on the ink stopped flowing out the nib and I thought you beauty. Sure enough once I'd cleaned it up it was writing nicely...but a bit of blobbage started out the nib and a bit more. Hmm..
A quick trip to the trusty forum and it seems that unless the barrel is over 1/3rd full it does tend to be a bit looser. Anyway, the whole faff of the filling via end-cap put me off this idea.


Fraser Prototype B
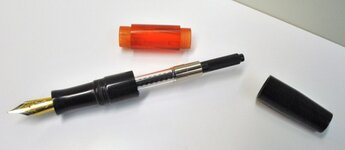
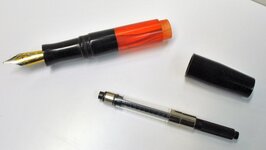
So taking the positives from that test, I decided to get some silicone grease and try a traditional eye-dropper, but retain the unbroken cap/body junction. I also wanted to keep the diameter of Prototype A of 12mm - I like a skinnier pen and find it's easier to write comfortably for longer, or indeed quicker than a lumbering great big thing.
I decided to introduce, seeing as it's now a front-filler, a larger window section. To make things a bit more interesting I decided to make it a closed end design and make it 1/3rd the capacity of the barrel so I would know when to fill up my chamber. I thought I'd make the section from clear as well but unfortunately botched the glueing of the nib holder so it looks a bit crusty. I should ideally of just epoxied the area behind the threads to hide the glue joint.
Anyway as another proof of concept and to make sure that a drippy blobby fountain pen wasn't just a quirk of the eye-dropper design, I filled it up and went to town.


My wee eye-dropper fillers. I wanted to get ones that I could send along with the pen full of ink, and a wee sample of silicone grease to give the person I gave the pen to an extra refill on me.

And the silicone grease - enough to last 1,000,000 refills...


So Prototype B was an absolute success with exception to the crusty section. The pen writes beautifully (JoWo commended) and the test-tube end gives great indication of ink levels (but I've filled it with Jet Black Diamine meaning I need to wait a few minutes with the pen on the end until the ink runs down the window.) The nib doesn't blob or leak - I've tapped it on a page for 10-20 taps and all get are small dots - absolutely no leaking! Fabulous!
The only problem with this was that filling up to a certain point was fiddly and took several checks to make sure the ink was where I thought it was by looking down in to the barrel and referencing it through the semi-transparent barrel and seeing the threads blah blah.
The contoured nib-section is lovely in the hand and fingers and the skinny barrel is a joy to hold. The cap also joins flawlessly to create a glossy stick with a big window at the end.
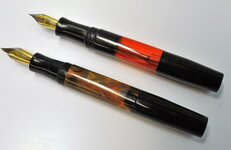
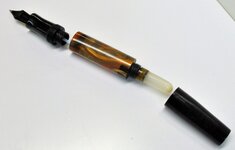
Fraser Prototype C
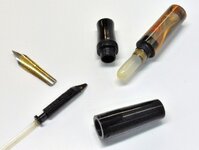
So the latest prototype takes the best of the previous two. I've made a large test-tube ink barrel with additional filling window at the nib-end to assist in quick filling. Just fill it to the window, screw the section on and you're done.
I also made the barrel and cap glossy, and the section matte to aid in grip and feel.


So time to get inking!
The nib-window was perfect - worked exactly like i'd hoped. Inking to the threads was a cinch and the inverted section threaded on securely and created the invisible join to the window. Silicone grease applied the section seems to be held on more securely than the cap meaning accidental unscrewing of the section is kept to a minimum, and so long as you hold the section whilst undoing the cap it's a non-issue.
I filled with Sapphire Blue Diamine - I wanted to see the ink this time rather than just a blackness. I also made the test-tube end a lot neater and for some reason the magnification of this one makes the ink chamber appear to be right to the very edge of the test-tube. A lovely visual trick that, coupled with the vivid lush blue I can see swishing inside, makes for a nice effect.
This pen is wonderful. It is lovely in the hand, it writes lovely and the matte section with the subtle profile is comfortable. Very comfortable. It's nice just to hold as well whilst you are in between writing due to the skinny barrel. It's light too which I'm not too happy about as I like a bit of a feeling of weight - I'm not talking heavy, but just a bit more than superfly if you get me. I might see if I can incorporate some kind of metal washer or ring somewhere inside out of sight to give it a bit of forward weight towards the page.
Some pictures of the completed and inked Fraser Concept C:


Conclusion:
So there you go - that's my to-date kitless experience. I've got so many ideas now it is now a case of finding enough time in the day! This is probably the most enjoyable thing I've done creatively so far and it's only just begun.
I've got some beautiful blanks on the way from Timberbits and some more ideas of what to do next. I think I'll stick with the dual window design just now as it's nice to have the quick filling gauge and 1/3 indicator already built in. I need to find some clips that I like to get them on the cap. It's a bit awkward having a pen horizontally in my back pocket rather than clipped out of the way of my arse when I sit. Could be a wee disaster there so in the meantime I just carry them in my hand.
For comparison then:


With a Sedona kit-pen for size reference


Wonderful!
SO!
I hope you've enjoyed my journey in to kit less with a twist and I hope I've given a wee bit back to the forum I've got so much from already.
Thanks for looking, all the best from Scotland and best wishes for the upcoming holiday season - I'm going to be eating my turkey by the lathe... hahaha
Gordon
I wrote a post a few weeks ago before my wedding about how I fancied kitless but wanted to remain married for at least a few weeks before the divorce papers were filed due to bankruptcy...
So I made it a week. What can I say.
This is my story of kitless.
I've spent a good while browsing the advanced pen turning forums to see the best way to go about producing not just a working pen, but a successful and usable pen, from a lump of material. Taps n Dies, that was my area of stumble - especially what drill bits to use with the dies, how thick a spigot to make etc etc...
So I threw caution in to the wind and got myself a 10x0.75 2nd tap and 10x0.75x1" die, a die holder and a 23/64th drill bit (actually 10 but that's eBay for you), going by the diameter minus the pitch equation.
Now after perusing all the posts I could until sleep got in the way, I noticed that many, if not all, of the kitless pens follow roughly the same pattern - larger thread for cap/body junction and smaller thread for nib section to body junction. Some even go for the nib-holder thread but I don't think I'll be changing many nib-holders so decided on the glue approach. The big thing I wanted from kitless was ease of manufacture and a different spin on things. I loved the idea of the eye-dropper due to big ink capacity and no-brainer manufacture. I also loved the idea of piston filler but my 1 size tap/die wouldn't work and I'd already spent quite a lot to get to this point. So I decided that eye-dropper was the way to go and started some lateral thinking.
I spoke with JoWo to get some of his nibs, which I did and he's just a fantastic person to speak to. Nibs are brilliant too.
So I had the nibs, I had the threading capabilities and I had my lathe (Jet 1014), time to go head-first.
I spent a wee while chatting to my aunty regarding the kit pens I'd made and how I was going to try making one from scratch, and in particular the eye-dropper method. Knowing pretty much nothing about fountain pen construction or indeed how an eye-dropper functioned, it was only a matter of time before stumbling blocks were found. The big question on my aunties mind was "If it's that easy, why aren't all fountain pens eye-droppers?" to which I answered convenience. I was about to find out whether there was actually a reason why eye-droppers aren't favoured. Is it actually convenience or is there a fundamental reason why an eye-dropper pen is not so popular?
Fraser Prototype A
Off to the lathe then, and a bit of imitation ivory from Timberbits.com - I've got 3 of these so I chose it over not losing a nice blank than anything else. I sketched up my ideas using the principle that the pen would be a back-filler, that is instead of screwing the section off to fill the pen, you'd just screw the back off. The thinking was that I'd not need silicone grease and instead use a syringe rubber piston to create the seal, along with the 0.75 threads. Belt and braces.
I'll just run through some images here as they are self explanatory, and I'll come back in when it gets more interesting.
This is me creating the parts for the body and cap.
So I had managed to create a proper thread! I was delighted at this, mostly because the 23/64 drill bit did such a great job and created a lovely hole within which to tap. Luckily I've got another 9 drills so I doubt I'll ever need to worry about it again!
On to the section now, and what I wanted to be a both a viewing window for ink levels and the join between cap and body, thus creating one flowing pen rather than steps and visible joins.
Unfortunately this section was both too short and too fragile and split, partly due to my idiocy. Anyway, it was a blessing in disguise as the window was too small to be of any use.
After a bit of adjustment and some head-scratching I eventually ended up with this:
Now you'll notice I've scuffed the ink window - annoying. But seeing as this is a proof of concept I left it. However a more dangerous problem was encountered - the join between clear nib section and body wasn't strong enough. I'd just inset a wee spigot and matching recess in body and thought araldite would be enough to keep these two sections together, but a drop on my garage floor cracked the two apart. A lot more glue and a bit more care would allow me to see if this concept would work.
This is the end-cap with rubber gasket. Sealed lovely and with the additional thread was safe as houses. But it got stuck in the chamber, whether it's suction or back vacuum or whatever, but the rubber gasket, after a bit of pulling and twisting, came off the clear end cap.
So the big one - ink time. I was petrified because the ink I've got is stain happy once on fingers. Anyway, glove on, ink in and....flush right out the other side. For some reason I thought that the ink, once the nib and feed were in, would remain in the barrel - the nib creating a seal of sorts to stop any ink flowing out. But the nib is obviously nothing close to a seal and as a result I had a bit of a hard time getting the ink in quick enough. I was also using a converter I got with some kit pens so filling was a bit slow, and my eye-dropper bottles for filling up my pens hadn't arrived from eBum yet.
But after quickly getting the end cap on the ink stopped flowing out the nib and I thought you beauty. Sure enough once I'd cleaned it up it was writing nicely...but a bit of blobbage started out the nib and a bit more. Hmm..
A quick trip to the trusty forum and it seems that unless the barrel is over 1/3rd full it does tend to be a bit looser. Anyway, the whole faff of the filling via end-cap put me off this idea.
Fraser Prototype B
So taking the positives from that test, I decided to get some silicone grease and try a traditional eye-dropper, but retain the unbroken cap/body junction. I also wanted to keep the diameter of Prototype A of 12mm - I like a skinnier pen and find it's easier to write comfortably for longer, or indeed quicker than a lumbering great big thing.
I decided to introduce, seeing as it's now a front-filler, a larger window section. To make things a bit more interesting I decided to make it a closed end design and make it 1/3rd the capacity of the barrel so I would know when to fill up my chamber. I thought I'd make the section from clear as well but unfortunately botched the glueing of the nib holder so it looks a bit crusty. I should ideally of just epoxied the area behind the threads to hide the glue joint.
Anyway as another proof of concept and to make sure that a drippy blobby fountain pen wasn't just a quirk of the eye-dropper design, I filled it up and went to town.
My wee eye-dropper fillers. I wanted to get ones that I could send along with the pen full of ink, and a wee sample of silicone grease to give the person I gave the pen to an extra refill on me.
And the silicone grease - enough to last 1,000,000 refills...
So Prototype B was an absolute success with exception to the crusty section. The pen writes beautifully (JoWo commended) and the test-tube end gives great indication of ink levels (but I've filled it with Jet Black Diamine meaning I need to wait a few minutes with the pen on the end until the ink runs down the window.) The nib doesn't blob or leak - I've tapped it on a page for 10-20 taps and all get are small dots - absolutely no leaking! Fabulous!
The only problem with this was that filling up to a certain point was fiddly and took several checks to make sure the ink was where I thought it was by looking down in to the barrel and referencing it through the semi-transparent barrel and seeing the threads blah blah.
The contoured nib-section is lovely in the hand and fingers and the skinny barrel is a joy to hold. The cap also joins flawlessly to create a glossy stick with a big window at the end.
Fraser Prototype C
So the latest prototype takes the best of the previous two. I've made a large test-tube ink barrel with additional filling window at the nib-end to assist in quick filling. Just fill it to the window, screw the section on and you're done.
I also made the barrel and cap glossy, and the section matte to aid in grip and feel.
So time to get inking!
The nib-window was perfect - worked exactly like i'd hoped. Inking to the threads was a cinch and the inverted section threaded on securely and created the invisible join to the window. Silicone grease applied the section seems to be held on more securely than the cap meaning accidental unscrewing of the section is kept to a minimum, and so long as you hold the section whilst undoing the cap it's a non-issue.
I filled with Sapphire Blue Diamine - I wanted to see the ink this time rather than just a blackness. I also made the test-tube end a lot neater and for some reason the magnification of this one makes the ink chamber appear to be right to the very edge of the test-tube. A lovely visual trick that, coupled with the vivid lush blue I can see swishing inside, makes for a nice effect.
This pen is wonderful. It is lovely in the hand, it writes lovely and the matte section with the subtle profile is comfortable. Very comfortable. It's nice just to hold as well whilst you are in between writing due to the skinny barrel. It's light too which I'm not too happy about as I like a bit of a feeling of weight - I'm not talking heavy, but just a bit more than superfly if you get me. I might see if I can incorporate some kind of metal washer or ring somewhere inside out of sight to give it a bit of forward weight towards the page.
Some pictures of the completed and inked Fraser Concept C:
Conclusion:
So there you go - that's my to-date kitless experience. I've got so many ideas now it is now a case of finding enough time in the day! This is probably the most enjoyable thing I've done creatively so far and it's only just begun.
I've got some beautiful blanks on the way from Timberbits and some more ideas of what to do next. I think I'll stick with the dual window design just now as it's nice to have the quick filling gauge and 1/3 indicator already built in. I need to find some clips that I like to get them on the cap. It's a bit awkward having a pen horizontally in my back pocket rather than clipped out of the way of my arse when I sit. Could be a wee disaster there so in the meantime I just carry them in my hand.
For comparison then:
With a Sedona kit-pen for size reference
Wonderful!
SO!
I hope you've enjoyed my journey in to kit less with a twist and I hope I've given a wee bit back to the forum I've got so much from already.
Thanks for looking, all the best from Scotland and best wishes for the upcoming holiday season - I'm going to be eating my turkey by the lathe... hahaha
Gordon