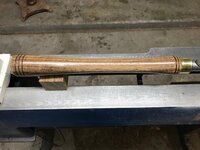
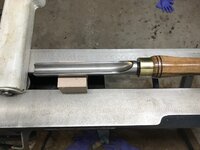
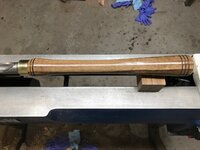
My first tool handle

Signed-In Members Don't See This Ad
See more from TattooedTurner

Joined
Aug 13, 2016
Messages
1,460
Location
Surprise, Arizona
I made this handle for my Carter & Son roughing gouge. I used Shedua, sanded to P400, sanding sealer then the Beall buff. I'm very happy with it, especially for a first. That being said 2 things went wrong. I polished the ferrule to a high shine then ended up getting epoxy on it. I wiped it off but it still shows. Secondly, the handle was a snug fit and I couldn't get it all the way in. I'm certain enough epoxy was pushed down to the bottom to prevent it from going in any further because I did several test fits prior to gluing. No worries for me though, I'll be happy using this for years to come. Any advice on making these is welcome, I have another on deck.
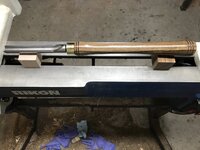
58C34AFD-32DF-4621-911B-2570EDEEF4D0.jpegEE84B717-91D5-4E7E-99B0-B6FC87977A15.jpegD863CB19-F46E-48AE-8FD5-ED7B0AD93629.jpegAAF64932-595C-49EC-887D-83985FEC7CA2.jpeg
 
Signed-In Members Don't See This Ad

magpens

Member
Joined
Feb 2, 2011
Messages
15,912
Location
Canada
Put some masking tape around the ferrule when you do the gluing .... :)

That handle looks absolutely GREAT !! . Very well done !!!

BTW, is Shedua a type of oak ?
 

monophoto

Member
Joined
Mar 13, 2010
Messages
2,543
Location
Saratoga Springs, NY
the handle was a snug fit and I couldn't get it all the way in. I'm certain enough epoxy was pushed down to the bottom to prevent it from going in any further because I did several test fits prior to gluing.

Yeah - that happens. And a further complication is that if the hole is too snug, you can trap air inside the hole which then compresses as you insert the tool, which means that it then tries to force the tool back out of the hole before the glue sets. Actually makes it quite difficult to insert the tool shank! DAMHIKT Several possible ways to avoid the problem:
  • I always use a clamp to hold the tool in the handle for an hour or so after assembly to prevent trapped air from forcing the shank back out of the hole until the glue cures.
  • Make the hole a bit oversized so that there is space for air to escape, and also for glue trapped in the hole to backfill around tool shank. This is probably the best solution.
  • Grind a slight mortise along the tool shank to provide a channel for air to escape and for glue trapped in the bottom of the hole to expand outward. That mortise only needs to extend for the depth of the hole in the handle, so it won't affect either the esthetics or strength of the tool.
  • If you are making your own tool, using a square cross-section steel shank with a round hold automatically provides channels for air to escape and for excess glue to flow into.
  • Use a small drill bit to drill a breather hole through the side of the handle at the bottom of the internal shank bore. I have a pin vise that I keep loaded with a #65 bit for this purpose. The hole is small enough that it doesn't affect the structural integrity of the handle, and if there is excess glue in the main shaft hole, it will be forced into (and through) the breather hole, eventually sealing the hole when it cures. Wipe off any glue that squeezes through that hole before it cures.
 

duncsuss

Member
Joined
Jun 29, 2012
Messages
2,160
Location
Wilmington, MA
  • Use a small drill bit to drill a breather hole through the side of the handle at the bottom of the internal shank bore. I have a pin vise that I keep loaded with a #65 bit for this purpose. The hole is small enough that it doesn't affect the structural integrity of the handle, and if there is excess glue in the main shaft hole, it will be forced into (and through) the breather hole, eventually sealing the hole when it cures. Wipe off any glue that squeezes through that hole before it cures.

This is what I've done, but I wrap a piece of painters' masking tape around the handle and drill the breather hole through it, so the epoxy that pushes out doesn't get all over the handle. Avoids the ugliness of an epoxy stain on beautiful wood, just as important to me as avoiding a stain on the ferrule.
 
Joined
Aug 13, 2016
Messages
1,460
Location
Surprise, Arizona
Thanks for the replies, I'll be using all your advice on the next one.

@magpens shedua is from Africa and is related to bubinga. It's called ovangkol when used for guitars. A local woodworking store had some kiln dried stock and it had nice color & straight grain so why not?
 

howsitwork

Member
Joined
Jul 9, 2016
Messages
2,318
Location
Thirsk
I second the comments about hydraulic locking by the glue stopping it going all the way in. Coat one side of the hole with epoxy NOT ALL round the hole. Then insert the shaft and rotate it to spread the glue all the way round.

Then apply a sash clamp ( pipe clamp over there ? ) along the tool with a nice piece of hard wood to stop it blunting the blade apply a little pressure to make it go home the leave in a warm place to speed the epoxy cure .

Nice work though , well done
 
Top Bottom