
You are using an out of date browser. It may not display this or other websites correctly.
You should upgrade or use an alternative browser.
You should upgrade or use an alternative browser.
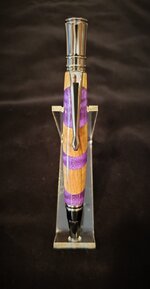
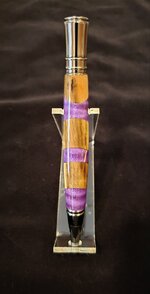
My First Segmented
- Thread starter TonyL
- Start date
Signed-In Members Don't See This Ad
See more from TonyL


")


Signed-In Members Don't See This Ad
Well, Tony, I was fully intending to say "Nice pen" when I read your title.
But then I saw the segment colors and read your text. . Perhaps "Bride of Frankenstein" is not inappropriate !! . LOL !!
And I have to tell you that I am contemplating making a similar segmented pen today and I am struggling with what colors to choose from my rather limited selection of blank offcuts that I use for this purpose. . My color choice could very well also suit the monster you named !!! . LOL !
In the meantime, I will indeed say, for yours ...... Nice Pen !!!
Dieseldoc
Member
Tony: Good start on segmenting.
Thanks you both. It is Applewood and Ben's curly maple dyed blanks. If I taped/videoed my process, I would have been arrested by the segmenting-police, OSHA, and any one with any sense of art. . Special thanks to Mark James and Diesdoc...I am glad that have not blocked me or still answer the phone when I call LOL. BTW, I love the Byrnes. Now, THAT, is a work of art!
. Special thanks to Mark James and Diesdoc...I am glad that have not blocked me or still answer the phone when I call LOL. BTW, I love the Byrnes. Now, THAT, is a work of art!leehljp
Member Liaison
I noticed that the grains are aligned too! Second thought: Duh - the miter cuts dictate correct alignment! 
Well done!
Well done!
Last edited:
jjjaworski
Member
Nice job Tony. I like the color combinations and it works very well with that pen kit.
Guess you will be busy now with the segmenting bug.
Guess you will be busy now with the segmenting bug.
mark james
IAP Collection, Curator
Well done Tony! Keep playing and experimenting. Consider simply constructing and turning round down 5-10 segmented blanks to 1/2" OD just to see what you like and don't like. And I know you realize that failures in materials, design, etc is part of this.
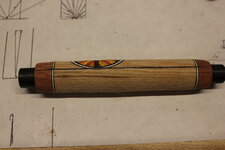
This is a blank that never got finished due to a design flaw on my part. The insert was too shallow, so if I would have turned it to bushing size, most of the inlay would have been turned away. You can see a pencil line where the approximate bushing OD would have been. I sadly turned it down a reclaimed the tube.
This is a blank that never got finished due to a design flaw on my part. The insert was too shallow, so if I would have turned it to bushing size, most of the inlay would have been turned away. You can see a pencil line where the approximate bushing OD would have been. I sadly turned it down a reclaimed the tube.
Attachments
Thanks for the encouragement!Well done Tony! Keep playing and experimenting. Consider simply constructing and turning round down 5-10 segmented blanks to 1/2" OD just to see what you like and don't like. And I know you realize that failures in materials, design, etc is part of this.
This is a blank that never got finished due to a design flaw on my part. The insert was too shallow, so if I would have turned it to bushing size, most of the inlay would have been turned away. You can see a pencil line where the approximate bushing OD would have been. I sadly turned it down a reclaimed the tube.
jttheclockman
Member
Welcome to the cruel world of segmenting. It can be both rewarding and cruel so just have fun. Look to see what else you come up with. Pretty soon we will have another player in the diamonds forever world of segmenting. Good luck. Pen looks good.
Thank you JT. Be wellWelcome to the cruel world of segmenting. It can be both rewarding and cruel so just have fun. Look to see what else you come up with. Pretty soon we will have another player in the diamonds forever world of segmenting. Good luck. Pen looks good.
wolf creek knives
Member
Kudos Tony! I like the pen and I like the what you've done. Do you have any instructions for those of of who have not tried this yet? I'm thinking like "beware of" or "don't do this". I'm still trying to get enough courage to try segmenting.
Displaced Canadian
Member
Dive in, try things, don't wait. The only way to learn what happens when you turn a square pattern round is to do it. My only recommendation would be is to put a piece of plywood on your miter saw and a piece of wood along the back to keep pieces of wood flying across the shop, buy a GOOD fine tooth blade find ways of cutting small pieces off of big pieces without getting your fingers near the blade.Kudos Tony! I like the pen and I like the what you've done. Do you have any instructions for those of of who have not tried this yet? I'm thinking like "beware of" or "don't do this". I'm still trying to get enough courage to try segmenting.
What Christopher said ^ .
I am a hack; I watched a few videos, bought some tools, then impatiently ran though the process - allowing pieces to shoot all over the place, glued my fingers to the blank, misplaced a few segments (which I found just now as I was vacuuming the shop, and then placed one of the sections in the wrong direction. The only thing I did to keep things simple is cut all at 60 degrees and 1 inch lengths (I think).
Dieseldoc and Mark James did give me a lot of guidance to do it properly and safely.
.I am a hack; I watched a few videos, bought some tools, then impatiently ran though the process - allowing pieces to shoot all over the place, glued my fingers to the blank, misplaced a few segments (which I found just now as I was vacuuming the shop, and then placed one of the sections in the wrong direction. The only thing I did to keep things simple is cut all at 60 degrees and 1 inch lengths (I think).
Dieseldoc and Mark James did give me a lot of guidance to do it properly and safely.
MPVic
Member
I like it!!Well.....they say you always remember your first. Say hello to the bride of Frankenstein
Dalecamino
Local Chapter Leader
Outstanding work Tony!
mbroberg
IAP Activities Manager, Emeritus
Wonderful job! Now you are off and running in the segmenting world.
Bob in SF
Member
Fine pen, Tony!
Thank you. You would have grown your own trees and made your own dyes, and designed a new geometric shape LOL. Good night and be well BobFine pen, Tony!
Bryguy
Member
Tony, So glad you got the Byrnes, just remember to keep your fingers away from it. After losing the tip of my finger I made a set of pushers and a sawing jig to fit it. I highly recommend you do the same.
WriteON
Member
Nice job both workmanship & combo. Looking good.
keithbyrd
Member
Nice job Tony - Some how even the colors work! I like it!
I am having close calls with the segment shooting back.Nice job Tony - Some how even the colors work! I like it!