You are using an out of date browser. It may not display this or other websites correctly.
You should upgrade or use an alternative browser.
You should upgrade or use an alternative browser.
My First Laser Engraved Blank
- Thread starter KenB259
- Start date
Signed-In Members Don't See This Ad
Signed-In Members Don't See This Ad
I've only laser on a couple pens. Both in which I jusr CA'd over. Depending on how deep the engraving is, you probably will still be able to feel the engraving. I lasered a small texas symbol into one pen, then filled it in with mica powder mixed with CA.


Thanks for the reply.I've only laser on a couple pens. Both in which I jusr CA'd over. Depending on how deep the engraving is, you probably will still be able to feel the engraving. I lasered a small texas symbol into one pen, then filled it in with mica powder mixed with CA.
View attachment 388664
View attachment 388665
leehljp
Member Liaison
Ken, I can't find it but there were some discussions way before laser engraver prices came down to ordinary people's affordability. At that time, - before around 2010 - some people sent the turned blanks to Kalashan (sp?) Woods or some other engraver. I don't remember exactly but it seemed like it was about 50-50 for CA'ing before engraving and after. IIRC, after the pens were sent back to the owner, theywere filled in and CAed over that.
Thanks Lee, I'll probably try filling the engraved area with CA. This one measures .009 deep.Ken, I can't find it but there were some discussions way before laser engraver prices came down to ordinary people's affordability. At that time, - before around 2010 - some people sent the turned blanks to Kalashan (sp?) Woods or some other engraver. I don't remember exactly but it seemed like it was about 50-50 for CA'ing before engraving and after. IIRC, after the pens were sent back to the owner, theywere filled in and CAed over that.
Seer
Member
I like to finish mine first with CA then put a piece of blue tape over the area I am engraving. Then I can do a color fill in the engraving and let it dry for a little while and remove the tape. I usually don't put another coat of CA after that but all I do is engrave single lines in it since I don't have a rotary yet.
That'sa cool idea.I like to finish mine first with CA then put a piece of blue tape over the area I am engraving. Then I can do a color fill in the engraving and let it dry for a little while and remove the tape. I usually don't put another coat of CA after that but all I do is engrave single lines in it since I don't have a rotary yet.
SteveJ
Member
I've used CA after engraving and it works fine. If you want a smooth feel you will need to build it up quite a bit. If you choose to color fill you need to make sure the engraving is deep enough so that when finishing you don't sand through the color (especially when using something like crushed stone).
That is a nice design you've shown.
That is a nice design you've shown.
Kenny Durrant
Member
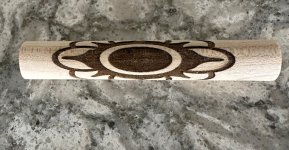
Hello Ken. I've been doing a lot of engraving. I'll tell you what I do and why. Before I engrave I seal the wood. If it's a stand I use lacquer and a pen I use flex CA. I'll engrave then wipe off all the over burn. Then I'll seal it with lacquer. Then I'll paint with a water base acrylic paint if needed. After the paint or sealer is dry I'll put a thin coat of CA and let dry on its own. If the engraving is small I'll use a straw cut at a sharp angle like the old quill pens. That way I don't make a huge mess. After the first coat of CA I'll build it up slowly using accelerator. I'll let set for a few minutes so I won't get any glassy spots between layers. Once I get the engraving filled I'll sand it down flush with the wood. Be careful not to over sand and open up the pores in the wood or you'll get smearing outside the engraving. Once that's done finish as you normally would. Another tip is that regular CA and flex CA don't do well together so use the same type all the way through. I'll add some pictures to maybe help get an idea of what I did. Good luck.
Attachments
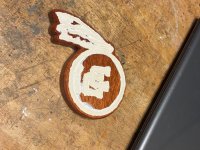
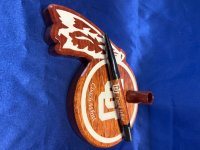
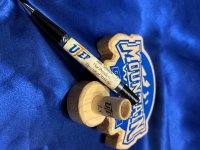
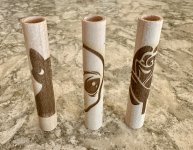
Thanks Kenny your laser inlays are awesome. Inlay work is one of the reasons I wanted a laser, not so much for pens. It came with a rotary attachment so I decided to figure out how it works. The rotary attachment was very easy to use. I've come to the conclusion though laser engraved pen blanks just don't have the appeal for me. The pen you show though, is very appealing. I'm assuming that is one you painted. Here's three I was playing around with. The cat was all filled in with CA, the other two have had nothing done with them.Hello Ken. I've been doing a lot of engraving. I'll tell you what I do and why. Before I engrave I seal the wood. If it's a stand I use lacquer and a pen I use flex CA. I'll engrave then wipe off all the over burn. Then I'll seal it with lacquer. Then I'll paint with a water base acrylic paint if needed. After the paint or sealer is dry I'll put a thin coat of CA and let dry on its own. If the engraving is small I'll use a straw cut at a sharp angle like the old quill pens. That way I don't make a huge mess. After the first coat of CA I'll build it up slowly using accelerator. I'll let set for a few minutes so I won't get any glassy spots between layers. Once I get the engraving filled I'll sand it down flush with the wood. Be careful not to over sand and open up the pores in the wood or you'll get smearing outside the engraving. Once that's done finish as you normally would. Another tip is that regular CA and flex CA don't do well together so use the same type all the way through. I'll add some pictures to maybe help get an idea of what I did. Good luck.
Attachments
Kenny Durrant
Member
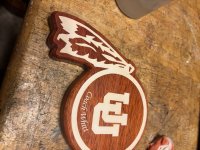
Very nice. I don't know that I'd call what I do an inlay. More of a color fill. Most of what I do is smaller projects. I still enjoy pens but I like making them custom, so to speak, for the person receiving them. I fill most every pen because I like the smooth feel rather than the grooves made from engraving. I always paint the engraving so I can use clear CA and not worrying about mixing more color and then it now matching. I'll show one I just finished. This is the first time I used different colors in a tight spot. I was always worried about color contamination. This time I figured I'd just turn another pen if I messed it up. Thank You for the compliment.