My first kitless pen

Signed-In Members Don't See This Ad

wilbersc

Member
Joined
May 28, 2025
Messages
9
Location
Parker, CO
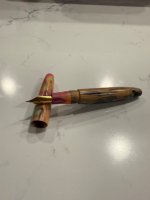
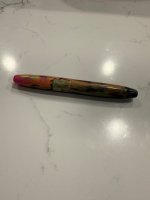
I gave it a shot and turned my first kitless pen. The kitless hardware kit came from BG Artforms and the blank came from Cocoon Blanks.

I made a few mistakes along the way (broke section when turning, turned cap too thin and had to remove the last couple threads). My biggest issue was turning it too thin.

I'm looking to improve so please give me advice and helpful hints.
 

Attachments

  • IMG_3868.jpeg
    IMG_3868.jpeg
    294.9 KB · Views: 103
  • IMG_3869.jpeg
    IMG_3869.jpeg
    271.7 KB · Views: 103
Signed-In Members Don't See This Ad
This pen is really light. Is there a secret to making them more substantial (heavier) without making them larger?

I'm not sure what you mean by "substantial".

Heavier? Why would you want a heavy pen, if you write a lot that would just make your hand/wrist tired quicker.

Less breakable when dropped? Not sure making it heavier is the way to make it less breakable, often the lighter objects are less likely to break when dropped than a heavier object. (Drop a drinking straw - does it break?)

Less breakable when gripped? Don't squeeze so tight! Writing with a fountain pen is meant to be a relaxing experience, it requires no downward pressure of the nib onto the paper (just touching is enough for ink to flow - if the nib is properly adjusted) and hence it requires the lightest of grips.

Less breakable when screwing the cap on and off the pen? Valid concern - you must choose dimensions for the joints (nib section to barrel, cap to barrel) that leave enough material for structural strength. Generally though, if the material doesn't break up when you machine the parts (drill and thread) it will hold up to the everyday stresses caused by using the pen.

Some materials are prone to breakage - home-made castings with metal foil pieces, for example, can be prone to break at the foil. Fordite is prone to delaminate, so thin walls are risky because the material itself is weak. I choose to add mechanical strength by using brass tubes (like the ones in pen kits) in barrels I make from fordite - with blocks each end (one at the end of the barrel to fill the hole, one at the end to be threaded for the cap and the section screwthreads.
 
Nice for first try! Kitless brings in a whole bunch of new learning experiences! As suggested by someone else, a class with a pro is a real plus. I spent a good part of a day in a one on one class with Jim Hinze of Hinze Pen fame and it was a breakthrough time for me. As an alternative take a look at the bespoke penturning series on YouTube from Turners Warehouse. Chad goes from start to finish with options in a half dozen or so well done videos. Just keep playing!!

Kevin
 
Great looking pen Steven!

The broken section is probably the #1 hurdle that all of us face when starting to make kitless pens. Your nib looks like a Jowo #6 and that is a great place to start. The Bock nibs are a little more challenging to make a section for because their geometry puts the threads farther down into the section which depending on your design can result in a weak(er) spot near the section tenon and threads. If you have any questions, just ask!

Turning too thin is usually a math or measuring issue. I assume that you have a caliper to take measurements as you turn. Do yourself a favor and sketch out your designs and work the math. You will quickly begin to figure out the limitations of the materials and your lathe, tools, and skill level (which will increase with time).

Please keep sharing your work with us!
 
If you want a pen more weighted toward the section you could make a two piece section. Make a brass inner section sleeved with a polymer over it. This is on my list to try. I have a Montblanc roller ball like this. The weight distribution is comfortable.
 
Thanks everybody for the advice. I did watch a bunch of videos, read through the Beaufort ink tutorial (excellent read), and I have a copy of the Pen Turner's Bible. I'm not sure where I'd go for a classroom setting, but I'd love to do it.

I think my weight issue is I'm using a fairly big tap (m14x1) for the cap threads, but was still trying to turn a thinner pen. I need to learn the limitations choosing different thread sizes.

I'll keep turning a posting my finished projects, my progress, and my learnings.
The M14 threads are a typical size used by a lot of makers for large body pens - some even going to M15, but as you say there are limitations. Finding your balance between body length, diameter, nib sizing, and overall weight will take a bit of experimenting. I tend to use an M13 the most, but it's my preference for my style - develop your own and see where it takes you!

As for classes - you might try a local AAW chapter and see if there are any pen turners in the club that might help. The big penmakers show is in Chicago area each year MPG but you might be able to find something more local to you. Lots of good people on this website who will keep walking you though stuff, but a hands on class is always the best. Good luck!

Kevin
 
After drawing it out, I think my section breakage issue stems from making too deep of a relief cut.

I also could have threaded the jowo tap a bit shallower (maybe).
 

Attachments

  • IMG_3871.jpeg
    IMG_3871.jpeg
    647.2 KB · Views: 24
After drawing it out, I think my section breakage issue stems from making too deep of a relief cut.

I also could have threaded the jowo tap a bit shallower (maybe).
My recommendation, stop making the relief cut in the section tenon, it absolutely creates a weak spot. If you ever decide to work with Bock nibs, it will be worse (as noted in my post above). I stopped doing that a long time ago. I put the relief in the opening of the tenon on the barrel instead. Here is a picture that explains it better...

C7C3ACA1-3805-4B70-AD22-59FD1CB45E83_1_201_a.jpeg
 
My recommendation, stop making the relief cut in the section tenon, it absolutely creates a weak spot. If you ever decide to work with Bock nibs, it will be worse (as noted in my post above). I stopped doing that a long time ago. I put the relief in the opening of the tenon on the barrel instead. Here is a picture that explains it better...

View attachment 386294
Cool, I didn't know that worked the same. It looks better too.
 
You're off to a good start. The only thing I really don't like is the relief cut behind the threads on the barrel. I've seen various sets of instructions that suggest it should be done, but frankly it makes the construction weaker and it looks terrible. It's better practice to cut the relief inside the cap. Likewise, as was mentioned, on the section there's no need for it either. In your drawing the tenon is called out at over 11mm for an 11mm thread. If anything it should be smaller, like 10.9 - 10.95. It'll be just as strong and infinitely easier to thread with a die. As for making it feel more substantial, you can either use denser material or add metal. There's something to be said for lightweight pens, but balance is far more important to me as a user. As was mentioned, you can make a two piece section like I did on this pen, or add a section of brass tube inside the barrel to adjust the weight and balance. I would also suggest anyone starting out to buy the cheapest acrylic blanks they can find to use for practice. Exotic Blanks has some as cheap as $2.50, with quantity discount making them even cheaper. Three 5" blanks will typically net two complete pens. It's much easier to experiment when the stakes are low.
 
You're off to a good start. The only thing I really don't like is the relief cut behind the threads on the barrel. I've seen various sets of instructions that suggest it should be done, but frankly it makes the construction weaker and it looks terrible. It's better practice to cut the relief inside the cap. Likewise, as was mentioned, on the section there's no need for it either. In your drawing the tenon is called out at over 11mm for an 11mm thread. If anything it should be smaller, like 10.9 - 10.95. It'll be just as strong and infinitely easier to thread with a die. As for making it feel more substantial, you can either use denser material or add metal. There's something to be said for lightweight pens, but balance is far more important to me as a user. As was mentioned, you can make a two piece section like I did on this pen, or add a section of brass tube inside the barrel to adjust the weight and balance. I would also suggest anyone starting out to buy the cheapest acrylic blanks they can find to use for practice. Exotic Blanks has some as cheap as $2.50, with quantity discount making them even cheaper. Three 5" blanks will typically net two complete pens. It's much easier to experiment when the stakes are low.
Thank you. That is all great advice. It totally makes sense that the tenon diameter should be slightly smaller than the die major size.
 
Thank you. That is all great advice. It totally makes sense that the tenon diameter should be slightly smaller than the die major size.

There's another benefit to making the tenon a smidge under the die major diameter that Oliver didn't mention.

If you polish the tenon before threading, the peaks of the threads are untouched by the die and remain shiny. If the thread is complete all the way to "the peak of the triangle" you'll lose that shiny flat, and it's really difficult to polish afterwards.
 
Back
Top Bottom