My first cutting board build

Signed-In Members Don't See This Ad
See more from Mike

Mike

Member
Joined
Oct 23, 2022
Messages
302
Location
Albuquerque
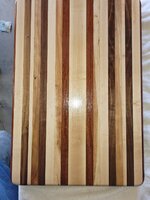
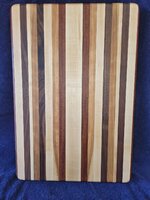
Just finished this yesterday, I think it turned out pretty good.
It is 14" by 20" by 1.5".
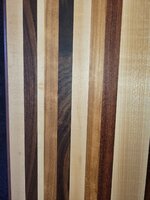
From the wide center piece out, boards are Maple, Brazilian Cherry, American Cherry, Maple, Walnut, American Cherry, Maple,Walnut, Maple, and Brazilian Cherry. I think I got that right???
My son researched cutting board finishes and decided on this one, so I went with it. He is a very thorough man.
I finished one side with Milk Paint Half and Half per the instructions on the container. It is made from Pure Tung Oil and natural, food-grade thinner Citrus Solvent.
I let it sit overnight and did the other side, again letting it sit over night.
I then waxed it with Boos Block Board Wax, heavy coat, let sit overnight, etc.
I don't think the heavy coat was necessary, wax does not soak in after the Half and Half, and maybe not before.

My planer is a Delta 13", so I glued it up in 2 parts then scraped all the glue off and planed both pieces evenly until all the uneven surfaces were gone.
I then glued the 2 parts together, being very careful that they were even.
After removing the glue, top and bottom were within a few thousandths of an inch.
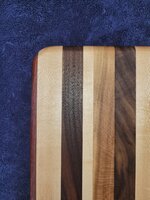
A lot of sanding with the mouse, some routing and more sanding and finishing.
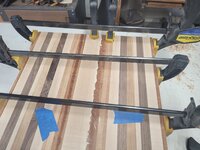
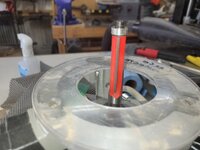
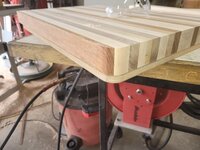
First pic is the final glue up of the 2 parts. Then the router bit I used for the corners. A pic of the corner with the router template underneath.
See pics here.
Thoughts, criticism, praise, say what you think.

Thanks,
Mike
 

Attachments

  • CB001.jpg
    CB001.jpg
    321.2 KB · Views: 76
  • CB002.jpg
    CB002.jpg
    181.8 KB · Views: 80
  • CB003.jpg
    CB003.jpg
    212.9 KB · Views: 70
  • CB004.jpg
    CB004.jpg
    338.2 KB · Views: 70
  • CB005.jpg
    CB005.jpg
    364.6 KB · Views: 76
  • CB006.jpg
    CB006.jpg
    366.9 KB · Views: 79
  • CB007.jpg
    CB007.jpg
    394.1 KB · Views: 86
Last edited:
Signed-In Members Don't See This Ad

Mike

Member
Joined
Oct 23, 2022
Messages
302
Location
Albuquerque
I apologize for the photography, I used a 3 year old Samsung that wasn't the top of the line when I got it and no special lighting. I have no idea about good photography.

Mike
 

Marko50

Member
Joined
Oct 22, 2013
Messages
938
Location
Orem, UT
I like it! I've been wanting to make one about that size to go with my Recteq 700 smoker. It needs to be big enough to handle a large brisket;)

Nice job Mike!
 

Mike

Member
Joined
Oct 23, 2022
Messages
302
Location
Albuquerque
I like it! I've been wanting to make one about that size to go with my Recteq 700 smoker. It needs to be big enough to handle a large brisket;)

Nice job Mike!
I am going to store this one on the left side table of my griddle. It is sized to fit there and fit nicely under the cover. I can move it inside to the counter when I need it for something else.

Mike
 

Mike

Member
Joined
Oct 23, 2022
Messages
302
Location
Albuquerque
If you plan on making a bunch more. You might consider this as another step.
Thanks for the link.
I didn't know that was what they are called, but I did use cauls on the other glue ups. My son covered several pieces of maple 2X2s with 3M packing tape (heavy duty) for a similar project. They worked great, but I don't have any pics. You can't see in the first pic, but there is a piece of 12 gauge wall 1.5" square tubing under the board. It kept the 2 pieces almost perfectly aligned. I guess they are still cauls even if they were only on the bottom. I think if it was only 3/4" or so thick you might need them on both sides in multiple places so it didn't warp up. This was about 1 5/8" and with the tubing underneath the 2 pieces squared up perfectly.

Mike
 

PreacherJon

Member
Joined
Aug 28, 2019
Messages
679
Location
Indiana
Thanks for the link.
I didn't know that was what they are called, but I did use cauls on the other glue ups. My son covered several pieces of maple 2X2s with 3M packing tape (heavy duty) for a similar project. They worked great, but I don't have any pics. You can't see in the first pic, but there is a piece of 12 gauge wall 1.5" square tubing under the board. It kept the 2 pieces almost perfectly aligned. I guess they are still cauls even if they were only on the bottom. I think if it was only 3/4" or so thick you might need them on both sides in multiple places so it didn't warp up. This was about 1 5/8" and with the tubing underneath the 2 pieces squared up perfectly.

Mike
Yep... I concur. Just threw the video out there for ideas.
 

Mike

Member
Joined
Oct 23, 2022
Messages
302
Location
Albuquerque
Yep... I concur. Just threw the video out there for ideas.
Also, you need to cover the bare steel if you are using it for a caul. I used some of the same square tubing gluing something else and the steel did not stick to the wood but it left a nasty mess to sand off. 3M packing tape tape works great.

Mike
 

jttheclockman

Member
Joined
Feb 22, 2005
Messages
19,159
Location
NJ, USA.
Nice work on this and what stands out to me most is you used all safe woods. Cherry and maple are perfect woods. Some people argue about walnut but I believe that is a closed enough grain wood it works well.
 

Mike

Member
Joined
Oct 23, 2022
Messages
302
Location
Albuquerque
Nice work on this and what stands out to me most is you used all safe woods. Cherry and maple are perfect woods. Some people argue about walnut but I believe that is a closed enough grain wood it works well.
Thanks, I did a little research and talked to the owner of our local exotic hardwoods store and he agreed I could use these woods. I only bought the walnut, everything else was in my garage. My son bought a load of wood that filled the back of his 4Runner from someone here in town for pennies on the dollar, so it was essentially free to me.

Mike
 
Top Bottom