Mini sander from spare parts

Signed-In Members Don't See This Ad

Texatdurango

Member
Joined
Apr 23, 2007
Messages
4,649
Location
Show Low, Arizona
To anyone who has converted their Jet mini single speed lathe to a variable speed lathe, you might find this of some interest.

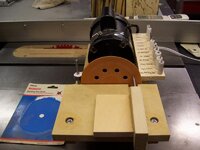
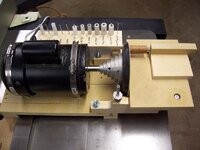
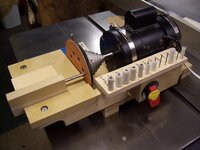
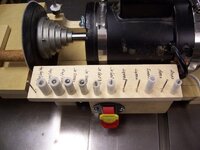
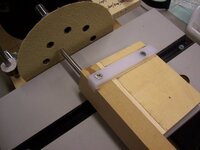
I was cleaning up my shop and came across the motor and pulley guide I removed from my Jet mini lathe when I switched from single speed to variable speed. Rather than toss it out I decided to make a mini disk sander.

My current method of squaring blanks is to use a small arbor chucked in a hand drill but to be honest, it's slow going if you have a bit to trim, the sandpaper clogs up real fast since the blank is hitting the same spot on the paper. My larger bench mounted disk sander is way too course with an 80 grit disc so I decided to make a smaller version.

I have a 5" Ryobi random orbital sander and had an extra pad so decided to use that for my mini pen squaring sander.

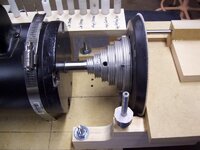
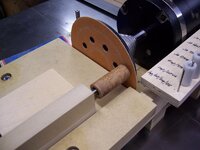
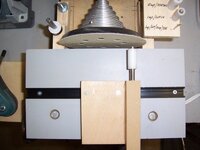
I just mounted the motor on a base, attached the pulley guide to the Ryobi sanding pad, made a table with a slot for the pen blank holding arm. I used the original on/off switch and mounted it on the side, just below a board I use to hold the different delrin bushings I use for different kits I make.

I will still use the small arbor that fits in a hand drill so I saved a spot for it to rest when not in use.

The disk uses common 5" fabric backed disks which are readily available and the sander is small enough to either leave on the table top or stowed away underneath if the space is needed and when running is vibration free so it doesn't try to walk across the table!
 

Attachments

  • sander1.jpg
    sander1.jpg
    52.5 KB · Views: 402
  • sander2.jpg
    sander2.jpg
    52.2 KB · Views: 409
  • sander3.jpg
    sander3.jpg
    51 KB · Views: 372
  • sander4.jpg
    sander4.jpg
    57.8 KB · Views: 355
  • sander5.jpg
    sander5.jpg
    52.1 KB · Views: 387
  • sander6.jpg
    sander6.jpg
    47.7 KB · Views: 392
Signed-In Members Don't See This Ad
WOW! That looks great. Way to use the extra stuff found in your shop. Did you make the insert yourself if so of what material. Looks like you really enjoy your hobby. Keep turning and have fun. :biggrin::biggrin::biggrin:
 
WOW! That looks great. Way to use the extra stuff found in your shop. Did you make the insert yourself if so of what material. Looks like you really enjoy your hobby. Keep turning and have fun. :biggrin::biggrin::biggrin:

Yes I made the inserts from delrin, it's cheap, easy to turn and works perfectly for bushings.
 
Did you consider the channel going parallel with the grinding face, and then lightly pushing the blank into the face with the free hand. It would have been a 2 hand operation but it would then use all the sandpaper-edge to center instead of one spot. But then, that may have taken off too much just to square it up. Just a thought, and you made good use of available still useable equipment. We'll probably see something like this through PSI soon :laugh:.
 
Did you consider the channel going parallel with the grinding face, and then lightly pushing the blank into the face with the free hand. It would have been a 2 hand operation but it would then use all the sandpaper-edge to center instead of one spot. But then, that may have taken off too much just to square it up. Just a thought, and you made good use of available still useable equipment. We'll probably see something like this through PSI soon :laugh:.

Actually I did. I have some "Tee channel" stock that I use on a lot of my home made tools but it's over 1/2" thick and I wanted to see if this little sander was really going to work well. I threw it together using 3/4" board. If it works, I'll make the bed from 1" stock then add the parallel miter slot.
 
That's just too cool George . It would beat the heck out of sharpening a six blade barrel trimmer any day . Thanks for the pics .
 
My buddy made a sander like that from an old motor that he had. But, I think that this gives me an added incentive to go variable. Awesome!! :good:
 
Brilliant. Just brilliant. I'll be damned if I didn't just replace my Turncrafter Pro motor this weekend with the VS upgrade. The old motor is just sitting in the box, waiting for me to figure out what to do with it.

Where did you buy your delrin stock?
 
My buddy made a sander like that from an old motor that he had. But, I think that this gives me an added incentive to go variable. Awesome!! :good:

Hey, that's right! For those on the fence about spending the money on the variable speed upgrade, this is a way of further justifying the cost.

Don't think of it as Just an upgrade, think of it as an upgrade with a FREE mini bench sander/barrel trimmer! :biggrin:
 
Brilliant. Just brilliant. I'll be damned if I didn't just replace my Turncrafter Pro motor this weekend with the VS upgrade. The old motor is just sitting in the box, waiting for me to figure out what to do with it.

Where did you buy your delrin stock?

I bought a good supply a few years ago from a friend but I buy other supplies from US Plastic and notice that they have pretty good prices.

http://www.usplastic.com/catalog/item.aspx?itemid=23671&catid=439
 
That's great George. I did the same thing with my Nova 1624-44 now I know what I am going to do with that motor.

Lin.
 
Very Nice!

I recently replaced the 120 grit sanding disc on my disc sander with an 80 grit disc, and I agree- much too coarse! Even though there's a lot of life left in it, I have to get a new disc of 120 or higher. What grit do you have on your custom sander?

Also, where did you buy your delrin?
 
Very Nice!

I recently replaced the 120 grit sanding disc on my disc sander with an 80 grit disc, and I agree- much too coarse! Even though there's a lot of life left in it, I have to get a new disc of 120 or higher. What grit do you have on your custom sander?

Also, where did you buy your delrin?

This is the first disk I put on and it's 150. The nice thing is that it can be changed in a heart beat when a coarser or finer grit is desired.

See post #11 for the delrin reply.
 
Did you consider the channel going parallel with the grinding face, and then lightly pushing the blank into the face with the free hand. It would have been a 2 hand operation but it would then use all the sandpaper-edge to center instead of one spot. But then, that may have taken off too much just to square it up. Just a thought, and you made good use of available still useable equipment. We'll probably see something like this through PSI soon :laugh:.

Bob, After using the sander for a few weeks it was appearant that I was just wearing out one portion of the disk so I did as you suggested and made a parallel slot in which the blank holder slides. While at it, I went ahead and made a thicker table using a piece of mdf with a formica surface.

To aid in squareness I made the slot a very tight fit and used a piece of delrin as the slide so it would still glide easily while being tight.

Thanks for the suggestion!
 

Attachments

  • sandermod1.jpg
    sandermod1.jpg
    62.9 KB · Views: 156
  • sandermod2.jpg
    sandermod2.jpg
    41.6 KB · Views: 148
  • sandermod3.jpg
    sandermod3.jpg
    56.5 KB · Views: 156
Back
Top Bottom