Making a custom Sierra style pen.

Signed-In Members Don't See This Ad

mredburn

IAP Activities Manager
Staff member
Joined
Jul 5, 2009
Messages
8,753
Location
Fort Myers FL
When I made my first custom Sierra style pen I used the transmission Assembly from a Sierra kit. This time I wanted to build the same basic style but I wanted to use an 8mm tube and transmission. The Sierra/Wall street transmissions are hard to come by without buying the whole kit. As it turns out the 8mm couplers and transmissions are not available as parts either so I still end up buying kits and parting them out. When I designed the Cigar pen with the Inlay pieces I went ahead and made inlay parts for most of the styles of pens I already had in the works. 7mm,8mm and the Sierra styles. For this pen I chose an Emerald green blank from Exotics. I trimmed the blank to 3/4 x 3/4 on the band saw, the extra cutoffs will be used for the inlays.
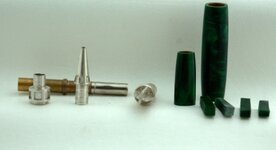
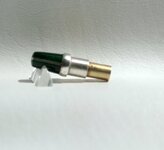
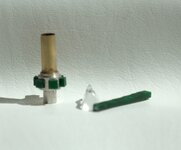
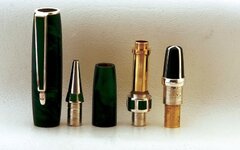
The first picture is of the pieces, I had several choices for the cap/finial but chose the far right one.

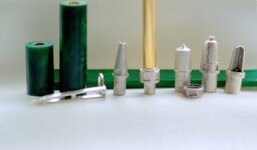
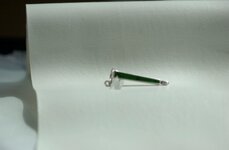
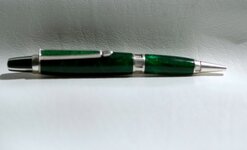
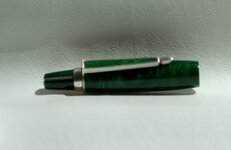
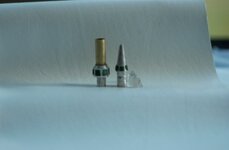
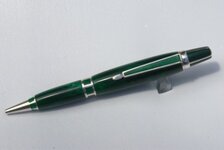
Second photo shows the blanks turned to shape. They are close but not finished completely. They will have the final turning and finishing after the Inlays are installed and finished. This way if the dimensions change from the inlay work I can adjust all the final dimensions. The transmission and tube have been cut to length. I have to assemble and measure the lower tube centerband and nib and adjust the tube length to match. All the parts are made to slip in and out of the tubes. They will be epoxied in place at final assembly.

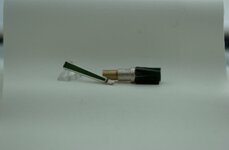
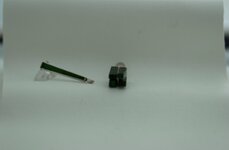
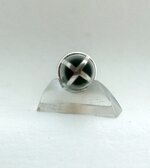
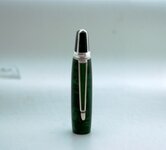
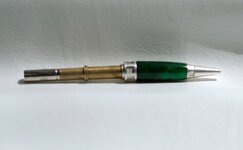
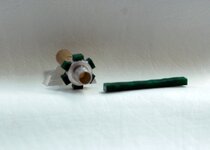
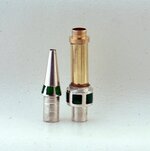
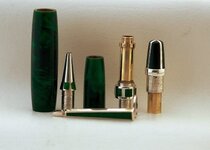
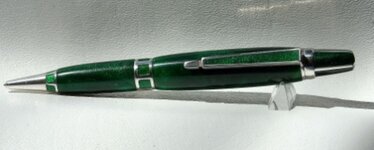
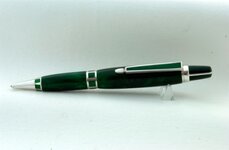
3rd and 4th show the clip with the center piece inlayed and the rough cut piecesglued into the cap.

continued
 

Attachments

  • se2.JPG
    se2.JPG
    41.5 KB · Views: 381
  • se3.JPG
    se3.JPG
    49.9 KB · Views: 354
  • se4.JPG
    se4.JPG
    48.6 KB · Views: 329
  • se1.JPG
    se1.JPG
    42.4 KB · Views: 418
Signed-In Members Don't See This Ad

mredburn

IAP Activities Manager
Staff member
Joined
Jul 5, 2009
Messages
8,753
Location
Fort Myers FL
The next step is to turn the cap to final shape. I remove as much of the material as i can befor i put it back on the lathe. I use a jewelers saw and files to get it as close as i can without touching the metal. It is then turned on the lathe using mostly files to make the final form and the sanded strating at 320g and working down to 12000 MM. 1s and 2nd Pictures show the final shape of the cap from the side and end.
3rd picture is the clip with stronger light so you can see the glitte.
The 4th picture of the upper assembly shows the design I had in mind when I made the cap piecs. In the rough it didnt look like I had thought but really shaped up when finished. The upper tube has still not been turned to final dimensions abdthe pieces are not epoxied in yet. At this point im just verifing that the pen is becoming what I had in mind.

The tube in the cap is a standard 8mm piece epoxied in place. It will grab the transmission .
 

Attachments

  • se5.JPG
    se5.JPG
    40 KB · Views: 250
  • se6.JPG
    se6.JPG
    46 KB · Views: 298
  • se8.JPG
    se8.JPG
    71.9 KB · Views: 245
  • se8a.JPG
    se8a.JPG
    65 KB · Views: 288

mredburn

IAP Activities Manager
Staff member
Joined
Jul 5, 2009
Messages
8,753
Location
Fort Myers FL
In the first picture here the transmission tube assembly is epoxied in place. Normally I would solder it in but I want to make sure that there would be no problems with epoxy holding up to the stress. The lower Blank is about 1.2 inches long made with an 8mm tube.
The center band is about .484 in diameter it has a tube turned to fit in the lower 8mm blank tube, it is drilled .250 (1/4) to allow the refill to pass through. The center band at the inlay section is drilled with an O or 5/16 or 8mm drill to accept the transmission tube.
The dimensions of the lower tube affect the upper tube assembly. I got very lucky on this one. Most of the Sierra/Wallstreet caps are hollow because the Transmission assy is taller than the Upper tube. My cap is not hollow past the silver band at the bottom of the inlay area. I have 0 clearance between the end of the transmission assy and the cap.
Making the lower tube .10 longer would have alleviated that. Or using a hollow cap/finial piece.

The other pictures are just showing me what its shaping up to look like. The parts are not epoxied in place, the tubes will need final finish after I cut and inlay the C/Band and nib pieces.

The center band and finial could be left without the inlays and still have a nice pen. Tomorrow I will work on the inlays.
Mike
 

Attachments

  • se12.JPG
    se12.JPG
    45 KB · Views: 349
  • se11.JPG
    se11.JPG
    56.8 KB · Views: 279
  • se10.JPG
    se10.JPG
    47.2 KB · Views: 267
  • se9.JPG
    se9.JPG
    46 KB · Views: 226

mredburn

IAP Activities Manager
Staff member
Joined
Jul 5, 2009
Messages
8,753
Location
Fort Myers FL
Even though I cast my pieces it would be very easy to turn the center band out of aluminum or brass. Bieng able to use 8mm tubes to make the lower piece and trans missions means you could use 10mm (cigar) tubes available in 10in lengths to make longer upper body Sierra style pens. YOu would only have to make the 8mm tube in the cap longer to reach down to the tranny.
 

mredburn

IAP Activities Manager
Staff member
Joined
Jul 5, 2009
Messages
8,753
Location
Fort Myers FL
Thanks guys,
The first two pictures shows the Center band with the pieces cut, and glued in place. It took about an hour to do the center band. The is a small strip of PR from the cut off of the blank. I scribe a line to match the openings of the C/B and cut pieces with a jewelers saw,Fitting them as I go. I number the bottom of the inlay areas and keep the small pieces arranged in order they are to fitted in. They are then epoxied in and allowed to set as I cut and inlay the nib. The pieces on the C/B are about 3/16ths square. I then cut and fit the nib inlay areas and glue them in. once they have set long enough to stand up to handleing I hand file the bulk of the PR off. I remove as much material as i can without hitting the surface of the pieces. (Picture 3) I will let them set 2 hours or so to make sure the epoxy has set fully and then remount them on the lathe and using a file and a sanding board take them down to final size, then finish them sanding with MM to 12,000. Once these parts are finished I will resize the upper and lower tubes to make sure they match and then do fianl assembly.

Mike
 

Attachments

  • cb2.JPG
    cb2.JPG
    42.5 KB · Views: 229
  • cb4.JPG
    cb4.JPG
    53.9 KB · Views: 251
  • cb5.JPG
    cb5.JPG
    69.2 KB · Views: 188

mredburn

IAP Activities Manager
Staff member
Joined
Jul 5, 2009
Messages
8,753
Location
Fort Myers FL
Here the Center Band and nib have been given their final shaping and polished. using a file and a sanding stick to keep things straight and then finish with MM down to 12,000g.
The second Picture shows a small groove cut into the clip, this matches up to a small 20g wire I have installed in the cap. WHen they are epoxied together this wire pin will keep the clip from spinning.
Pictures 3 and 4 show the pieces ready for final assembly. I have touched up the upper tube to better match the Center band and did my final finishes. I will now epoxie the pen together and post it when I get the pictures done.

Questions?
Mike
 

Attachments

  • final1a.JPG
    final1a.JPG
    54.6 KB · Views: 206
  • final1.JPG
    final1.JPG
    46.7 KB · Views: 229
  • final3.JPG
    final3.JPG
    68 KB · Views: 229
  • final4.JPG
    final4.JPG
    71.1 KB · Views: 237

mredburn

IAP Activities Manager
Staff member
Joined
Jul 5, 2009
Messages
8,753
Location
Fort Myers FL
Final pictures of the assembled pen.
 

Attachments

  • finalpen1.jpg
    finalpen1.jpg
    31.5 KB · Views: 126
  • finalpen5.jpg
    finalpen5.jpg
    36.7 KB · Views: 117
  • finalpen2.JPG
    finalpen2.JPG
    44.4 KB · Views: 114
Top Bottom