Learning process..

Signed-In Members Don't See This Ad
See more from amtechrs

amtechrs

Member
Joined
Feb 6, 2024
Messages
107
Location
Yoncalla, OR
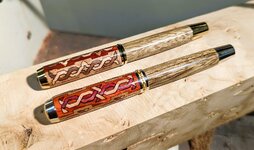
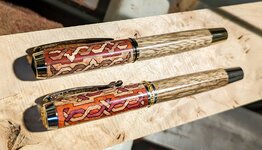
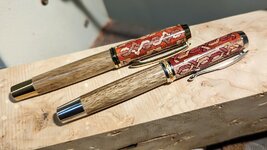
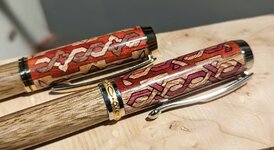
Well, slowly figuring things out with my method of segmenting. Haven't nailed it yet, but I think little by little making small improvements. I need to mess around with the offsets to try making joints a bit tighter/consistent. Also, decided to just make half of the pen complicated, and the other half mellow. These two are Jr. Gent and Jr. Statesman kits. Lower segments of both are black limba. Uppers are combinations of Patagonian rosewood, redheart, figured maple, purpleheart, maple burl and walnut. The designs were inspired by Moorish tiles and art. I really need to break away from making pens for a while so I can clean up around here..... Thanks for checking them out and please give any suggestions or feedback, it's very helpful!
 

Attachments

  • PXL_20240303_192208735.jpg
    PXL_20240303_192208735.jpg
    265.5 KB · Views: 87
  • PXL_20240303_192236371.jpg
    PXL_20240303_192236371.jpg
    278.6 KB · Views: 81
  • PXL_20240303_192337119.jpg
    PXL_20240303_192337119.jpg
    265 KB · Views: 66
  • PXL_20240303_192428627.jpg
    PXL_20240303_192428627.jpg
    247.1 KB · Views: 83
Signed-In Members Don't See This Ad

egnald

Member
Joined
Jun 9, 2017
Messages
3,144
Location
Columbus, Nebraska, USA
Very Cool. I've been toying with the idea of copying your process. I've got some 3/16 hardwoods on order. Did you start out with Boxes.py? I'm thinking about some designs similar to yours, but I plan on making a closed box hybrid by leave the smallest, center pieces out, taping the outsides, then filling the middle with alumilite. The alumilite should make the box into a solid piece for drilling and it should be exposed through those little center bits. - Dave
 

amtechrs

Member
Joined
Feb 6, 2024
Messages
107
Location
Yoncalla, OR
Thank you, guys. Michael, let me point out one of my goofs, mostly resulting from being impatient. The box/blanks I make have ends with small locating holes for brad point bits to locate, and drill quite well centered. The upper blank for these call for 12.5 mm. I don't have that size in brad point, so drill the closest undersized that I do have, then normally chase that incrementally to the final size. Well, I skipped the in between drilling (forgot, actually) and when I drilled with the 12.5mm bit, it walked off center slightly. You can see the result in where the internal elements intersect the turned OD. The points on the upper edge almost break out, while the lower have the desired gap.
zoom2.jpg


David, yes, I use the boxes.py for the panels. I use my CAD program for the designs, mostly. Also, Lightburn somewhat. I'll have to see what you're talking about. I also tried filling with alumilite, but found it unecessary unless your drill diameter hardly touches the wood panels. Good luck! Can't wait to see your results!
 

egnald

Member
Joined
Jun 9, 2017
Messages
3,144
Location
Columbus, Nebraska, USA
Thank you, guys. Michael, let me point out one of my goofs, mostly resulting from being impatient. The box/blanks I make have ends with small locating holes for brad point bits to locate, and drill quite well centered. The upper blank for these call for 12.5 mm. I don't have that size in brad point, so drill the closest undersized that I do have, then normally chase that incrementally to the final size. Well, I skipped the in between drilling (forgot, actually) and when I drilled with the 12.5mm bit, it walked off center slightly. You can see the result in where the internal elements intersect the turned OD. The points on the upper edge almost break out, while the lower have the desired gap.
View attachment 369979


David, yes, I use the boxes.py for the panels. I use my CAD program for the designs, mostly. Also, Lightburn somewhat. I'll have to see what you're talking about. I also tried filling with alumilite, but found it unecessary unless your drill diameter hardly touches the wood panels. Good luck! Can't wait to see your results!
Here is a screen capture that I modified with photoshop to give you an idea of what I'm talking about related to the alumilite (purple for this example) showing through by omitting certain pieces. - Dave
Capture Modified.png
 

amtechrs

Member
Joined
Feb 6, 2024
Messages
107
Location
Yoncalla, OR
Oh, I got you now, Dave! I was thinking of something similar as well. Can't wait to see how yours come out!
One more thing I thought of, Dave, you might want to put an end panel at least at one end of the 'box' with a small (I go with 1.2mm dia.) hole centered on it to locate dead center of the box. I guess those blank drilling vises out there that automatically center it might work okay, if not. The lesson I learned is to buy a brad point drill in the size I need, rather than chase a smaller hole to the final size. Being centered is pretty critical.
 

TDahl

Member
Joined
Dec 11, 2019
Messages
1,894
Location
Brentwood
Here is a screen capture that I modified with photoshop to give you an idea of what I'm talking about related to the alumilite (purple for this example) showing through by omitting certain pieces. - Dave
View attachment 369990
Wow! The sky is the limit for you guys. If you could incorporate different types of inlays (i.e. abalone shell, mother of pearl) that would be amazing.
 

egnald

Member
Joined
Jun 9, 2017
Messages
3,144
Location
Columbus, Nebraska, USA
Wow! The sky is the limit for you guys. If you could incorporate different types of inlays (i.e. abalone shell, mother of pearl) that would be amazing.
Richard is way ahead of me in this game. I have yet to build one blank using the technique he developed. He developed a very innovative method that I have not seen anywhere else. It's easy to tweak and customize once something has been developed, but coming up with the concept and developing it from scratch is nothing short of amazing. - Dave
 

derekdd

Member
Joined
Jan 29, 2023
Messages
1,100
Location
Wisconsin
So very impressive from the design, use of software and tech, to the execution and finish.

I really like the contrasting upper and lower of these. Doing it this way really accentuates the pattern of the cap.
 

amtechrs

Member
Joined
Feb 6, 2024
Messages
107
Location
Yoncalla, OR
Thought I'd share a pic of one of the pieces I have to collect and assemble. Fun stuff for this fat fingered fellow! The piece goes in the center of the "X" intersection... I even try to get the grain orientation right..🤪

zoom3.jpg


PXL_20240304_215553235.jpg
 

TDahl

Member
Joined
Dec 11, 2019
Messages
1,894
Location
Brentwood
Thought I'd share a pic of one of the pieces I have to collect and assemble. Fun stuff for this fat fingered fellow! The piece goes in the center of the "X" intersection... I even try to get the grain orientation right..🤪

View attachment 370012

View attachment 370013
I think your work is even more amazing now that we have seen the actual size of the segmented pieces. I can't imagine the strain that work must put on your eyes.
 

Kcimdrib

Member
Joined
Nov 1, 2020
Messages
1,378
Location
UK
Richard I find your work staggering the effort you must put leaves me amazed.
Great work.
 
Top Bottom