Learning how to do water slide decals

Signed-In Members Don't See This Ad
See more from Drewby108

Drewby108

Member
Joined
Apr 30, 2022
Messages
359
Location
Spokane, WA
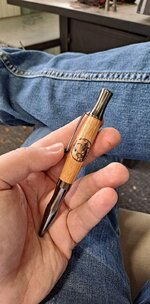
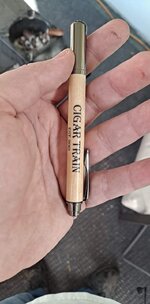
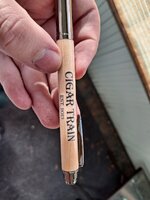
All afternoon for two simple pens. I don't know how the time disappears on me. The oak virage went fairly well, but the maple rollester is pretty obvious on the decal edges. I think I need to do more to make the surface smooth before applying the decal.

I'm making a handful of these for my local cigar shop's anniversary party raffle. The owner has given me hundreds of dollars worth of cigars over the years. Least I can do is give back stuff that I make.
 

Attachments

  • received_443728847570388.jpeg
    received_443728847570388.jpeg
    235.6 KB · Views: 142
  • received_974121383269376.jpeg
    received_974121383269376.jpeg
    146.1 KB · Views: 148
  • 20220620_191850.jpg
    20220620_191850.jpg
    218.4 KB · Views: 144
Signed-In Members Don't See This Ad

JohnU

Member
Joined
Jan 31, 2008
Messages
4,951
Location
Ottawa, Illinois
They can be tricky. I've done many of them. I like Testors decal paper the best but I've have ok luck with other brands. I've found the best way to get the decal to disappear is to apply a CA finish first and use all 9 grits of micromesh to get it nice and shiny, then apply the decal. Make sure you get plenty of water under it as you apply it to the blank so there's no air bubbles. Then lightly press on it with a paper towel or Q tip to remove most of the water. I like to apply a shop clamp light over it to warm it up and help dry it out before applying several layers of medium CA over the decal. Then I refinish it like before the decal. I also like to trim the decal as close to the image or words as possible. It will help the decal paper disappear. Keep in mind, any flaws in the pen surface will be preserved under the decal so make sure you are happy with it. It can be a lengthy process so be patient and it will all work out.
 

Drewby108

Member
Joined
Apr 30, 2022
Messages
359
Location
Spokane, WA
They can be tricky. I've done many of them. I like Testors decal paper the best but I've have ok luck with other brands. I've found the best way to get the decal to disappear is to apply a CA finish first and use all 9 grits of micromesh to get it nice and shiny, then apply the decal. Make sure you get plenty of water under it as you apply it to the blank so there's no air bubbles. Then lightly press on it with a paper towel or Q tip to remove most of the water. I like to apply a shop clamp light over it to warm it up and help dry it out before applying several layers of medium CA over the decal. Then I refinish it like before the decal. I also like to trim the decal as close to the image or words as possible. It will help the decal paper disappear. Keep in mind, any flaws in the pen surface will be preserved under the decal so make sure you are happy with it. It can be a lengthy process so be patient and it will all work out.
I went all the way through the grits on the oak pen, but not on the maple. Thought I was good halfway through. What I get for being lazy lol.

I'm using Spin It brand paper from Michaels because it was literally the first one I found. I'm using these pens as practice before doing some trade work with the local distillery. I really liked the whiskey pen you did and wanted to do something similar for them.
 

JohnU

Member
Joined
Jan 31, 2008
Messages
4,951
Location
Ottawa, Illinois
Your off to a very good start! I'm sure that decal paper will work fine for you. The letters and print stand o it real nice. Just get the blanks nice and shiny before adding the decal. I learned that the hard way. Lol
 

Drewby108

Member
Joined
Apr 30, 2022
Messages
359
Location
Spokane, WA
Your off to a very good start! I'm sure that decal paper will work fine for you. The letters and print stand o it real nice. Just get the blanks nice and shiny before adding the decal. I learned that the hard way. Lol
Will do. Thanks for the advice
 

Fine Engineer

Member
Joined
Nov 17, 2021
Messages
286
Location
Carson City, NV
I second what John said. My first waterslide decal came out perfect which kind of made me a little overconfident on my next one which looked terrible. I thought that the CA finish over the top would make the decal disappear, and that didn't happen. Sanded it all off and started over, this time micromeshing until it became shiny (I think about 3/4 through the stack) and then applying the decal. That worked perfectly, and has worked on a couple more since then.
 

Kenny Durrant

Member
Joined
Sep 11, 2012
Messages
2,496
Location
Sachse Tx. 75048
I'd like to bring up and add another topic. CA out gassing. I've talked to the guy that manufactures Mercury CA and he said it doesn't. I think it does because every time I skip the 3 day wait period it fails. The reason for this is I put a decal over CA the next day, forgetting about what I just said, and it looked great until the next day. It glassed up just like the other blanks when not waiting for the out gassing. What's this groups opinion on this. Thanks
PS I'm bring it up here because of the original post. If I'm intruding I can start another thread. Thanks Again
 

JohnU

Member
Joined
Jan 31, 2008
Messages
4,951
Location
Ottawa, Illinois
I think it all comes down to the brand your using. It's probably good practice to give it a day to degas. I use Gluboost (orange and blue bottle) which is manufactured to be a finish and not just a CA. (The red and green labeled bottles are more of just a CA adhesive. ). I don't do a lot of decals anymore but with Gluboost I only wait about an hour after the initial finish and then apply the decal and I haven't had any issues. I would not have done it that quick with EZ bond CA that I used to use.
 

Drewby108

Member
Joined
Apr 30, 2022
Messages
359
Location
Spokane, WA
I'd like to bring up and add another topic. CA out gassing. I've talked to the guy that manufactures Mercury CA and he said it doesn't. I think it does because every time I skip the 3 day wait period it fails. The reason for this is I put a decal over CA the next day, forgetting about what I just said, and it looked great until the next day. It glassed up just like the other blanks when not waiting for the out gassing. What's this groups opinion on this. Thanks
PS I'm bring it up here because of the original post. If I'm intruding I can start another thread. Thanks Again
Thankfully these two don't appear to have that issue, but I will keep that in mind moving forward.

Also, not intruding as advice on bettering the process is always welcome in my book.
 

RGVPens

Member
Joined
Oct 4, 2021
Messages
408
Location
Mission TX
OK...dumbquestion here.
So you type something, or make/find a design on the computer.
Get some "waterslide decal paper".
Stick it in a regular ink jet printer.
Print it.
Cut out what you want to use...and you're off to the races???

Then follow JohnU's instructions!
 

JohnU

Member
Joined
Jan 31, 2008
Messages
4,951
Location
Ottawa, Illinois
OK...dumbquestion here.
So you type something, or make/find a design on the computer.
Get some "waterslide decal paper".
Stick it in a regular ink jet printer.
Print it.
Cut out what you want to use...and you're off to the races???

Then follow JohnU's instructions!
You'll need to seal the printed decal with either clear coat or if your using Testors brand they sell a sealer spray in their kit. Then yea, let it dry a day and have some fun. Just be careful when you order or buy your decal paper… some are clear and others are white.
 

Fine Engineer

Member
Joined
Nov 17, 2021
Messages
286
Location
Carson City, NV
OK...dumbquestion here.
So you type something, or make/find a design on the computer.
Get some "waterslide decal paper".
Stick it in a regular ink jet printer.
Print it.
Cut out what you want to use...and you're off to the races???

Then follow JohnU's instructions!
One additional step is very important; to seal the decal. After printing, apply at least two coats of clear prior to using the decal and getting it wet. Without the sealant, the printer ink just washes away almost immediately. To preserve as much decal material as I can, I print the decal, then cut a strip off the end that has the printed part, and just seal that. I get quite a bit of mileage out of a sheet of decal paper this way.
I spray the strip, then it gets a minute under a hair dryer to dry. I do the same for the second coat, and the decal is ready to use. At least that is what has worked for me so far.
 

Drewby108

Member
Joined
Apr 30, 2022
Messages
359
Location
Spokane, WA
One additional step is very important; to seal the decal. After printing, apply at least two coats of clear prior to using the decal and getting it wet. Without the sealant, the printer ink just washes away almost immediately. To preserve as much decal material as I can, I print the decal, then cut a strip off the end that has the printed part, and just seal that. I get quite a bit of mileage out of a sheet of decal paper this way.
I spray the strip, then it gets a minute under a hair dryer to dry. I do the same for the second coat, and the decal is ready to use. At least that is what has worked for me so far.
I wish I had cut mine before. I didn't realize how much overspray I would get and I only have about an inch of untouched paper on the bottom of the sheet. Oops
 

Bstrauch

Member
Joined
Apr 1, 2021
Messages
28
Location
Washington State
Another thing to check is your software and printer settings. Some software, such as Word will default to compressing your images reducing the quality. Make sure that all compression is off. The decal paper I use has a glossy finish, kind of like photo paper, so switching the printer settings to glossy paper and "best" resolution helps a lot.
 

RGVPens

Member
Joined
Oct 4, 2021
Messages
408
Location
Mission TX
For software I'll probably use the same as I use with scroll saw designs...Inkscape and GIMP.
Good to know about cutting a strip and spraying sealer before I dunk it!!
When I try it I'll check the printer settings too!

Sounds like that could be interesting.
 

Drewby108

Member
Joined
Apr 30, 2022
Messages
359
Location
Spokane, WA
For software I'll probably use the same as I use with scroll saw designs...Inkscape and GIMP.
Good to know about cutting a strip and spraying sealer before I dunk it!!
When I try it I'll check the printer settings too!

Sounds like that could be interesting.
I used inkscape for mine just to get crisper edges on everything. Word doesn't seem to put out the best quality for some fonts and images.
 
Top Bottom