Laminated Sierra

Signed-In Members Don't See This Ad
See more from Kcimdrib

Kcimdrib

Member
Joined
Nov 1, 2020
Messages
1,375
Location
UK
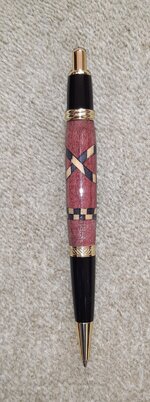
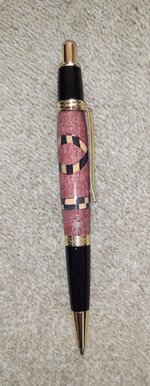
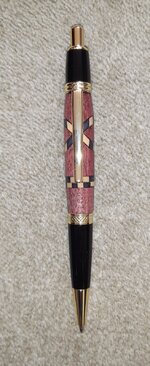
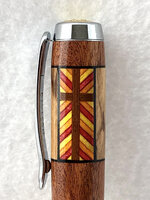
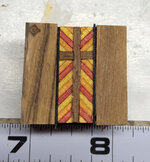
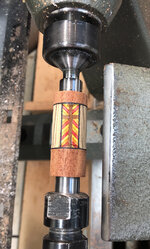
One of my most adventurous laminations one I'm quite pleased with. The CA finish leaves a bit to be desired and I wish I had used friction polish. But with fingers covered in CA glue from Laminating, I just carried on.
By the standards I view on the IAP site I realise this is very much beginners standard but I will continue to try.
Please comment always appreciated.
 

Attachments

  • 20220126_140542~2.jpg
    20220126_140542~2.jpg
    319.8 KB · Views: 133
  • 20220126_140332~2.jpg
    20220126_140332~2.jpg
    338.9 KB · Views: 136
  • 20220126_140316~2.jpg
    20220126_140316~2.jpg
    317.3 KB · Views: 138
Signed-In Members Don't See This Ad

Kcimdrib

Member
Joined
Nov 1, 2020
Messages
1,375
Location
UK
You did well with your pen, Michael, as there is not a lot of timber to play with when segmenting a Sierra.

Alan
Alan thank you compared to many I see a little basic. But glad you like it. For me it's such a messy process but I will continue to try never going to catch you guys up though.
 

mark james

IAP Collection, Curator
Joined
Sep 6, 2012
Messages
12,752
Location
Medina, Ohio
You did well with what you are attempting. If you give some explanation of how you constructed the blank we can offer better suggestions. I have typically preferred patterns that are the same from all angles, but this requires to build it from the OD to the ID, and also is not the best for Celtic Knots.
 

Attachments

  • CE05AFD7-AF5F-4F39-9E4C-6967C4651836_1_201_a.jpeg
    CE05AFD7-AF5F-4F39-9E4C-6967C4651836_1_201_a.jpeg
    114 KB · Views: 100

Kcimdrib

Member
Joined
Nov 1, 2020
Messages
1,375
Location
UK
MarkYou did well with what you are attempting. If you give some explanation of how you constructed the blank we can offer better suggestions. I have typically preferred patterns that are the same from all angles, but this requires to build it from the OD to the ID, and also is not the best for Celtic Knots.
 

Kcimdrib

Member
Joined
Nov 1, 2020
Messages
1,375
Location
UK
Mark thanks for your comments. The build was simple.but so messy.
I had some square black and white stringing which I glued together using 8 strips.
Cut the blank and glued in the assembly.
Your photos are brilliant and your assembly is far more complicated well done.
 

jttheclockman

Member
Joined
Feb 22, 2005
Messages
19,148
Location
NJ, USA.
Michael you are doing a fine job. They get easier the more you do. Also you will figure out the little tricks that will make things easier. Nice design.
 

Humongous

Member
Joined
Feb 20, 2019
Messages
385
Location
Canandaigua, NY
Nicely Done Michael. Keep experimenting, some of the greatest innovations happen by accident or when things take a different turn than what you expected. I really like what you are doing.
 

howsitwork

Member
Joined
Jul 9, 2016
Messages
2,320
Location
Thirsk
Michael

I like it a lot .

Alwats keep a bottle of acetone , or debonder nearby , it saves you so much embarrassment! DAMHIKT šŸ˜³
 

Kcimdrib

Member
Joined
Nov 1, 2020
Messages
1,375
Location
UK
Nicely Done Michael. Keep experimenting, some of the greatest innovations happen by accident or when things take a different turn than what you expected. I really like what you are doing.
Thank you for your comments.
 

mark james

IAP Collection, Curator
Joined
Sep 6, 2012
Messages
12,752
Location
Medina, Ohio
Mark thanks for your comments. The build was simple.but so messy.
I had some square black and white stringing which I glued together using 8 strips.
Cut the blank and glued in the assembly.
Your photos are brilliant and your assembly is far more complicated well done.
Hi Michael, now I/we have a better understanding of the construction. When doing layered stacking (e.g. your 8 strips), I have found that it looks better NOT to try a visual from all sides, but to go for a front and back visual, with sacrificial but still appealing sides. So basically, keep your middle stack close to the tube OD, and have a side piece to enclose it. (Yea, photos are better than words at this point).

For this pen below (yes, two different blanks, but you'll get the thought), it looks very complicated, but there were only 9 segments, plus 2 black veneers. Deceivingly easy after a few trials. Plus, the design is visible on the front and back, but not on the sides. To me, having the sides look good (even when simple) is nice.
 

Attachments

  • AC7EC72C-B92A-40DB-A7E6-7C075ED252CF_1_201_a.jpeg
    AC7EC72C-B92A-40DB-A7E6-7C075ED252CF_1_201_a.jpeg
    303.5 KB · Views: 95
  • 9AAE7015-DC38-48F6-93DC-816FF88A4F40_1_201_a.jpeg
    9AAE7015-DC38-48F6-93DC-816FF88A4F40_1_201_a.jpeg
    651.8 KB · Views: 100
  • 47966533-2E2F-4C00-A72A-5C983F1AA588_1_201_a.jpeg
    47966533-2E2F-4C00-A72A-5C983F1AA588_1_201_a.jpeg
    389.4 KB · Views: 89

Kcimdrib

Member
Joined
Nov 1, 2020
Messages
1,375
Location
UK
Hi Michael, now I/we have a better understanding of the construction. When doing layered stacking (e.g. your 8 strips), I have found that it looks better NOT to try a visual from all sides, but to go for a front and back visual, with sacrificial but still appealing sides. So basically, keep your middle stack close to the tube OD, and have a side piece to enclose it. (Yea, photos are better than words at this point).

For this pen below (yes, two different blanks, but you'll get the thought), it looks very complicated, but there were only 9 segments, plus 2 black veneers. Deceivingly easy after a few trials. Plus, the design is visible on the front and back, but not on the sides. To me, having the sides look good (even when simple) is nice.
Mark
Thanks for that makes it much easier to understand. I will persevere.
 

Kcimdrib

Member
Joined
Nov 1, 2020
Messages
1,375
Location
UK
Nicely Done Michael. Keep experimenting, some of the greatest innovations happen by accident or when things take a different turn than what you expected. I really like what you are doing.
Ken
Thanks for your comments.
 
Top Bottom