
workinforwood
Member
I'm sure this is normal..first kitless and it's a flop. But...let's examine it and discuss what did I do, how do I do it better, what are the proper steps.
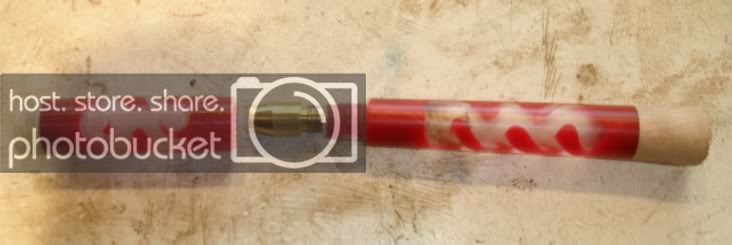
I just want to start simple. My plan is to use this brass compressor hose fitting. I ground the end down so a parker tip will fit through it. It still needs to be filed down on the lathe to be smooth, but this part is only important to know so that you know this will be my nib and the end result is a parker non twist with a cap.
Barely stepped up in diameter from the nib, is a short thread section, then a shoulder so that the cap and the pen meet flush.
I began by drilling out the pen to the proper inside length. The assumption, because I did not use the chart Skip emailed me, was that I used the right size bit and would then tap the hole for the nib...oops. The hole will tap, but barely, meaning the threads are too shallow to hold..first mess up. I decided I can ignore this, re-pore another blank, turn it and jam it in the end then drill that, but that's a mute now that I broke the pen. Anyhow, after trying to tap the inside, I stuck a dowel inside the pen. The dowel was a decent tight fit. I chucked the dowel into my drill chuck and the center into the scrap wood on the end. I spun the pen round and spun the tennon for the cap threads. I removed the pen and tapped the tennon, but my tennon again was just a bit small. I think I was using a 12x1.5 tap. It was almost ok, but just not quite. It was however good enough to get buy for a first try. I re-chucked the pen in the lathe and spun it out the way I wanted it to be.
I drilled the cap section. I then threaded the inside of the cap. This was a big success this time. The threading went perfect, nice deep decent looking threads. I then stuck a dowel in and started spinning the cap section. I was having a problem with chattering near the threaded area. Didn't matter about how sharp my chisel and how light I took it, it just wanted to chatter and grab. Not even turned to size, I capped the "pen" together. The cap seemed to look like it was leaning to the side like maybe I was making an Italian pen, but the shoulder of the cap and pen line up perfect. So the cap or the pen, or both are being turned off center is what I"m sure this means. Looking at the threaded end of the cap, I can see one side thicker than the other, the pen, not so much. I decided maybe I can spin the pen in capped mode on the lathe to straighten it out. I took out the drill chuck and inserted a toothed center to grab the pen as I spun it. It was going kinda ok, but wobbly and then finally at one point it, spinning at the cap in the same area as before where I had difficulties, the pen grabbed and flew apart. The cap section cracked. So the pen is lost, but not the experience. The material used was alumilite.
I think a bulk of my problems is the dowel chucked in the drill chuck. This is pretty much the whole story, tried to give out all the details for your criticisms and suggestions. Please give me all you got...I'm not embarrassed about it.
Oh..btw, there's no tubes, and the crud you see in the blank is just dirt from tapping and turning. It is clear to see through.
Last edited:
