
civilwartalk
Member
At the Potomac Arsenal Penturning garage, we have a saying. I don't remember what it is right now, but when I remember, I'll be sure to tell you about it...
This whole journey started like two weeks ago when I said "Honey, I know we are broke, the garage is already full of too much stuff, I just brought home a heavy, rusty, dirty Craftsman Lathe that my father owned, and I want to restore to working order and you know that's going to be a big mess. Why don't we spend another $200 on a woodworking lathe, and then I'll have a reason to spend even more money we don't have!"
Needless to say, I've been sleeping on the couch for the last two weeks, but now I can watch YouTube all night long if I want. Well, at least until I get yelled at to shut the light off... anyway. I waited my mandatory week for Rockler's shipping to do it's magic, and the big heavy box arrived with my new lathe. What do you mean it doesn't have any of the tooling I need? Geeze, like I have all this time to do research....
So, lucky me I found this site, and cancelled all my silly beginner orders, and got the RIGHT STUFF ordered, and it came in, and here we are, now you are caught up. I hate shows that go on and on with their recap, they just go on and on.......
OK, ok, hold on a second!
I've got to get my camera ready. I'm a visual story teller... (cough)

So, I went in the woods one day, and cut down some Ash trees... These came from some private property in Gettysburg, actually from my Mom's property, so yes I had permission!
 My mom thinks the trees died from the common Ash Tree disease, but some of this tree is still live. That's not to say that some of those trees I cut weren't dead, we were able to push one 30 foot tree over by hand it was soo rotten.
I did spend a few days trying to cut blanks from one of the Ash trees (on the left), and I'll need to do more cutting some do get that job finished.
 When the Saturday after Black Friday came, I got to visit a local Hardwood Lumber shop who had a sale, and he had this log and another for sale for a buck each, which I think is Purpleheart (photo on the right), I purchased both of them.
I'll need to cut this one soon before it cracks. The first one, about the same size, made about 30 full pen blanks, and another 5 half blanks (because of the holes).
I have them stacked up, zip tied, and weighed down to dry and hopefully they won't twist or crack. I use glue to seal the end grain on my blanks.... Or at least that's what I'm trying...
But I'm not playing with logs today, I want to practice turning a pen today! So I'm going to get started by... opening my Pinewood Derby toolbox, and finding a nice pine block with some cooked axle slots...
 and...

then...
 and finally...

Not exactly rocket science like Pro Level Pinewood Derby can be, more like slice and dice right?
Well, now it's time to Press My Luck!

Look! I even pulled out my 1,2,3 Blocks for this operation! That means this was a precise operation!
and.... that went well...
 sort of ...

Did you know that you could buy substitute pen parts a Lowes and Home Depot?

I'm still waiting for the Pen Kits I ordered to show up, and I don't want to practice turning with those anyway. So, I bought these copper pipe pieces, one 3/8" and another in 1/4", just to simulate pen parts, so we will see if I can make this work as test pieces!

This looks about right... so I cut that thing with my trusty old pipe cutter. This should work well....
 and once that was done... a test fit!
 Oh no... What did I do....
 Nevermind!
The un-necessary 1/4" pipe was just for sizing, the 3/8" pipe is where it's at!
Next Step...
This is going to hurt you more than me...

Now, Let's Sand & Glue!

So, I take the tube, and do the scratchy scratchy, up and down, left and right, then I add a little CA glue to the inside of the blank, and then I add more glue to the tube. I go to press the tube into the hole in the blank... I said I go to press the tube into the blank.... .... .... I SAID I PRESS THE TUBE INTO THE.....
I regret to inform everyone, that it's at this point that a terrible accident has happened. It was all going so well until it wasn't I need to remind everyone of something I probably failed to mention earlier, I have done this twice already, so this is supposed to be the CLEAN take of this process... so anyway... this is the state of things...

WTF...
...
I WILL NOT BE DEFEATED LIKE THIS!

That takes care of the tube....

I didn't like the long blank anyway...

Parting is such sweet sorrow....

Look, how cute! It's like they are made for each other!

Just gotta clean this up, I know what to do!

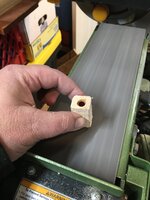
Spin some sandpaper on this....

Look all shiny...

A test fit, still kinda tight, stupid Home Depot pipe is bigger than Lowes pipe, can you believe this?

A little glue & persuasion, and it's in!

Almost ready to turn!


Make this tool sharp!

Then make sure it's clean, dry, and lubricated!
So at this point, I turned a test pen blank... and about 5 minutes later, I took this off the lathe...

On this third test in three days, I finally met my goal, 0.420" on a pipe that should be 0.375"

But not without some issues...

But, that's okay, I was really pushing how close I could get to the copper tube, and now this blank will join the other two that are already on my shelf...

From Right to Left, Test Number 1, Test Number 2, Dale's 1997 Daytona 500 Racecar
So, what's the moral of this story? Take up pottery?
No, that can't be right. When life gives you lemons, make a peanut butter and jelly sandwich, cause nobody makes a sandwich with a lemon!
Tune in next week when my glue comes in, and we all learn how many times you can finish a wooden pen blank; and then refinish it, before you end up with just a copper pipe again.....
This whole journey started like two weeks ago when I said "Honey, I know we are broke, the garage is already full of too much stuff, I just brought home a heavy, rusty, dirty Craftsman Lathe that my father owned, and I want to restore to working order and you know that's going to be a big mess. Why don't we spend another $200 on a woodworking lathe, and then I'll have a reason to spend even more money we don't have!"
Needless to say, I've been sleeping on the couch for the last two weeks, but now I can watch YouTube all night long if I want. Well, at least until I get yelled at to shut the light off... anyway. I waited my mandatory week for Rockler's shipping to do it's magic, and the big heavy box arrived with my new lathe. What do you mean it doesn't have any of the tooling I need? Geeze, like I have all this time to do research....
So, lucky me I found this site, and cancelled all my silly beginner orders, and got the RIGHT STUFF ordered, and it came in, and here we are, now you are caught up. I hate shows that go on and on with their recap, they just go on and on.......
GET ON WITH IT ALREADY!!
OK, ok, hold on a second!
I've got to get my camera ready. I'm a visual story teller... (cough)
So, I went in the woods one day, and cut down some Ash trees... These came from some private property in Gettysburg, actually from my Mom's property, so yes I had permission!
I did spend a few days trying to cut blanks from one of the Ash trees (on the left), and I'll need to do more cutting some do get that job finished.
I'll need to cut this one soon before it cracks. The first one, about the same size, made about 30 full pen blanks, and another 5 half blanks (because of the holes).
I have them stacked up, zip tied, and weighed down to dry and hopefully they won't twist or crack. I use glue to seal the end grain on my blanks.... Or at least that's what I'm trying...
But I'm not playing with logs today, I want to practice turning a pen today! So I'm going to get started by... opening my Pinewood Derby toolbox, and finding a nice pine block with some cooked axle slots...
then...
Not exactly rocket science like Pro Level Pinewood Derby can be, more like slice and dice right?
Well, now it's time to Press My Luck!
Look! I even pulled out my 1,2,3 Blocks for this operation! That means this was a precise operation!
and.... that went well...
This looks about right... so I cut that thing with my trusty old pipe cutter. This should work well....
The un-necessary 1/4" pipe was just for sizing, the 3/8" pipe is where it's at!
Next Step...
This is going to hurt you more than me...
Now, Let's Sand & Glue!
So, I take the tube, and do the scratchy scratchy, up and down, left and right, then I add a little CA glue to the inside of the blank, and then I add more glue to the tube. I go to press the tube into the hole in the blank... I said I go to press the tube into the blank.... .... .... I SAID I PRESS THE TUBE INTO THE.....
I regret to inform everyone, that it's at this point that a terrible accident has happened. It was all going so well until it wasn't I need to remind everyone of something I probably failed to mention earlier, I have done this twice already, so this is supposed to be the CLEAN take of this process... so anyway... this is the state of things...
WTF...
...
I WILL NOT BE DEFEATED LIKE THIS!
That takes care of the tube....
I didn't like the long blank anyway...
Parting is such sweet sorrow....
Look, how cute! It's like they are made for each other!
Just gotta clean this up, I know what to do!
Spin some sandpaper on this....
Look all shiny...
A test fit, still kinda tight, stupid Home Depot pipe is bigger than Lowes pipe, can you believe this?
A little glue & persuasion, and it's in!
Almost ready to turn!
Make this tool sharp!
Then make sure it's clean, dry, and lubricated!
So at this point, I turned a test pen blank... and about 5 minutes later, I took this off the lathe...
On this third test in three days, I finally met my goal, 0.420" on a pipe that should be 0.375"
But not without some issues...
But, that's okay, I was really pushing how close I could get to the copper tube, and now this blank will join the other two that are already on my shelf...
From Right to Left, Test Number 1, Test Number 2, Dale's 1997 Daytona 500 Racecar
No, that can't be right. When life gives you lemons, make a peanut butter and jelly sandwich, cause nobody makes a sandwich with a lemon!
Tune in next week when my glue comes in, and we all learn how many times you can finish a wooden pen blank; and then refinish it, before you end up with just a copper pipe again.....

") ) No matter, there are many beautiful pieces produced by our members in all manner of work spaces. Just don't stop trying ...... and enjoy your craft.
) No matter, there are many beautiful pieces produced by our members in all manner of work spaces. Just don't stop trying ...... and enjoy your craft.
")