'Interesting' Cracks in Acrylic Blanks

Signed-In Members Don't See This Ad

Sandy H.

Member
Joined
Apr 4, 2013
Messages
101
Location
Charlotte, NC
After a long hiatus from turning due to work, I got some time over the holidays to turn a few. Most turned out fairly well, but I have 2 that I noticed a problem I hadn't seen before. Attached are some pictures.

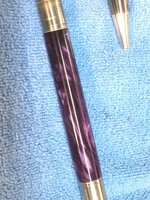
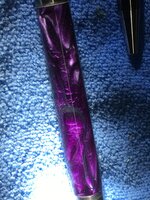
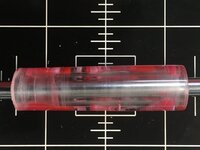
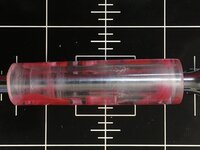
Starting with the purple one, overall, from 1 foot, it looks fine. Up close, cracks are visible from the inside out (it seems). I tried to get close-up pictures by shining a light to highlight the cracks. They actually look much worse this way than in just ambient light.

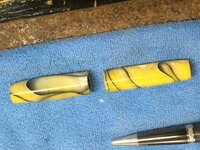
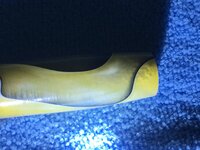
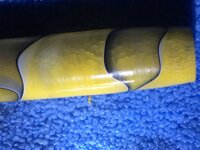
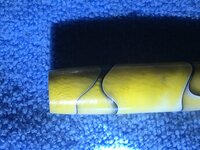
I went back to look at the yellow one, which I initially rejected due to what I thought were radial grooves left by the drilling process, but upon closer inspection, I think these are the same type of cracks.

By looking at the paint penetration, it seems that they start at the drilled hole and make it only part of the way through the blank due to the pain absorption, however I could easily believe this is just a coincidence and the paint was not able to wick up the cracks further. I cannot feel any cracking on the outside of either blank with my fingernail, but it is possible that the sanding and buffing would make it hard to feel anyway.

My assumption is that during the drilling process, the blank got hot and caused cracking. I am surprised by this, as I drilled on the lathe at 500 rpm and cleared the drill-bit often. I grab the drill tip after each drilling step and it was warm at most and not hot - definitely not hot enough to cause any discomfort when grabbing the tip, so less than 120-130 deg F for sure.

I painted the inside of the blanks with water based acrylic paint and used 2 part epoxy to attach the tube the the blank, so I don't think any sort of chemical reaction was the cause.

I wanted to ask if anyone had other thoughts as to the cause and any remedy other than taking smaller bites and cooling with water more often. Regretfully, I've drilled a few others using the same method already, so I might have the same scenario on more blanks. . .

Thanks for any suggestions.

Sandy.
 

Attachments

  • IMG_3472.JPG
    IMG_3472.JPG
    314.2 KB · Views: 276
  • IMG_3473.JPG
    IMG_3473.JPG
    423 KB · Views: 311
  • IMG_3474.JPG
    IMG_3474.JPG
    409.7 KB · Views: 313
  • IMG_3476.JPG
    IMG_3476.JPG
    284.8 KB · Views: 301
  • IMG_3478.JPG
    IMG_3478.JPG
    260 KB · Views: 301
  • IMG_3479.JPG
    IMG_3479.JPG
    220.1 KB · Views: 287
  • IMG_3477.JPG
    IMG_3477.JPG
    298.4 KB · Views: 295
Signed-In Members Don't See This Ad

Sly Dog

Member
Joined
Nov 16, 2018
Messages
417
Location
Boise, Idaho
I know you painted inside the blank, but to my eye they look more like glue marks/swirls than cracks (as in the tube and epoxy rubbed off the paint inside the blank during insertion...). Maybe a reaction between epoxy and the kind of paint used, or maybe the paint coverage was thin or not fully dry before gluing. That's my guess anyway.

I'll be interested in other opinions you receive. šŸ‘šŸ»
 

magpens

Member
Joined
Feb 2, 2011
Messages
15,912
Location
Canada
Don't believe that is cracking, in the usual sense. . How are you drilling ? . On the lathe? . Drill press ?

After what you wrote ... hesitant to suggest ... but ... Excessive speed, and the resulting heat, when drilling ??

In my experience, drilling acrylic at 500 RPM is going to make the drill bit hotter than you want to touch ... far higher than 120-130F (barely warm).

Those markings don't look like glue lines to me. . IMHO, more likely blistering/melting when drilling. . But ... I've been wrong before !
 

jttheclockman

Member
Joined
Feb 22, 2005
Messages
19,132
Location
NJ, USA.
My thoughts are if you are using very transparent blanks like these the first thing you need to do is sand the radial scratches out from the drilling process. I have said this before. Think of a blank and its layers. When you turn a blank down the very first thing that is seen is the underside of the blank where it was drilled. Then is the layer of paint used. Then is the adhesive. Then is the tube. First line of defense is start with inside the blank or reverse side. Sand smooth and lengthwise after for final sanding. Then use a good quality paint. Waterbased paint is not ideal. but can work I like Testors enamel paints. Then adhesive. If transparent blank I will always add some color to the epoxy. I only use epoxy. I never paint the tube because if i get past all other defensive moves I am not going to like the blank anyway. The cracks can be internal when the blank was made. have no way of knowing that. You will not get cracks in a line like that if you over heated a bit. they would be crackly. That is about all I can say and this is just my opinion.
 
Joined
Jan 10, 2013
Messages
238
Location
Howell, Michigan
I get these when I don't let the paint dry thoroughly, at least 24 hours. I tend to get into a rush. I use acrylic craft paint and epoxy. I had a couple of pens using that yellow blank that looked like scales on the inside, made an interesting texture that a customer loved (bought both). Sometimes our "mistakes" are unique enough that they draw attention.
 

Sandy H.

Member
Joined
Apr 4, 2013
Messages
101
Location
Charlotte, NC
Thanks for the replies. To address some of the questions above:

1: Drilled on lathe at 500 RPM. Method was to drill about 1-1 1/2" in first, pull bit out to ensure it was clean and cool. Repeat, but in about 1" increments. If the bit got more than warm to the touch, stop and let it cool down for 5 minutes or so. On the purple blank, I squireted water into the bore after the first 2 plunges due to the length of the blank, but still stopped to let the bit cool. The yellow ones were so short, I didn't use water.

2: Drill bits were sharp by my perspective, but maybe not by everyone's. . . They made long strands of chip, not dust and they didn't squeak when driving in. Near the end of the cuts, I would say it did start to clog on the purple one, but that may have been due to the water used. The yellow one was done with brad-point bits (what I had in the right size) and the purple one was a regular twist drill sharpened on a drill doctor.

3: Paint used on the yellow was yellow spray paint (2 coats) followed by 2 coats of black water based acrylic paint applied with a Q-tip. Paint on the black one was 2 coats of black water based acrylic paint applied with Q-tip. The yellow was allowed to dry 24 hours before applying the black. The black was allowed to dry overnight.

Given the responses above, I think some more experimentation/verification should be done on my end to try to narrow down the cause.

I propose the following test - please comment in case I'm missing something obvious.

1: Grab a few similar blanks (same material, fairly translucent) and turn them round, sand and polish the outside. The diameter will still be large, but by finishing it to a polished surface, maybe I'll be able to see inside easier than the stock blank.

2: Using a sharp standard point drill, drill in using the previous procedure. Make visual observations at each step and record the drill bit temperature.

3: Repeat test using water to cool the drill bit and peck shorter duration (maybe clear every 1/2" instead of 1"). Visual and temperature measurements.

4: There is a good chance that I still won't be able to see the inside well, so plan to backpaint (wait 24 hours to dry), epoxy (overnight to dry) and turn to a thinner diameter and make observations.

Alternate drilling option: If 500 RPM is still too fast, I guess I could switch over to my metal lathe and drop the speed a lot more. I'd prefer to avoid this, as the cleaning regimen is different for the 2 machines, but I don't have a convenient option of dropping my wood lathe speed below 500 rpm at this stage. If someone could recommend a preferred RPM for drilling, I'll ponder a test that way.

As far as trying to save the other blanks I've drilled, I plan to:

1: Sand the hole longitudinally using sandpaper on a dowel to reduce the internal radial scratches.
2: Paint the inside of the tube with Testors black enamel instead of the water based acrylic. Should I use a brush or is a Q-tip acceptable? Let dry 24 hours.
3: Add a few drops of Testors paint to the epoxy when mixing and assemble the tube as usual.

Thanks for the suggestions and please feel free to comment on the above plan.

Sandy.
 

jttheclockman

Member
Joined
Feb 22, 2005
Messages
19,132
Location
NJ, USA.
Just a note Sandy that drill speed is just fine. It takes alot for the bit to become so hot not acceptable. If it is dull or the material is very hard or speed is to fast and the push effort is too much are the causes and none of which sound like your problem. This could all be just the nature of those blanks but we may never know for sure. Good luck.
 

More4dan

Member
Joined
Mar 17, 2016
Messages
2,102
Location
Katy, TX
I did have a thought, acrylics are more brittle when cold and would have a rougher finish when drilled. The purple one looks like scratches to me more than cracks.

Danny


Sent from my iPad using Penturners.org mobile app
 

magpens

Member
Joined
Feb 2, 2011
Messages
15,912
Location
Canada
Drilling "acrylic" on lathe, at no more than 500 RPM, I advance the drill with the tailstock wheel "very slowly" (can't quantify - sorry) ... in increments of no more than 3/8" (less as hole gets deeper) ... then withdraw to clean off the cuttings/chips/swarf ... lubricate with WD-40 (cautiously to be sure the integrity of the "acrylic" is not affected - clean with alcohol when drilling is complete).

Wish I could offer more help. . I admire your "passion" to understand the problem. . Please keep us posted as you (hopefully) progress.

I sense that a lot of people are quite interested in this issue.
 

ramaroodle

Member
Joined
Feb 15, 2018
Messages
686
Location
Seattle
I painted the inside of the blanks with water based acrylic paint and used 2 part epoxy to attach the tube the the blank, so I don't think any sort of chemical reaction was the cause.

Sandy.

I forget where but just the other day I read that you want to use enamel not acrylic paint on the inside of the blank and epoxy (never CA) to glue the tube. Also, shoot a little denatured alcohol in the hole as you drill to keep it cool.
 
Last edited:

TonyL

Member
Joined
Mar 9, 2014
Messages
8,915
Location
Georgia
They do not look like cracks to me. They look like the rifling marks from the drill bit. Even with painting the blank and tubes; and the "best" drill bits, I have never been able to hide them with some of the less opaque blanks. I have used mandrels to sand/polish them (the marks), but then I eventually changed the diameter of the hole (enlarged it) where I made it too large for the pen kit hardware. - the inside of the barrel was nice and shiny though LOL.

I now only buy those blanks for kitless pen making. I wish I could find a way. Much success with your pursuit.
 

Sandy H.

Member
Joined
Apr 4, 2013
Messages
101
Location
Charlotte, NC
Well, I have had some interesting observations, but not much I can conclude so far. Suffice it to say that with the method I used:

1: The drill marks (radial and spiral shape) are very pronounced as many suggested. Regardless of the cracking issue, these would likely be visible too.

2: I firmly believe there is indeed cracking going on. I can see evidence with my eyes in the proper light, but have yet to be able to take a good picture.

3: The drill and blank temperature was interesting. I don't 100% trust my measurements yet, but I can say for sure that I grabbed the bit after each drilling and was able to hold it - most of the time comfortably, but one time it was only for about 10 seconds before it started to get borderline uncomfortable.

I made videos of everything I did and if anything turns out conclusive, I can edit them and post them for others to see. I'll continue to do so as I test more and hopefully find something interesting.

I'm stopping by Woodcraft tonight after work to try to get some more extremely translucent blanks for additional data.

Thanks,

Sandy.
 

Sandy H.

Member
Joined
Apr 4, 2013
Messages
101
Location
Charlotte, NC
Well, I spent the last couple of days trying different things. I took video of the events as well in case there is interest in seeing that. Having said that, there is just under 2 hours of me drilling on the lathe and obviously nobody really wants to see all that, so it would need to be edited for general consumption. I imagine it could be cut down to about a half an hour, but it will take quite a while to do that, so if there is interest in seeing the video after reading the following, please let me know and I'll consider editing and posting it.

The goal was to determine if what I was seeing was interior cracking or something else and to determine process improvements to get better results. While this process isn't complete at this stage, I can say a few things with reasonable confidence:

1: It appears that the small internal cracking (sharp, short cracks, fairly longitudinal and sometimes forking into a Y shape) were caused by rinsing the blank internally with denatured alcohol. I make this assertion based on the fact that I looked carefully at the blank after washing in soapy water and didn't see any cracks. I then rinsed in DNA (which I typically do before epoxy) and within a few moments began to see cracks where none were before.

Brief research into this, especially related to cleaning laser-cut acrylic, reveals that people in the sign business seem to know this as complete fact. I saw a few different explanations, but there is almost a 100% agreement that one should never rinse laser cut acrylic with DNA, or it will begin micro cracking. For now, I'm satisfied that it is likely that the DNA rinse caused the initial cracking I observed.

2: People who recommend going slow and using water are 100% correct. Varying how fast and slow I drilled (feed, not RPM, as I help that constant) and whether I used water or not, greatly affected the quality of the hole drilled. I also tried soapy water as the drilling agent and did not see a huge difference, however once I switched to soapy water, I maintained that throughout the rest of the tests.

The conclusions I draw here are that slow, in my case, was 500 RPM, drilling 3/8" depth in about 20 seconds, then retracting the bit to for chip removal. It should be noted that as the drilling got deeper (about 1 1/4"- 1 1/2" deep per observations) the chips compacted more and more, generating more heat and generally not clearing well. Of the tests performed, It seems that switching to 3/16" depth between clearing after about 1 1/4" of drill depth gave the best results for chip clearing.

3: One of the tests was to wipe the drill bit down with paste wax, focusing on the inside of the spiral vs the cutting edge. The goal was to facilitate the flow of chips up the drill bit. As it turns out, the best results were obtained with these two tests. It appears that the drill bit temperature was generally lower (but did get warmer the deeper it went) and 'chip welding' seemed to be occurring less, but still existed.

I do not conclude that wiping the bit down with paste wax is required, nor am I completely convinced the results are completely related to the wax. These were the last two tests I did and therefore I was more consistent than the earlier tests, simply due to repetitive motion. It is possible that I was unintentionally making adjustments based on feel and sound to get the better results, but I think pursuing the wax (or other lubricant on the drill itself) merits additional testing. I do not believe the wax caused any problems, but as of yet, have not painted or epoxied the blanks, so I might find an unfortunate surprise then. . .

4: One additional test that could have merit relates to using a straight chucking reamer to cut the final hole size. I drilled one blank undersized (25/64 vs 27/64) with a twist drill and finished it with the reamer. This test had a bit of an asterisk next to it, as the drill I used performed differently than the baseline drill. I managed to get it stuck in the blank 2 times, leaving large chips welded in place. After the drilling was done, it looked by far the worst of all. While I had little hope for the reamer improving the result, I was pleasantly surprised. The reamed surface was the most clear and had the least scratching in general, however there were areas where the chip welding and pitting from the initial drilling did not clean-up. I believe if the initial drilling had been similar to other tests, the reamed finish would have been the best overall. This does require the purchase of an additional tool (or tools) and at $10 for a cheap import version or $40 for a high quality made in USA reamer, many people might not be interested in this path, regardless of the quality of the finish. For this reason, I did not continue testing at this point.

5: I sanded one blank by attaching 400 grit sandpaper to a steel dowel and spinning the dowel in the lathe. I obtained a uniform cross-hatch for 90+% of the drilling, however any areas that exhibited a lot of surface defect did not clean-up. In addition, the hole size opened up from the desired 0.422" diameter to 0.440". While this method has promise as well, it would be smart to start with a smaller drill bit if this method would be used. I suspect starting 1/32" smaller than desired drill bit with a coarser paper (320 dry, possibly) to move a lot of material to get rid of any problems, following by 400 and 600 wet would yield a good fit and likely a very good finish.

As I am out of overly translucent blanks at this point, I'm stopping for now. Maybe Woodcraft will have more in their Wednesday shipment and other tests can be performed. These would include linear sanding (parallel to the length vs the radial sanding done in the lathe), additional testing with waxing the drill bit and/or another lubricant and possibly more testing with the reamer. I am open to other suggestions.

Attached is a quick picture of the 8 samples produced, along with one of the thermal imaging pictures taken of the drill temperature. I will say that I am also not satisfied with the values from the thermal imaging, as it reported some temperatures I feel are completely unrealistic. I have a verification test planned, but don't have the parts to do that yet.

I will try to get some better pictures to show the actual individual quality of the drilling over the next day or two. It is frustrating how clear things can be by eye, but capturing that with the camera has been a bit elusive so far.

Please let me know any thoughts or additional information that you'd like to see.

Thanks,

Sandy.
 

Attachments

  • IMG_2390.JPG
    IMG_2390.JPG
    86.9 KB · Views: 148
  • IMG_3516.JPG
    IMG_3516.JPG
    429.9 KB · Views: 121

duncsuss

Member
Joined
Jun 29, 2012
Messages
2,160
Location
Wilmington, MA
... there is almost a 100% agreement that one should never rinse laser cut acrylic with DNA, or it will begin micro cracking. For now, I'm satisfied that it is likely that the DNA rinse caused the initial cracking I observed.
I have a couple of clear (colorless) acrylic acetate barrels with a fantastic crackled effect. I'd intended to make them into a demonstrator, but now I keep them on the bench as a reminder never to use DNA with acrylics.

There are probably other chemicals that cause similar cracking - and maybe the paint you used (in your first two barrels that prompted you to start this thread) also contains something that does it.

Good detective work, thanks for sharing your findings.
 

jttheclockman

Member
Joined
Feb 22, 2005
Messages
19,132
Location
NJ, USA.
I am not putting the DNA bottle away at all. I have used DNA to cool my drill bits on every material possible and have no problems but I do not soak material with it. I put it on dill bit to cool it down. DNA is not a good ingredient to lubricate a drill hole as is neither water if that is your purpose of using it. If using as a coolant it will not stay cool for long in a drilled hole so to me a waste of time. Cleaning hole out and cooling bit are the prime steps I use when drilling any material along with slow speed not only with drill speed but advancing speed. Good luck with your testing.
 

Sandy H.

Member
Joined
Apr 4, 2013
Messages
101
Location
Charlotte, NC
I managed to get some better individual pictures, in case anyone would like to see something specific.

I also got a before and after DNA picture. To be clear, I was only using DNA as a cleaner after all the work is done, not as a lubricant etc. In the following pictures, the first is the blank after drilling and washing with warm soapy water. It was allowed to completely dry and the picture was taken. The second picture is after I filled the hole with DNA, swished it around for 10 seconds and then dumped the DNA out. I let it sit for 10 minutes to completely dry and photographed.

I took some pictures under a microscope as well, but honestly these two pictures tell the tale better than the microscope did, as you see more of the blank and that helps to quantify the magnitude.

Sandy.
 

Attachments

  • IMG_3537.JPG
    IMG_3537.JPG
    196.7 KB · Views: 144
  • IMG_3539.JPG
    IMG_3539.JPG
    201.7 KB · Views: 114

jttheclockman

Member
Joined
Feb 22, 2005
Messages
19,132
Location
NJ, USA.
You learned something but again not sure why you need to clean the blank out. Sand and blow dust out. Paint with enamel paint add some paint to epoxy and insert tube and turn to pen size I have made many of those blanks and never had one problem with them. Those lace pens are transparent for sure.
 

More4dan

Member
Joined
Mar 17, 2016
Messages
2,102
Location
Katy, TX
I remember as a teenager washing small airplanes at our local airport. When cleaning the windows we had to be careful that nothing we used contained any alcohol for the same reason. Same with my polycarbonate shield on my motorcycle helmet and the motorcycle windscreen.

Danny


Sent from my iPad using Penturners.org mobile app
 
Top Bottom