
jtate
Member
I got into pen turning because of my passion for vintage fountain pens. I now want to bring a concept from my fountain pen knowledge to my pen turning friends. And that concept is: THE INNER CAP
I'd suggest that we turn inner caps to the proper dimensions for our custom-modified kits and include them in their assembly. Knowledgable fontain pen buyers will look for this in the higher-end pens. We can turn them from plain acrylic and I think they can make a difference.
Nearly all vintage (and most nice modern) fountain pens have an inner cap, which is press-fit inside the cap. This inner cap is deep enough that the edge of the section (that's the part into which the nib fits) rests against the edge of the inner cap.
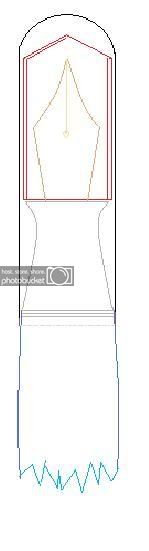
One of the points of the inner cap is that, if the fountain pen begins to leak, the ink will be mostly contained inside the inner cap. Another point of the iner cap is that it helps to secure the clip in a closed end cap where the clip can't be secured by a finial screwed onto the top of the cap.
There are a lot of ways that the inner cap can secure the clip. Here's one. In this one, the clip has little tabs that slide into slits in the cap. The pen-maker bends the tabs back, flat against the inside of the cap. The inner cap is then slid into the cap and secures the folded tabs in place.
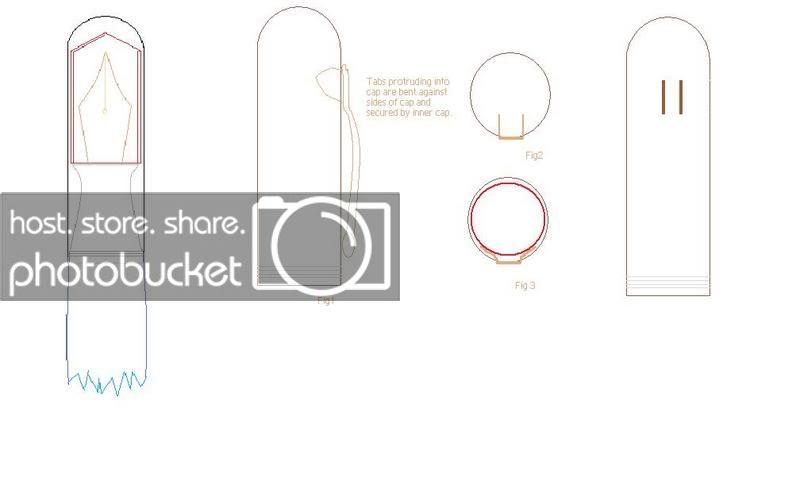
Figure 1 in this illustration shows the clip with the tabs inserted into the cap, but without the inner cap in place. Figure 2 is a cut-away, overhead view of the cap. It shows the tabs inserted into the cap but without the innercap. Figure 3 shows the tabs folded back against the inside of the cap and the inner cap (the red circle) slid into the cap.
Of course, the above method would require some fabrication of the clip. A method that would only require modification of the existing clip is below. In this method (which Bill Jackman detailed in his tutorial http://content.penturners.org/articles/2006/recessedpf.pdf ) the clip that comes with the kit is modified so that the upper part of the clip can be inserted into a slot in the closed-ended cap. The tutorial has the clip being secured by a hex-key set screw which has been screwed into the brass part which normally would hold the screwed-in finial. Using an inner cap would allow the top end of the inner cap to secure the clip. A little epoxy dribbled into the cap before installation of the clip will permanently secure it into the cap.
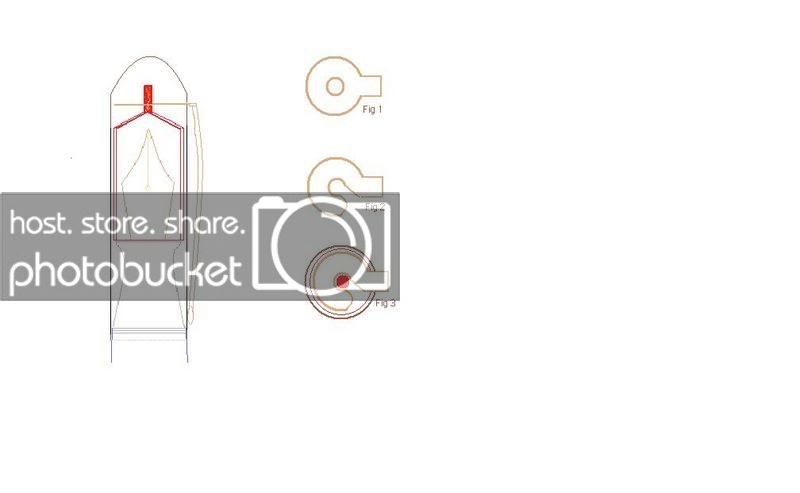
Figure 1 in the illustration above shows an overhead view of the clip that comes with the kit. Figure 2 shows the modification as per Bill Jackman's tutorial. Figure 3 is a cut-away, overhead view of the clip in place. The center red circle is a little post turned on the top of the inner cap, the outer red circle is the body of the inner cap and the outer black circle is the cap itself.
So that's about all I have on this. I'm hoping that this information will be useful to other penturners. Any comments or suggestions would be appreciated.
Julia
I'd suggest that we turn inner caps to the proper dimensions for our custom-modified kits and include them in their assembly. Knowledgable fontain pen buyers will look for this in the higher-end pens. We can turn them from plain acrylic and I think they can make a difference.
Nearly all vintage (and most nice modern) fountain pens have an inner cap, which is press-fit inside the cap. This inner cap is deep enough that the edge of the section (that's the part into which the nib fits) rests against the edge of the inner cap.
One of the points of the inner cap is that, if the fountain pen begins to leak, the ink will be mostly contained inside the inner cap. Another point of the iner cap is that it helps to secure the clip in a closed end cap where the clip can't be secured by a finial screwed onto the top of the cap.
There are a lot of ways that the inner cap can secure the clip. Here's one. In this one, the clip has little tabs that slide into slits in the cap. The pen-maker bends the tabs back, flat against the inside of the cap. The inner cap is then slid into the cap and secures the folded tabs in place.
Figure 1 in this illustration shows the clip with the tabs inserted into the cap, but without the inner cap in place. Figure 2 is a cut-away, overhead view of the cap. It shows the tabs inserted into the cap but without the innercap. Figure 3 shows the tabs folded back against the inside of the cap and the inner cap (the red circle) slid into the cap.
Of course, the above method would require some fabrication of the clip. A method that would only require modification of the existing clip is below. In this method (which Bill Jackman detailed in his tutorial http://content.penturners.org/articles/2006/recessedpf.pdf ) the clip that comes with the kit is modified so that the upper part of the clip can be inserted into a slot in the closed-ended cap. The tutorial has the clip being secured by a hex-key set screw which has been screwed into the brass part which normally would hold the screwed-in finial. Using an inner cap would allow the top end of the inner cap to secure the clip. A little epoxy dribbled into the cap before installation of the clip will permanently secure it into the cap.
Figure 1 in the illustration above shows an overhead view of the clip that comes with the kit. Figure 2 shows the modification as per Bill Jackman's tutorial. Figure 3 is a cut-away, overhead view of the clip in place. The center red circle is a little post turned on the top of the inner cap, the outer red circle is the body of the inner cap and the outer black circle is the cap itself.
So that's about all I have on this. I'm hoping that this information will be useful to other penturners. Any comments or suggestions would be appreciated.
Julia
")