Help with Casting Wood Blanks with Deep Inclusions

Signed-In Members Don't See This Ad

leehljp

Member Liaison
Joined
Feb 6, 2005
Messages
9,857
Location
Tunica, Mississippi,
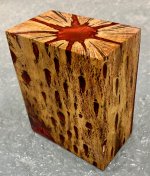
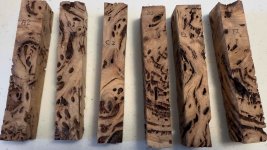
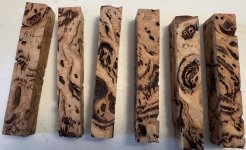
I need some expert and experienced help with something I have not done is a long while - Casting. BELOW are the 4 sides of 6 blanks with lots of inclusions/voids.

1. Hybrid like casting. What will be the best resin type (with colors added) to cast and fill these voids / inclusions? Some go all the way through, some do not.

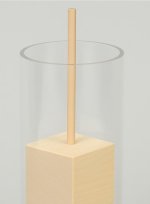
2. Some inclusions do not go all the way through. How to make sure the casting goes DEEP into the inclusions that are not all the way through the blank - with pressure? I have thought about drilling a 1/4 inch hole length wise through each to make sure the resin goes into some pockets that may not go all the way through.

I really do not want to turn a blank and find the colored resin didn't fill the inclusion all the way. Any suggestions would be appreciated!

3. For number 2 above, I am thinking that I need long open time, thin viscosity when in the pressure pot. If this is the best way - again what resin to use?

For color, I will probably use 1
. a blue sky with pearlescent , 2. A blackish gold, 3. A red pearlescent 4. An emerald green pearlescent type. Not sure on the other two colors or make them one of the 4 above.

Recommendations? Your comments appreciated!
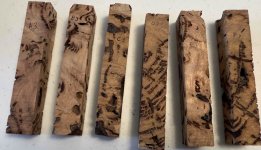
 

Attachments

  • Side 1.jpg
    Side 1.jpg
    473.2 KB · Views: 46
  • Side 2.jpg
    Side 2.jpg
    497.6 KB · Views: 37
  • Side 3.jpg
    Side 3.jpg
    460.1 KB · Views: 37
  • Side 4.jpg
    Side 4.jpg
    543.7 KB · Views: 41
Last edited:
Signed-In Members Don't See This Ad
Lee I'll tell you what I do and why. I hope it helps. My go to resin is Alumilite Clear Slow. The way I prep the blanks are simple. Make sure they're clean and I use museum get to hold them in place so they don't float. I put a BB sized ball on each end and a few in the middle. I also like the gel because it leave a small gap on the bottom. I also like a gap on the sides. That way the resin can flow around the blank and not create dry spots. I put the mold with the blanks in an oven at 125 degrees for about 30 minutes to dry any moisture and to warm the mold and blanks. That also helps with the flow of resin. To prepare the resin I weigh up the B side and add and dyes needed. I use a candle warmer to warm that once it's all mixed. When the blanks are about ready to come out of the oven I add the A side and mix the two. Something I haven't done is let the resin start to heat at this point to help with color separation. I've never made a straight resin blank so this was something I never felt the need to try. As soon as the A and B sides are mixed I pour it in the mold. If I use two colors I do the same thing with both cups and alternate the two while pouring in the mold. As soon as the mold is full I go straight to the pot. As mentioned I don't have the color separation but it does make a nice blank. I've cast several worthless wood blanks with great success. When I did have issues I felt it was because I rushed the timing on heating the blanks and the resin. Good Luck.
 
Wow! These blanks will be nice when finished. It's been so long, I can't remember who made the Worthless wood blanks. I agree with using pressure. Alumilite Slow is commonly used for casting. Getting the blanks oriented in the molds would be essential for flow through of the resin.

Sorry I'm not much help, but you have all of my support! 😁
 
My 2 cents is you want an epoxy resin and my go to resin is Liquid Diamonds. If coloring make sure whatever resin you use that the dyes work with them. Not all dyes are for all resins.
 
I think the ideal approach is to drill the centre hole , turn to round , and use a vertical tube mould . I would use Alumilite Clear Slow . The centre hole will ensure the blank doesn`t float in the resin . The difficulty I have when attempting something similar is finding a tube mould of the closest possible size which is compatible with the polyurethane resin .

Those will be absolutely gorgeous !
 
I also second Wayne's comment. I've cast Chola Cactus that way. Since you know what kit you want to use that would also give you a better idea of how much wood vs. resin you'll have on the pen. Paint the tube glue it in the blank and cast. Just to let you know the method I mentioned above is pretty much how I do all my casting regardless of resins used.
 
Apologies -when I wrote above: "I am going to go through this tonight." I meant that I would be reading each comment in depth - and would be contemplating all of it for a few days. Thanks!
 
I think the ideal approach is to drill the centre hole , turn to round , and use a vertical tube mould . I would use Alumilite Clear Slow . The centre hole will ensure the blank doesn`t float in the resin . The difficulty I have when attempting something similar is finding a tube mould of the closest possible size which is compatible with the polyurethane resin .

Those will be absolutely gorgeous !
This method had crossed my mind - that is the hole and vertical tube and maybe turn to round. I am a little skeptical at the moment of turning to round BEFORE casting because several look and feel like they have some major weak areas. I hoo ave lots of PVC of different sizes that I could use. I am thinking and contemplating the situation. Everyone's ideas are helping.
 
Last edited:
Although I have never used it (yet anyway), since Liquid Diamonds has such a long cure time and a low enough viscosity that it can even be used without a pressure pot, I would think it would be a good choice of resin for penetrating into the voids.
Dave
 
This type of casting presents a few challenges…
Keeping the blanks under resin while exposing all of the voids, getting resin deep in the voids where air can block its penetration, and having resin with a long enough working time to get the job done.

I don't know if this is the best way but this is how I would do it….

First, use a tube mold tall enough to stand the square wood blank inside of it so that the wood can be completely submerged and still have a few inches above it for resin. Also, CA a small stick to the top of the wood so that it extends past the top of the mold. That way you glue a cross brace to it over the top of the mold and use some tape to stick it to the mold so the wood can't float up.

I don't think I would use urethane resin because there may not be enough working time to get it in the voids, even if you cool it down first.

I would use either "alumilite Water Clear" or an epoxy that is thin and has a 10-15 min working time. Some epoxies have a thicker side but that can be warmed up with a heat light bulb (gradually) so not to get it too hot. Once it's warm and thin, let the heat dissipate so you don't accelerate the working time.

I would warm the wood blanks up to remove any moisture… 1 hr at 220°. Then let them cool in a plastic baggie to room temperature.

I've had success pulling a vacuum to remove air bubbles in casts. Short periods of opening and closing the valve to work bubbles out. The trick is not to suck the resin out of the mold and leave yourself enough time to get it in a pressure tank afterwards to cure.

I would suggest doing a sample pour to give you an idea of how long you have with the resin you choose so you k or how long you can pull a vacuum and still have enough time to get it in the tank. I used this process on the large piece of cactus pictured. It had a hole down the middle to help air escape and resin get it but all of the holes were not open at both ends.

Like mentioned above, if possible, I'd drill a 1/4" hole down the middle of that exposed an opening to the voids. I'm sure you'll do just fine but the time spent planning will make the results all that more rewarding.

Best of luck!
 

Attachments

  • IMG_3379.jpeg
    IMG_3379.jpeg
    44.2 KB · Views: 18
  • IMG_9748.jpeg
    IMG_9748.jpeg
    733.4 KB · Views: 24
JohnU: "I've had success pulling a vacuum to remove air bubbles in casts. Short periods of opening and closing the valve to work bubbles out. The trick is not to suck the resin out of the mold and leave yourself enough time to get it in a pressure tank afterwards to cure."

I have had this thought before and have in the case of these blanks, but in "listening" to several posts from long ago - thought it might be cause excessive bubbles to get caught in the hardening stage before pressure is fully applied. I have my tank set up for both pressure and vacuum, so switching from one to the other will keep the blank and resin in the same spot.

I have been really concerned about the resin getting deep into the cavities, and have wondered if anyone DID pull a vacuum in similar cases and then add pressure. I am still thinking the process through, but in reading your experience, I might try it on the first one to see how it goes.

I am going to drill one all the way through with a 1/4" bit, put it one a mandrill (which I have not used in17 - 18 years) and pull it up tight - to keep the integrity of the blank, and turn it round slowly taking small bites.

"I would suggest doing a sample pour to give you an idea of how long you have with the resin you choose so you k or how long you can pull a vacuum and still have enough time to get it in the tank."
I am certainly going to do this, regardless of the method or resin.
 
Last edited:
Although I have never used it (yet anyway), since Liquid Diamonds has such a long cure time and a low enough viscosity that it can even be used without a pressure pot, I would think it would be a good choice of resin for penetrating into the voids.
Dave
Long open time and low viscosity is what I need and want. Thanks for the tip!
 
I got a bunch of this from Amos Pascal in Australia, before he passed. He called it Tasmanian Myrtle Burl, but I have also been told it might be Tasmanian Eucalyptus burl.

He had stabilized it, which of course did not fill the big voids. I tried adding resin afterwards, but the problem is that some of the voids are completely separate with no interconnecting fissures. I still ended up filling voids with CA, as I turned it down. It is also incredibly fragile. The more black figure, the more fragile it is. The good part, is that with the wild figure, you can reglue on the blow out and it is never noticed.

This one has ebonite sleeves, with bronze and Damascus accents.

1759320553997.png
 
That pen is absolutely beautiful! Love the black! Your explanation is simple and I need to just jump in. Thanks

The guy I bought mine from called it "Tasmanian White Top Burl" but in looking it up, I came upon Tasmanian Myrtle Burl, and Eucalyptus and even Tasmanian oak. Not sure which but they are very nice blanks.
 
Back
Top Bottom