Hand mirrors

Signed-In Members Don't See This Ad
See more from Joebobber

Joebobber

Member
Joined
Sep 24, 2018
Messages
1,172
Location
Erie, North Dakota
Hi thought these might be fun to try. I ended uo making it in 3 pieces. A part to hold the mirror, a part to go over top of that acting as the front to also hold the mirror in, and the handle.

I have a niece who is just about 3. She just loves the maple one I made for her, and I lasered a picture of princess elsa on the back of it for her.

I decided to make another one for my friends 5 year old daughter out of Mansonia.
 

Attachments

  • 20210301_074041.jpg
    20210301_074041.jpg
    375.6 KB · Views: 133
  • 20210301_074012.jpg
    20210301_074012.jpg
    565.6 KB · Views: 128
Signed-In Members Don't See This Ad

monophoto

Member
Joined
Mar 13, 2010
Messages
2,543
Location
Saratoga Springs, NY
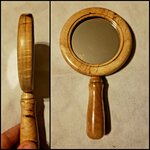
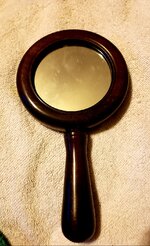
When I first got into turning I made a number of these. Initially, I used 3" bevel-edged mirrors that I bought from PSI, but I later found that I could get 2" mirrors for a lot less from AC Moore or Michaels. However, because the edges of these were not beveled, I had to be more careful to make sure that the mirrors are fully recessed into the turned surround so that the fingers are protected from that sharp edge; also, it's prudent to leave a small gap around the mirror to allow the wood to expand/contract without contacting the mirror. As noted below, because I wanted a mirror that could easily travel with me, it made sense that the surrounding wood frame be 1/16" or so proud of the surface of the glass to protect it from damage.

The approach I took was to attach a piece of 3/4" timber to a glue block using double-stick tape to turn the basic shape and cut a recess to receive the mirror. Then, I reversed the blank, either using more double-stick tape, or better yet gripping the edge of the recess using chuck jaws in expansion mode, to turn the back. The glass mirror is then attached in that recess using either silicone adhesive or double stick tape; either is flexible enough to withstand any wood movement that might occur. I didn't bother with an overlay frame.

I made a few with handles that became Christmas gifts, but at the time I was using a contact lens and needed to have a small mirror that could travel with me for inserting or removing the lens, and I found that a 2" mirror in a wooden surround (about 2 1/2" outside diameter) without a handle was exactly what was needed for that job. When making the handled version using bevel-edge mirrors, it made sense that the overall thickness be about the same as the diameter of the handle - somewhere around 5/8". But the unhandled versions could be a bit thinner - ultimately, I wanted a back thickness of around 1/8", so if the mirror itself was 1/8", and allowing for that 1/16" setback and about the same for adhesive or mounting tape, the overall thickness was more in the 3/8-1/2" range.
 
Last edited:

Joebobber

Member
Joined
Sep 24, 2018
Messages
1,172
Location
Erie, North Dakota
I made mine quite a bit differently due to the fact kids would be using them. I just turned 1 block round deep enough for the mirror to be flush with the face, made a groove in the side so the wood coukd expand and contract, and then made another block that would go over the entire first block with a hole just a little smaller than the mirror. The only problem with doing it this way is on the back side you get the line showing where the 1st block meets the 2nd. But with some strategic decoration and grooves it hides really well. The other problem was making sure it was thick enough to be able to put the handle tennon inside and wide enough so it wouldn't break easily. But going through 2 pieces of wood it felt really strong. I wish I would have done a search on making them, as it would have saved alot of time getting it made! I got the mirrors from a lot on Ebay of turning kits.
 

jttheclockman

Member
Joined
Feb 22, 2005
Messages
19,132
Location
NJ, USA.
I have watched John Lucus make these for so many years and he too has evolved in so many different designs. Yours are very well done. Thanks for showing.
 
Top Bottom