for puzzle fans

Signed-In Members Don't See This Ad
See more from its_virgil

its_virgil

Member
Joined
Jan 1, 2004
Messages
8,355
Location
Wichita Falls, TX, USA.
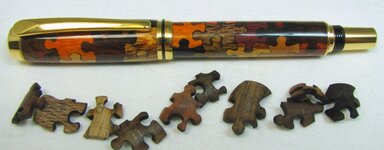
I started this pen several years ago. I became frustrated trying to assemble the pieces. Don't know why I just could not get them to go together. I put the parts in a bag and on the shelf in my shop. Then in 2009 Barry Gross wrote an article for Woodtgurning Design and i got the part back out and tried again. Not successful. Back on the shelf in the cabinet the parts went. Yesterday I was cleaning out that cabinet and found the puzzle parts. SUCCESS. I was able to get the last pieces assembled. They had shrunk from their original size so some nice gaps were visible. I tinted some two part epoxy with black and massaged the glue into the gaps between the puzzle pieces. Enjoy.
Do a good turn daily!
Don
 

Attachments

  • IMG_0002.jpg
    IMG_0002.jpg
    122 KB · Views: 395
Signed-In Members Don't See This Ad
Gaps or not it's still quite an accomplishment.I havent done one of those particular tube on builds myself,but I have done one of the 64pc herringbones.Talk about frustrating,If my hair was long enough to grab I would have hadless of it afterwords.Good job Don.
 
I have one that is almost ready to finish. I like the black epoxy between the pieces. I used a slurry of CA and sanding dust. Anxious to see how it will turn out.
 
I feel your pain...made one for my daughter for Christmas and on at least 3 different occasions had to just put everything down and go in the house for a few minutes to calm down.

Congrats on completion and it looks great!
 
That's a beautiful pen, but I'm a little concerned that you only showed us one side of it. Every puzzle I have made I've used all the pieces...are you sure there aren't gaping holes on the other side? :biggrin:

I like the black accent!
 
Back
Top Bottom